Getting Started As A Supervisor / Lead
A supervisor's role is to oversee the creative and technical aspects of visual effects production, ensuring that the final output meets the project's artistic vision, quality standards, and deadlines.
A key aspect of this is to ensure your team knows what they are working on.
1. Manage Your Department
Creating Departments
Departments are designed to help supervisors and artists focus on their tasks. Once a user is linked to one or more departments, supervisors and artists gain direct access to a filtered view of all tasks associated with that task type. Departments are also used to define what metadata columns appear for users within that department.
If a metadata column is linked to a department, then they will only show up for users in that department. If a metadata column is not associated with a department, they will show up for everyone.
TIP
By default, Kitsu provides some example departments to help you get started.
Defining your studio's Departments is typically the first step in setup, as multiple objects such as people and task types are linked to a department.
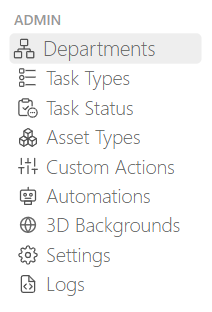
On the main menu  select the Department page under the Admin section.
If you need to create more departments, you can click on the  button.
When adding a department, you need to define:
- The name of the department
- A color (it will be displayed as a small round circle next to a column task type or a custom column)
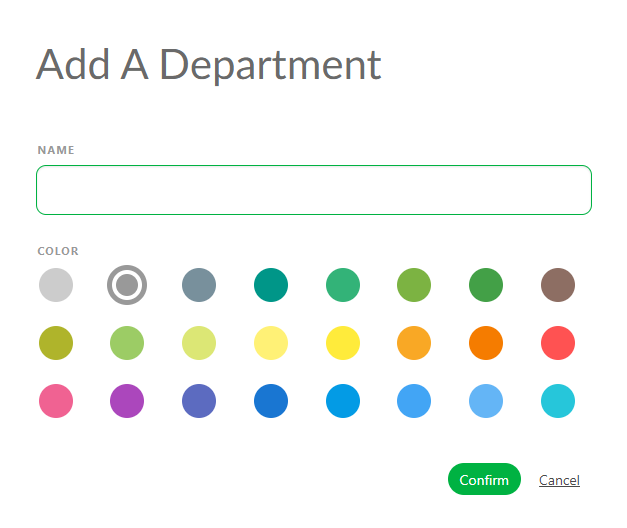
Click on Confirm to save your changes.
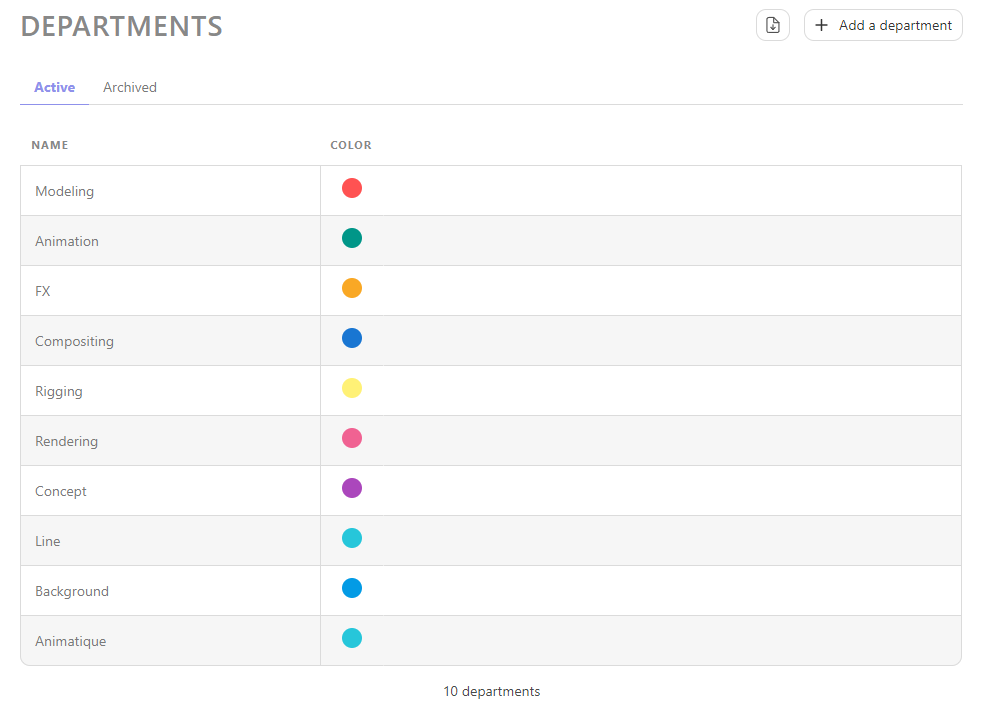
Once you finish creating the department, your page should look like this. Whereby each department has a unique name and corresponding color.
Update Departments
TODO
Delete Departments
TODO
2. Assign Tasks
In Kitsu, a task is a fundamental element used for planning, organizing, and tracking various aspects of your production.
Assigning a task to a user offers several benefits:
- You have a clear understanding of who is responsible for each task.
- Users are aware of their assigned tasks.
- Users can log time spent on each task.
- You can monitor individual workloads.
- Task groups by user are visible on the detailed task type page.
- The team schedule provides an overview of your studio.
- You can forecast team productivity.
- You can track the actual performance of your team.
Add Users to the Team
In the section on preparing your team, we cover how to add people to Kitsu, set their permission levels, and link them to a department.
TIP
In order for a user to be assigned to a task, they must first be added to a production. Please note that you cannot assign tasks to users outside of the production.
First, lets add some users to our production. Within your project, from the dropdown menu at the top of the page, select the Team page.
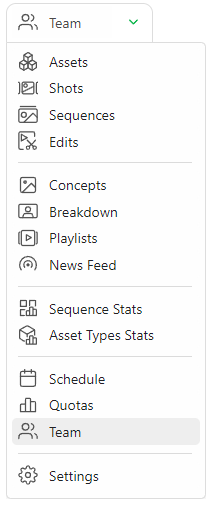
On the this page, you can see all the users who have been assigned to this project. If you've just created a brand new project, this page will be empty. for a specific project. You can also quickly navigate to the team page for a different project, by selecting the project name in the drop down menu.
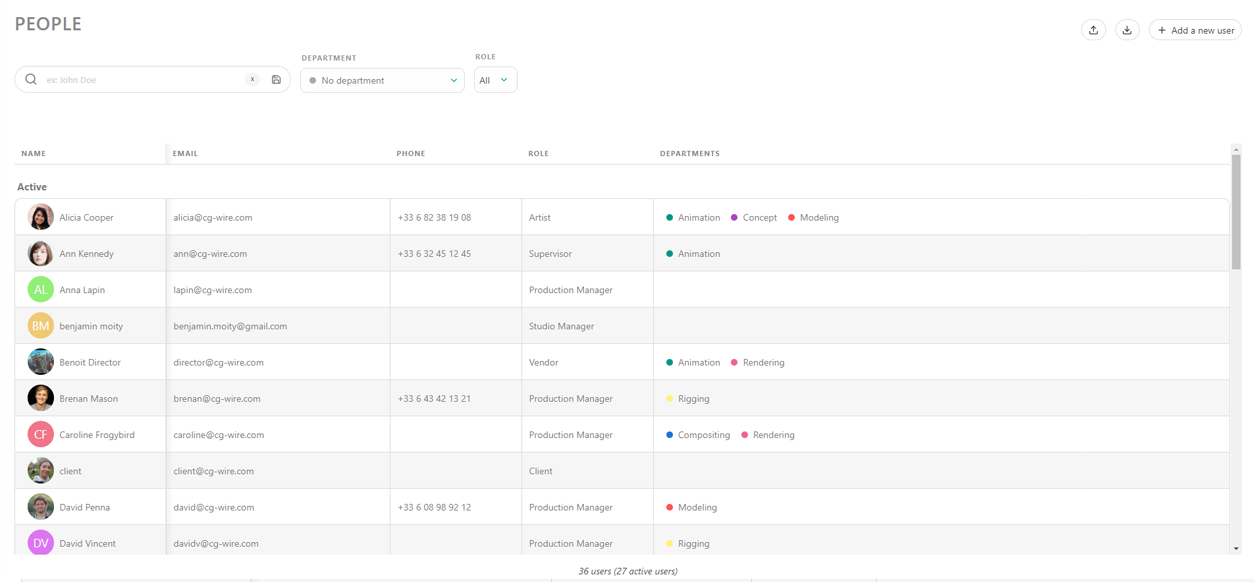
WARNING
Permissions and departments are set at the Studio Level. You can't adjust these at the production level.
How to Assign Tasks
Assign Tasks From the Global Page
Once you've added all your users to the production, it's now time to assign your first task!
Definition
In Kitsu, tasks from each task type are visually represented by the Status of the task cell, as shown below.

Click the status on the task that you want to assign.
You'll then see the comment panel appear on the right side of the screen, containing various options for configuring that task.
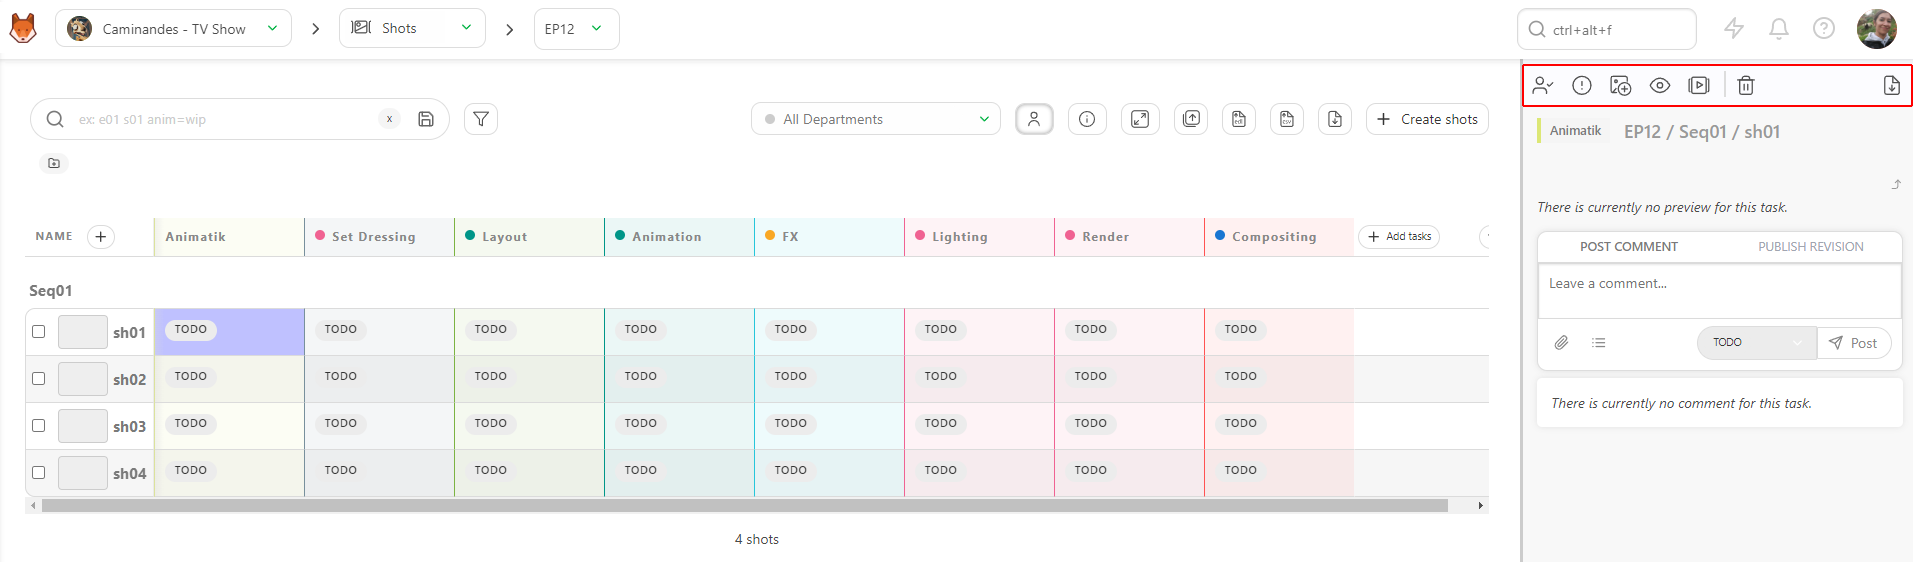
Then, click on the assignee button to open the assignment dialogue
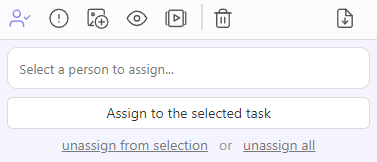
This is where you can assign users to the task. Click into the box to reveal a popup with available users. Alternatively you can start typing the users name to quickly narrow a specific user. Select the user you want to assign, and click on the assign to selected task button to complete the assignment.
Note
You can assign more than 1 user to a single task
You can also assign a user to multiple tasks simultaneously. First, you'll need to select the tasks you want to assign. You can do this by holding Ctrl / Cmd on your keyboard and clicking on the tasks you want to select. Alternatively, you can use the Shift key to select a range of tasks. You'll notice that the selected tasks are highlighted in blue.
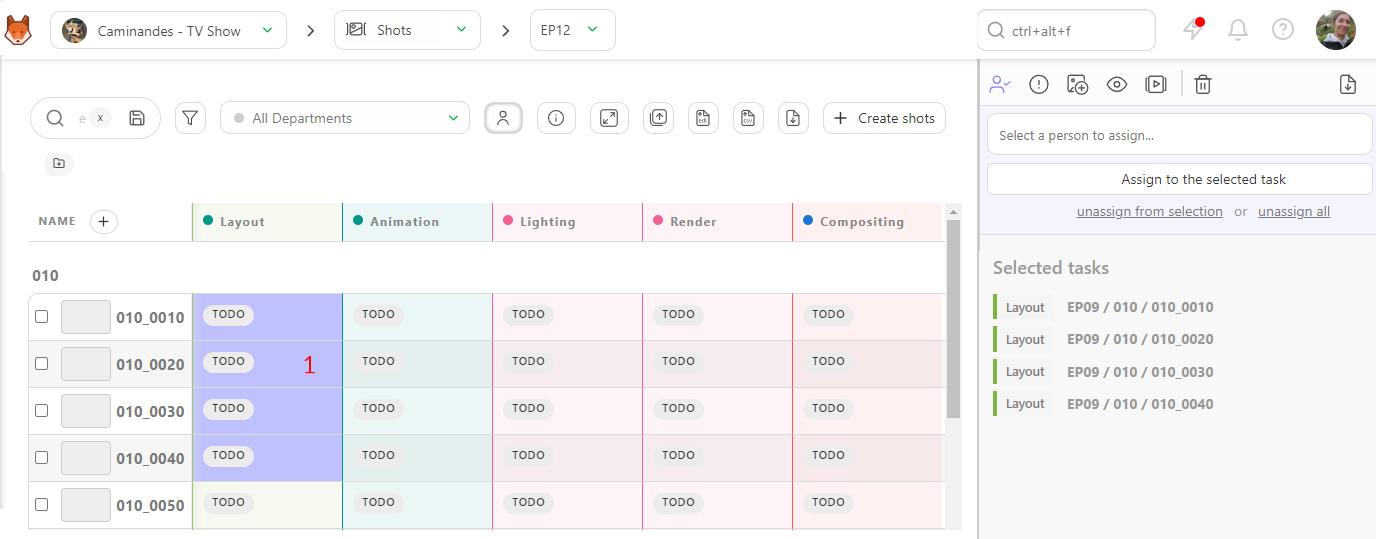
Once you have your tasks highlighted, select a user to assign and confirm your selection by clicking the Confirm button. Similarly, you can use the unassign from selection option to remove these assignments.
Now, you can see the artist's avatar next to each of the task's status.
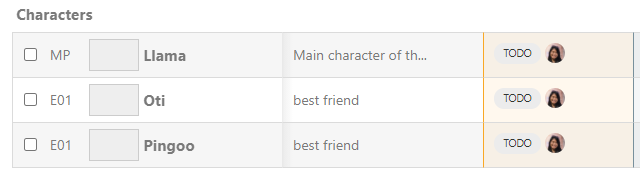
You can toggle the visibility of task assignments on or off by using the Show/Hide Assignments button located at the top of the spreadsheet  .
.
Keep in mind that task assignments can determine what a user sees, depending on their role (for instance, vendors need to be assigned to a task before they can view anything).
With your assignments completed, everyone knows their tasks and responsibilities!
Assign Tasks From the Detailed Task Type Page
You also have the option to assign tasks from the detailed task type page. To access this, click on the column header of the task type.
Next simply click on a status to open the comment panel. From there, you'll have the same options available as on the global page. You can select one or multiple tasks simultaneously to assign a user.
Assigning Tasks & Bidding Estimates
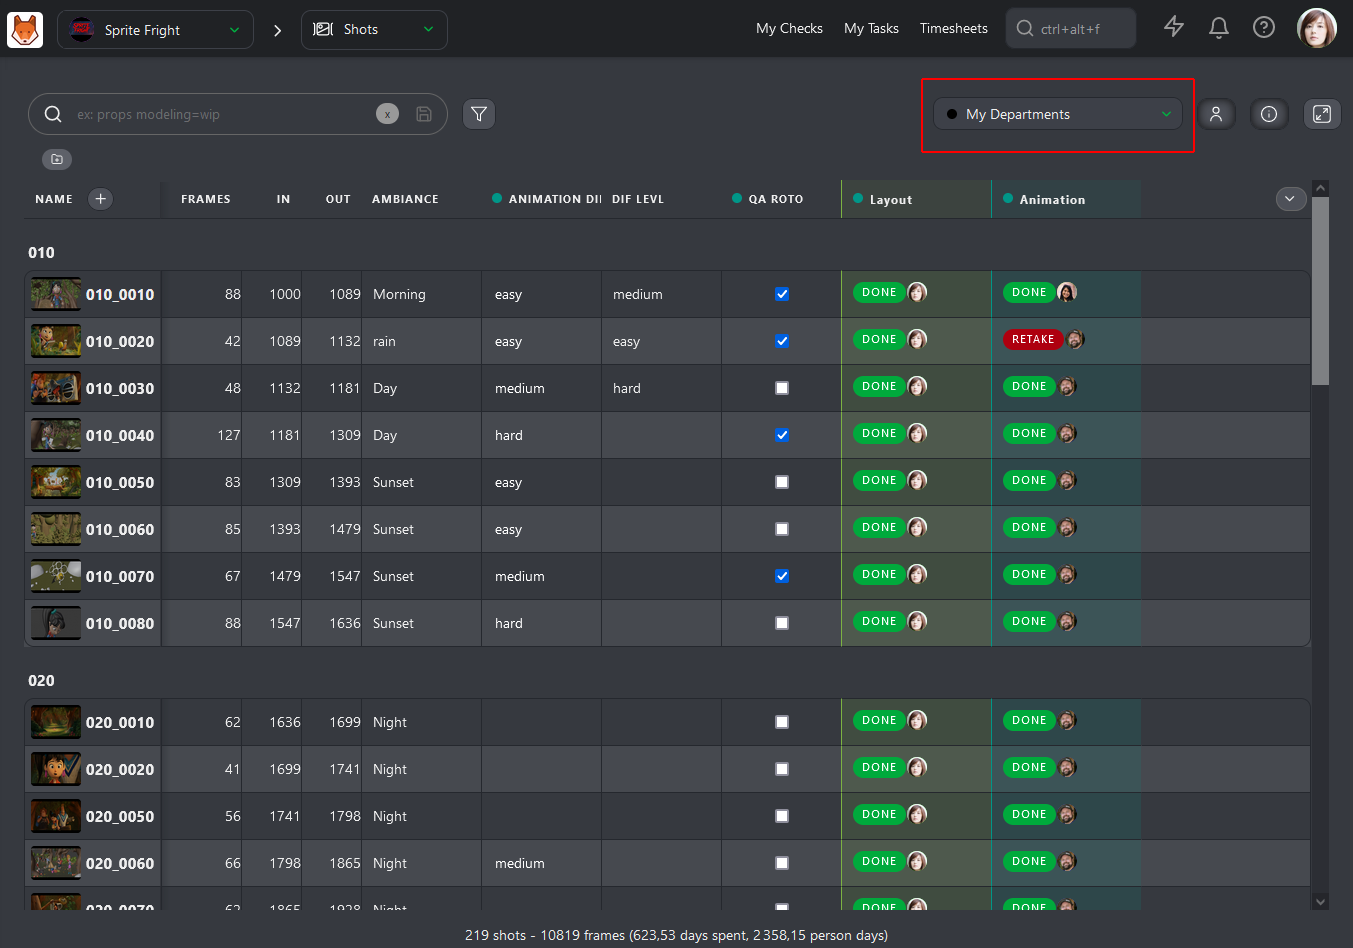
From the global shots / asset page, your view is automatically filtered by My Department. This shows you tasks from your departments Task Type and the Custom Columns linked to your department.
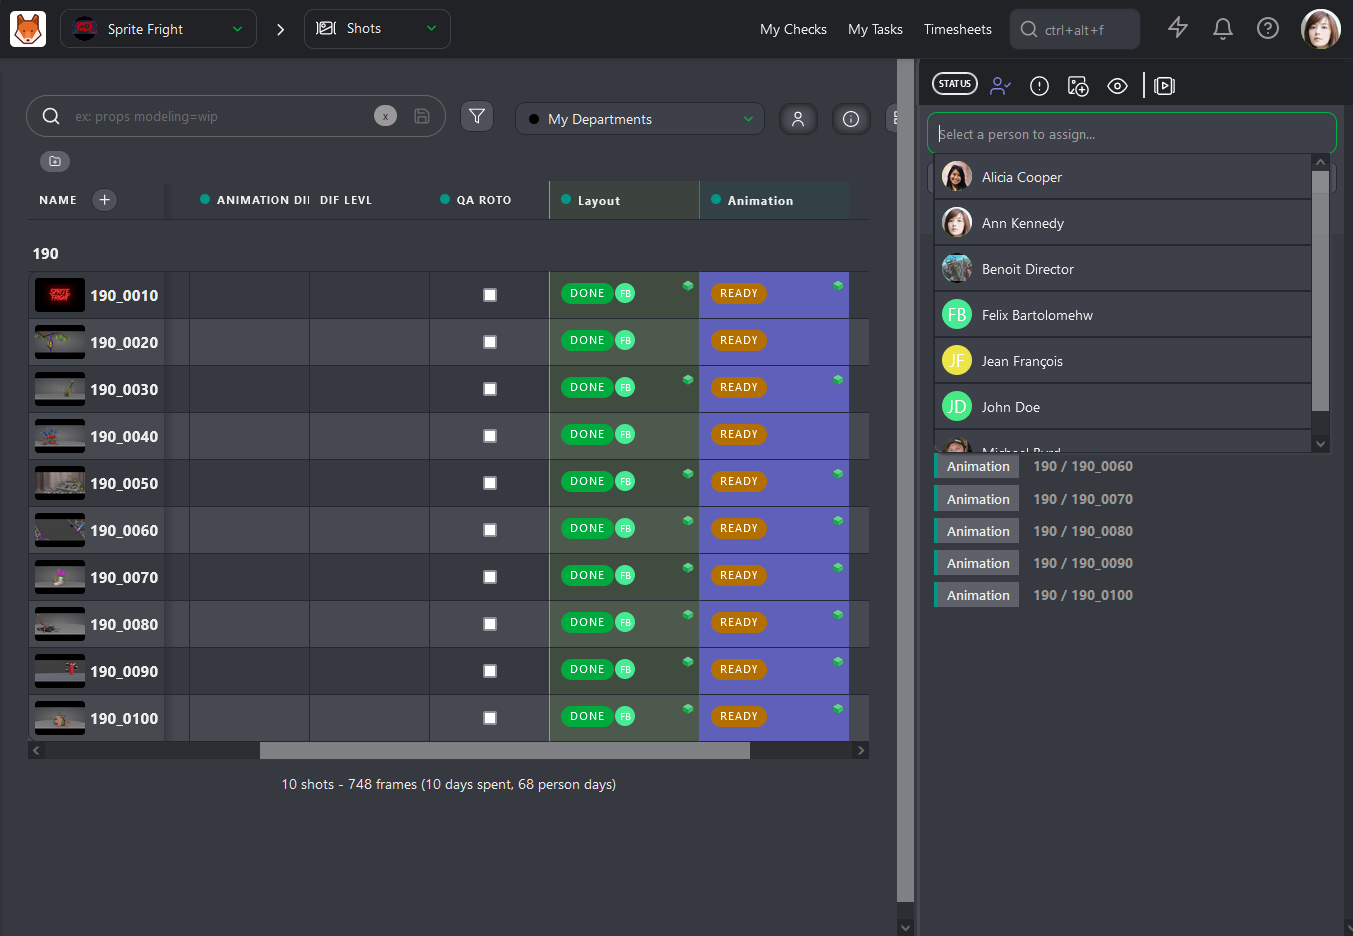
When you assign one or several tasks to someone, you will notice that you only have access to people from your department. This makes it faster to find the right artist for the task.
Now that you have assigned tasks to all your artists, it's time to fill in the Estimates for each task.
3. Bid Estimates
Estimating the time for each task can feel overwhelming, but the benefits far outweigh the effort. By filling out task estimations, you can:
- Clearly see the estimated days for any task in your production.
- Easily compare task estimates with actual time taken, allowing you to more accurately forcast tasks in the future.
- Adjust tasks from the entity schedule or team schedule once they have estimations, start, and due dates.
- Help your artists stay organized and be aware of the time they should spend on each task.
- Improve forecasting for your current and future productions.
Kitsu offers various features to help you easily track, review, and forecast task estimates. Let's look at some of the features that enable you to do this.
Add an Estimate for a Task
To get started, click on the name of a task type.
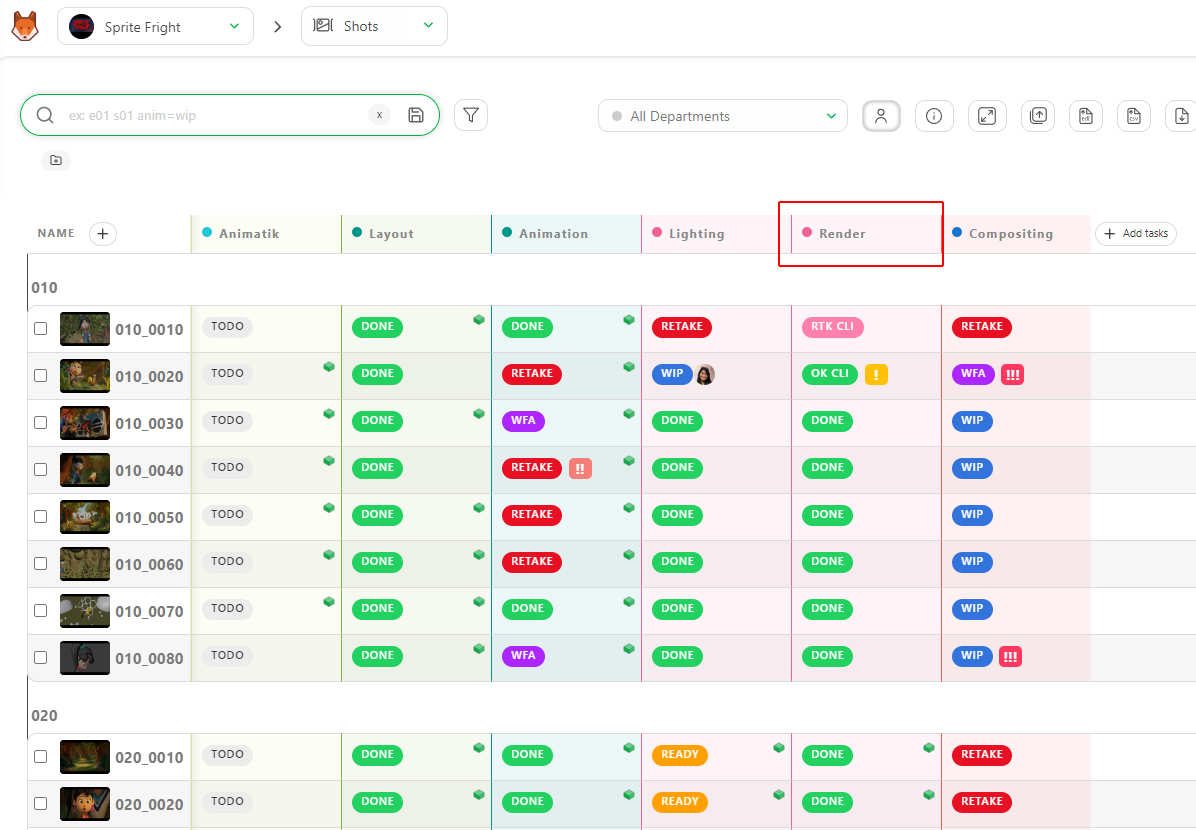
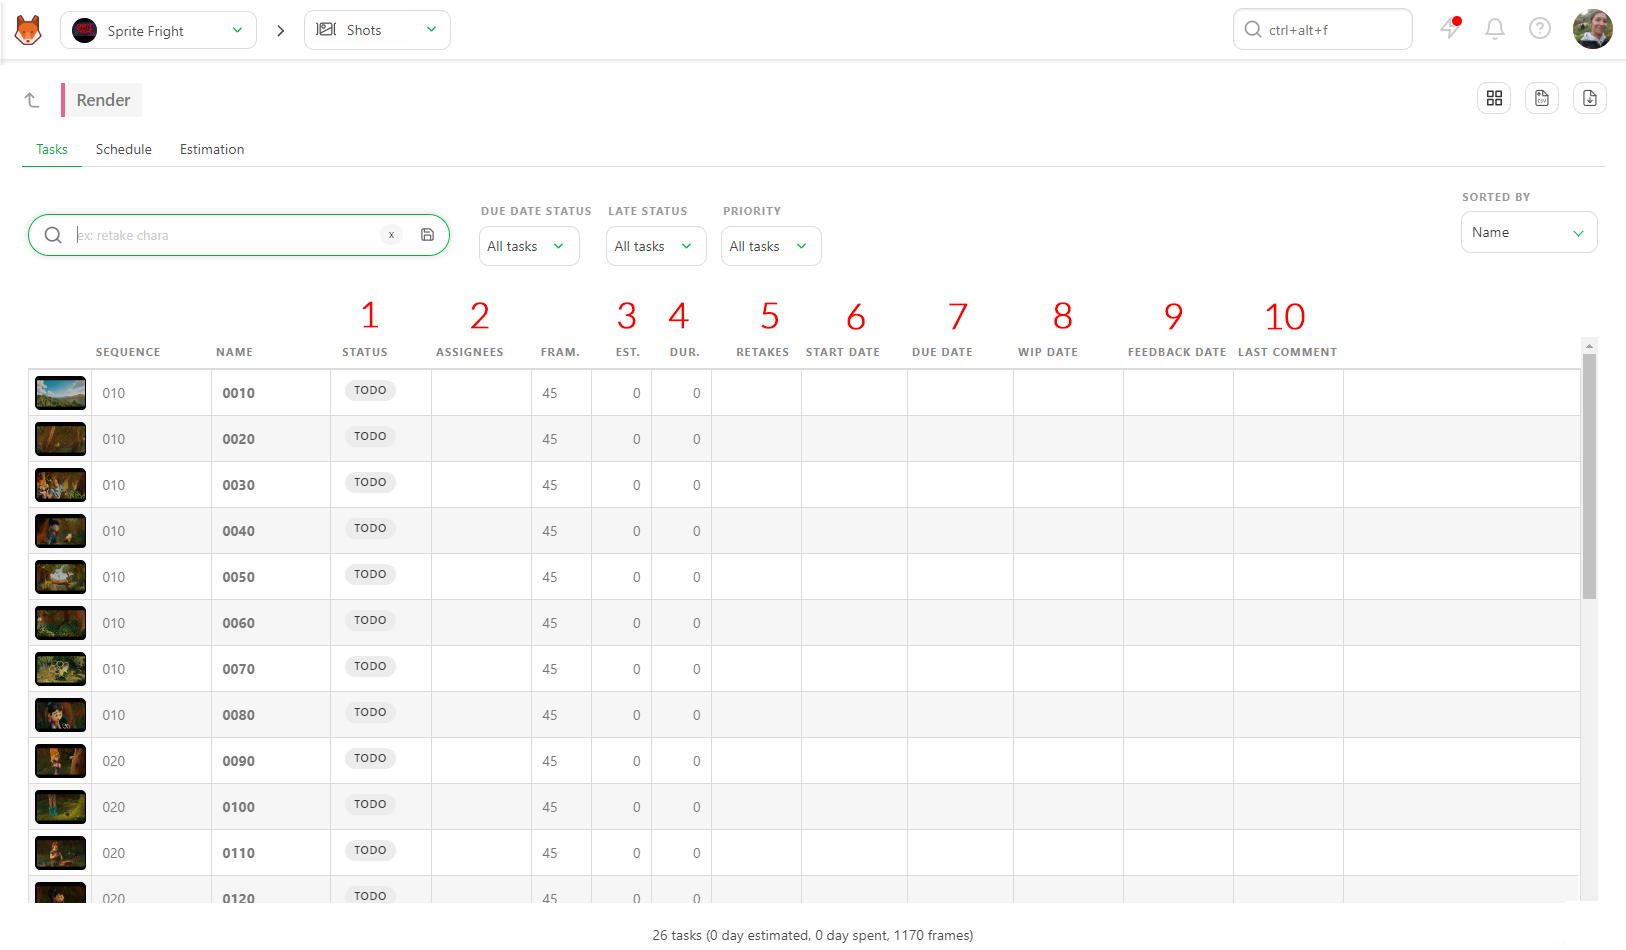
You'll then be taken to the Detailed Task Type view. Here you can see a list of of every task of that specific task type, along with additional details.
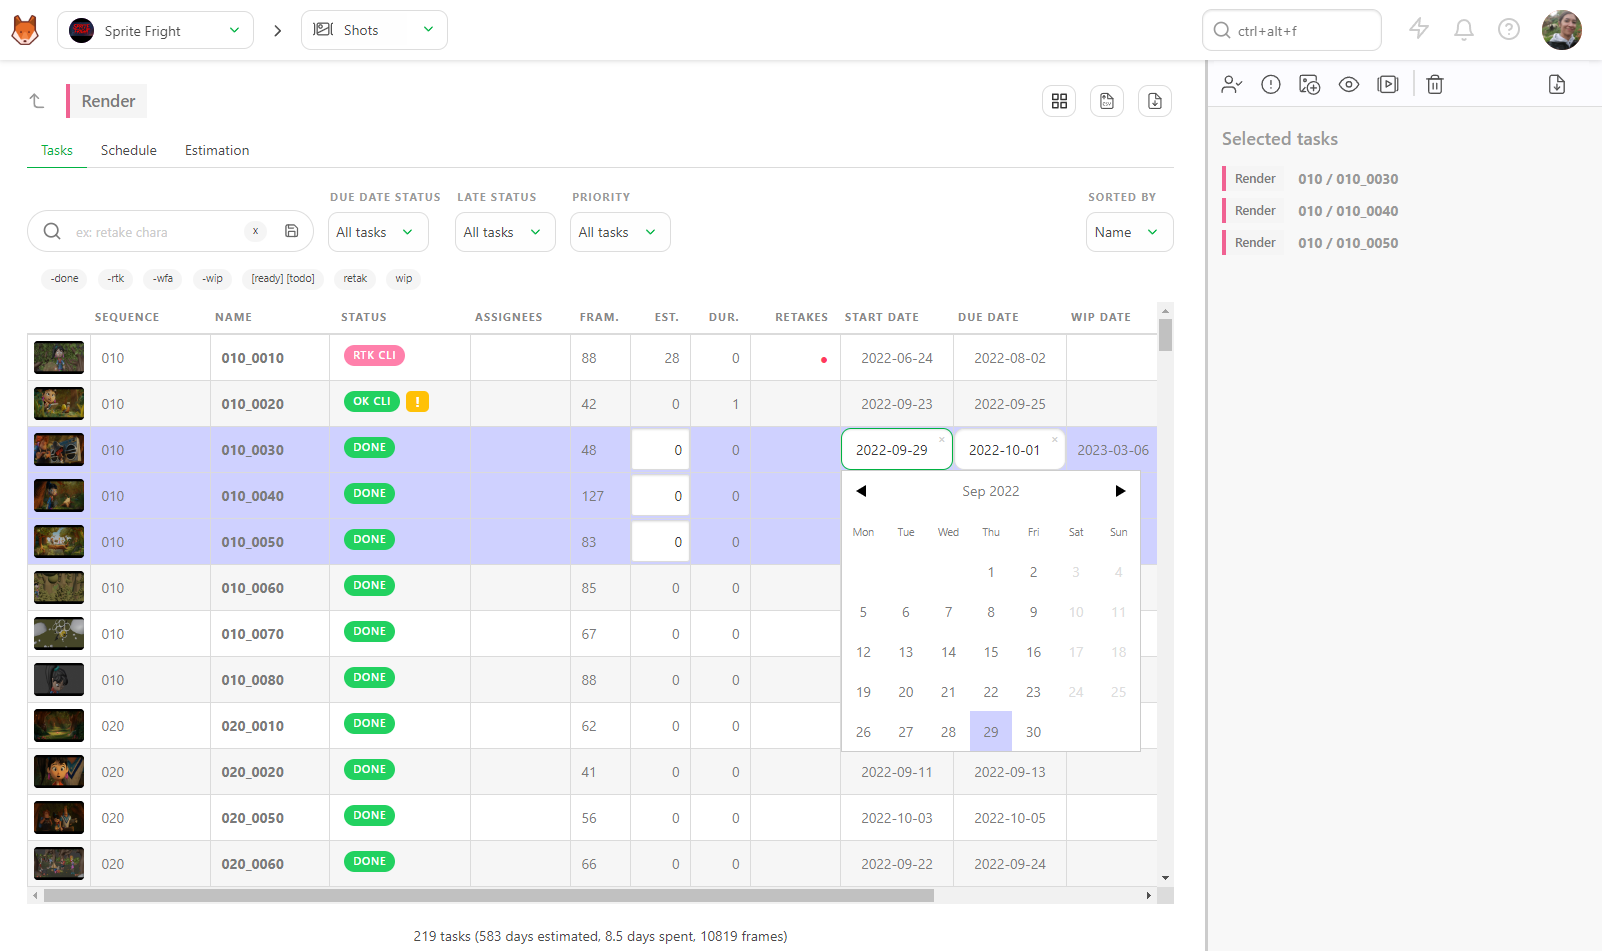
To add an estimate to a task, click on the Estimate (Est.) field and input the number of days. You can select multiple tasks with ctrl / cmd or shift and apply the same estimate across all selected tasks.
TIP
The duration represents how long your task actually took and is calculated automatically from logged time. We will cover this in more detail later.
You can also define a Start date by clicking into the field, and choosing a data from the pop-up calendar.
The Due date is automatically calculated based on Estimate and Start Date provided.
Detailed Task Type View Features:
Here is a summary of the cases and features you can leverage from the detailed task type view.
- See and change the status of tasks
- Assign people to tasks
- Add an estimate for the task (in days)
- View the cumulative sum of logged time from an artists timesheet
- Track the number of back-and-forths with the retake status
- Add a start date for the task using the calendar picker
- View the auto-generated due date based on the start date and estimate
- See the WIP and Feedback dates automatically filled in
- Monitor the latest comment section to keep an eye on the latest activity for this task type
Forecasting Team Speed
Forecast Your Team's Speed Using Estimated Quotas
To help you set accurate estimates, you can use the Estimation tab.
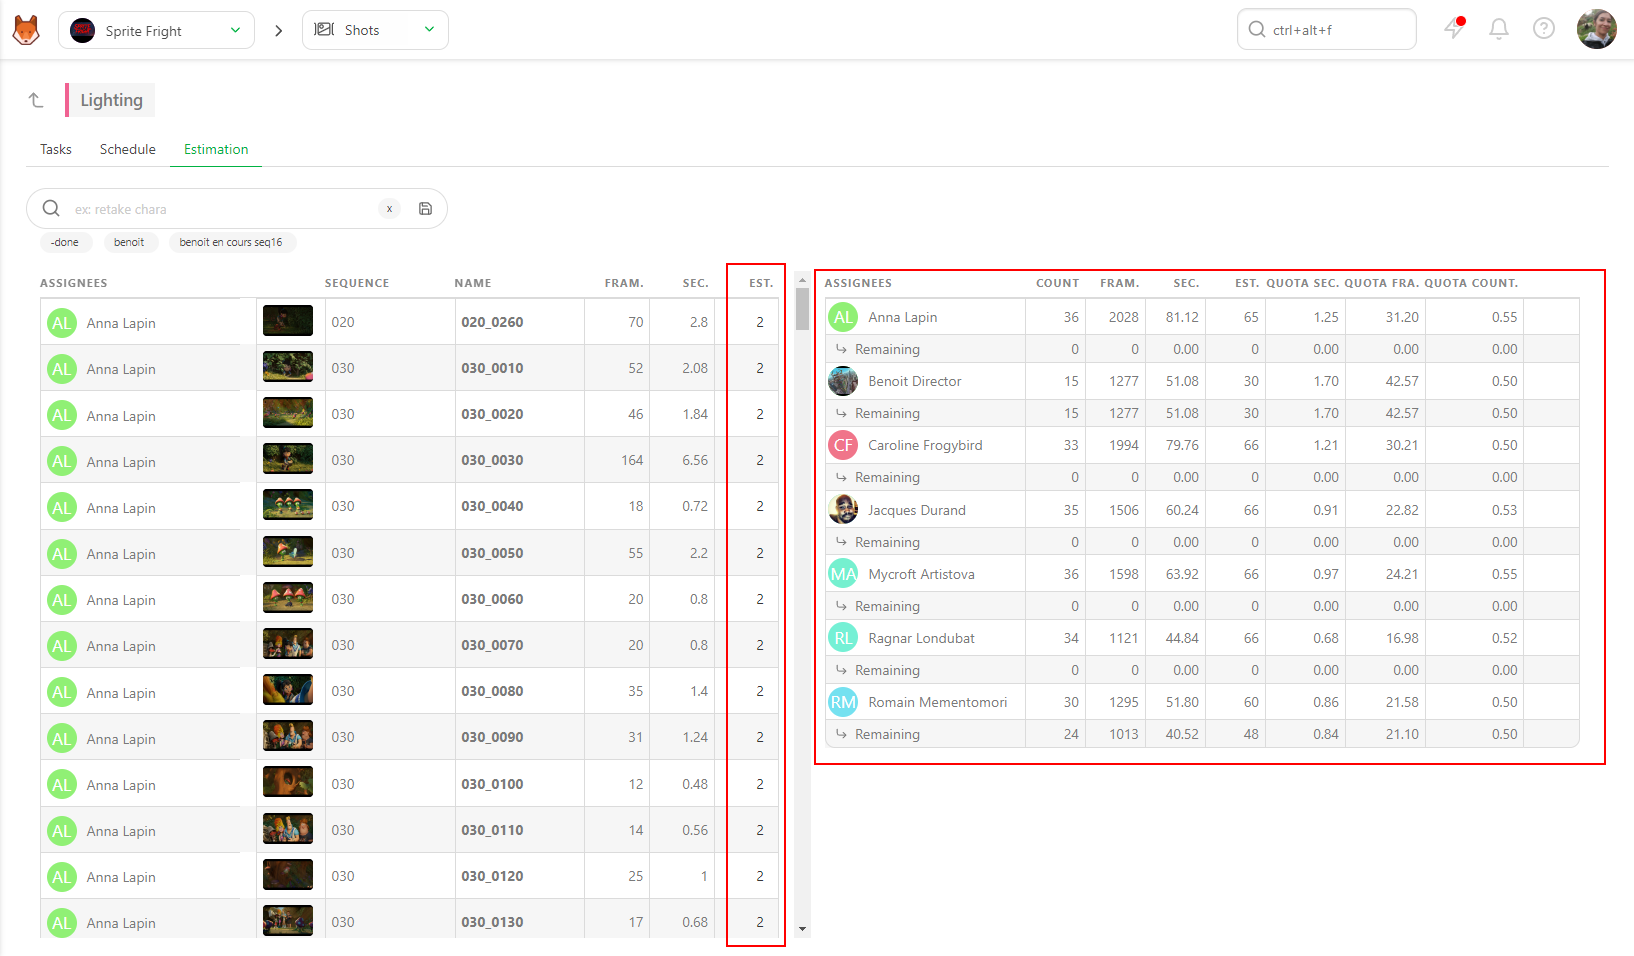
The left half lists the tasks with their assignments and the number of frames (1). Based on the FPS you have set for the production, the number of seconds will be automatically calculated (2).
Definition
Quotas visualize your team speed.
You can see on average how many shots, frames, or seconds the artist needs to complete daily to finish all tasks within the estimated number of days.
The right half shows the entire department team (based on the assignments you made), the number of shots they need to complete, the number of frames and seconds, and the average quota. You will also see the Remaining line, which gives you the current status of your team.
The last column is the Estimation. To modify the estimate, hover over the row with your mouse and click the editable area.
You can also select multiple tasks simultaneously to edit them all at once.
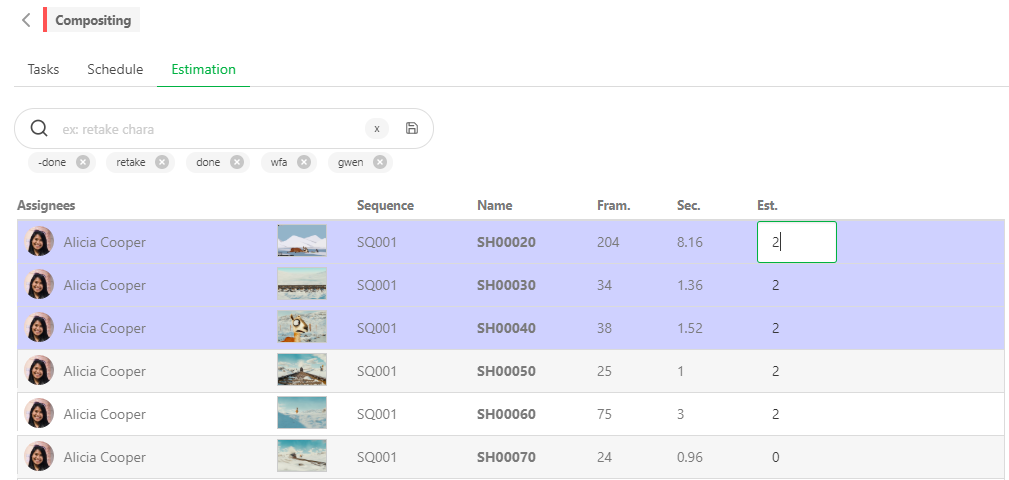
Every time you change the Estimation (in the number of days) on the right side, you will see that the Average Quota updates in real time.
For more information about the Schedule tab, refer to Task Type Schedule.
Changing Priorities
Priorities are often changing during a production, and you may want to easily highlight this change in priority to your team.
To do this, click on the space near a task's status (1).
The action box will appear.
Click on the icon in the action menu to choose Change Priority.
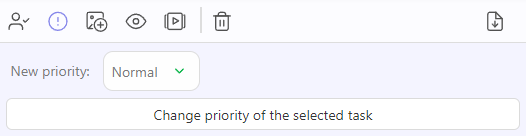
There are four levels of priority: Normal, which is the default value for all tasks, High, Very High, and Emergency. Save the changes with the Confirm button.
As with changing statuses or assignments, you can change the priority across multiple tasks at the same time by selecting the tasks, and choosing Change priority of the selected tasks.
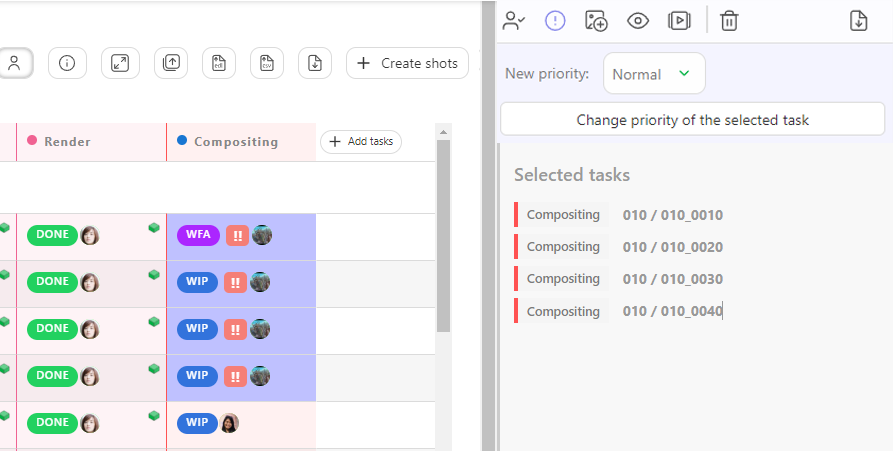
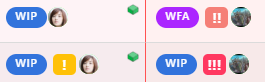
You will now see exclamation marks next to the task status. The more exclamation marks there are, the more urgent the task is.
- (1) is Normal
- (2) is High
- (3) is Very High
- (4) is Emergency
Bidding Estimates
Click on the name of a Task Type column to open its dedicated page. On this page, you can access three tabs: Tasks, Schedule, and Estimation. We will focus on the last one.
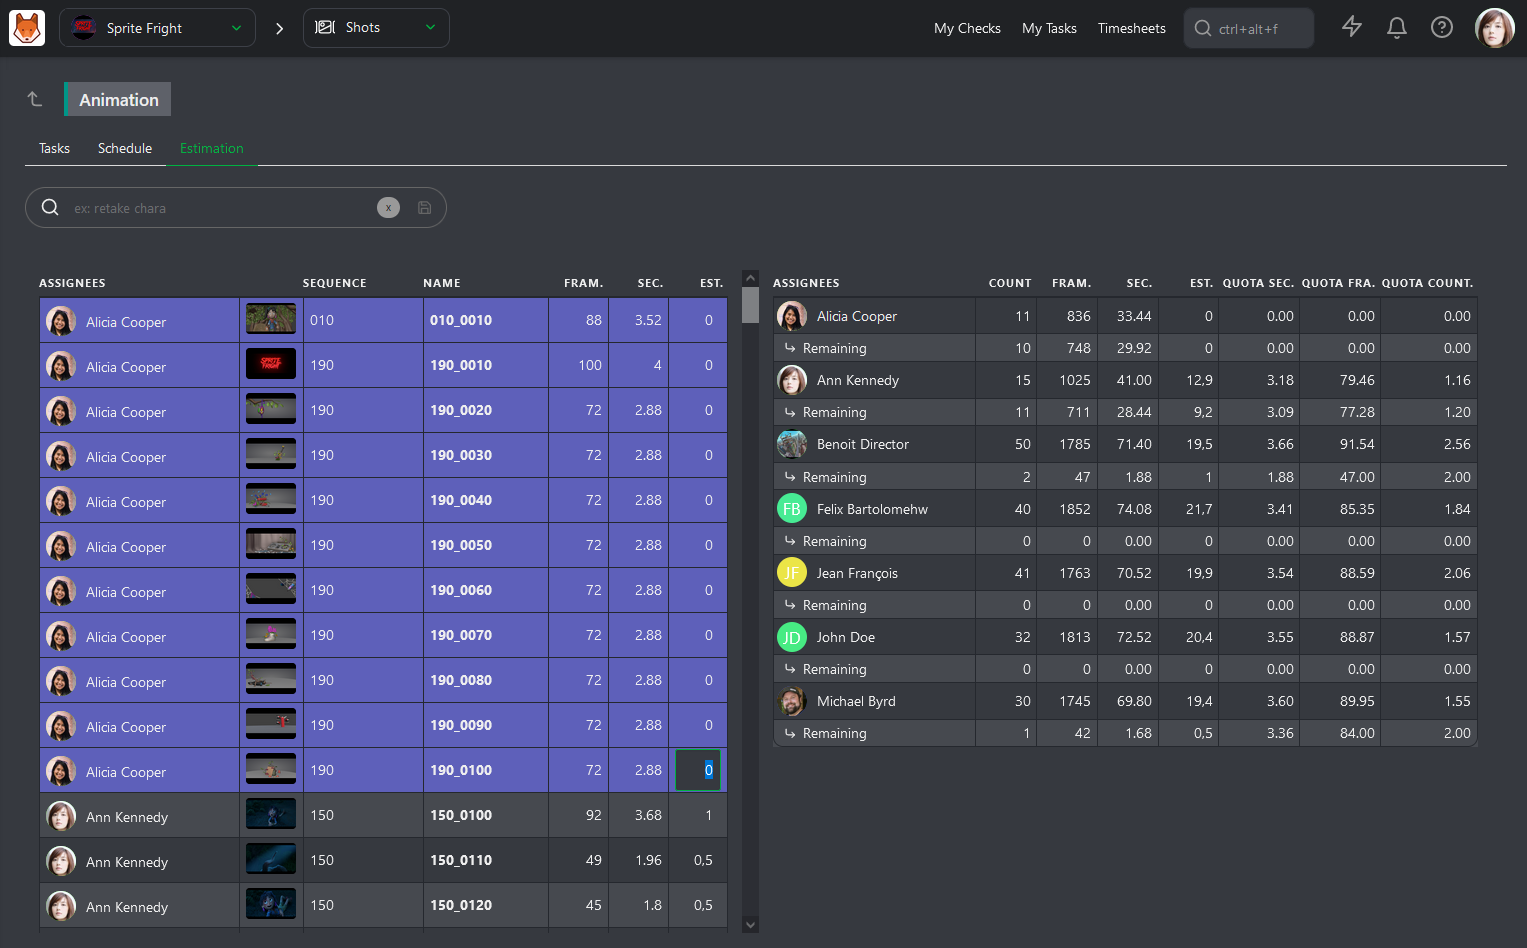
The Estimation page is split into two parts. On the left, you have all the tasks sorted by artist, along with their number of frames and seconds. On the right, you have a summary of your team, with one line per artist showing the total number of assigned tasks, total number of frames and seconds, and the updated total number of estimated days.
With this information, Kitsu can calculate different estimated Quotas: per Second, per Frame, and per Task.
You can now fill the Estimation column on the left and see the result on the right. As soon as you fill in an Estimation for a task, the artist's row will update on the right.
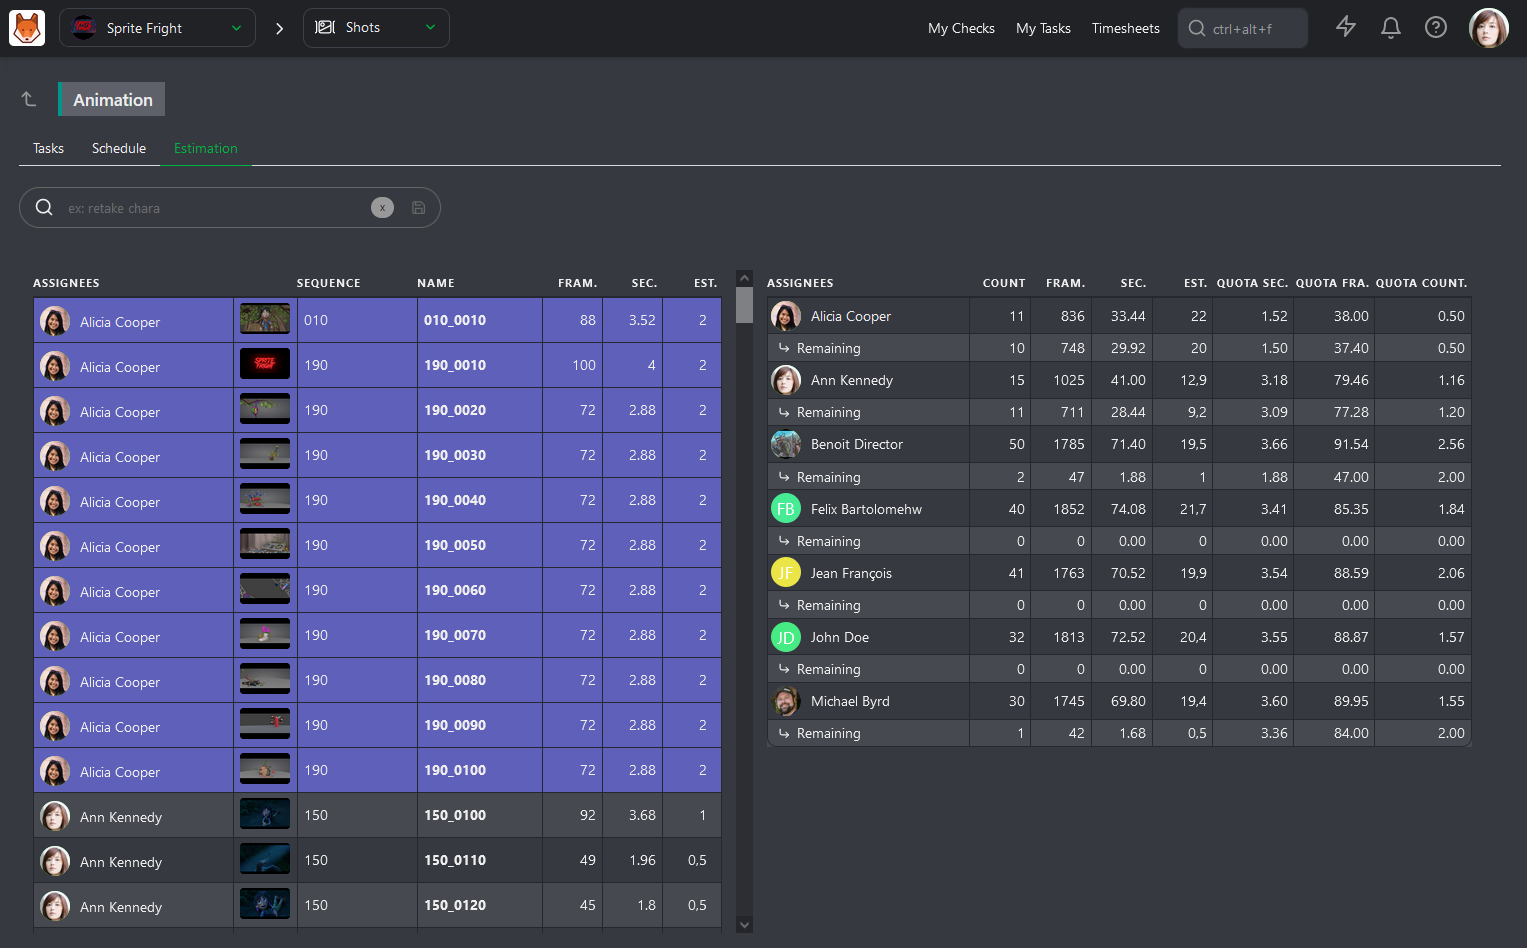
This allows you to ensure the distribution of tasks among your team members is equal and helps to understand their estimated quotas for production. You should consider artist's experience and the difficulty of each task when doing this.
4. Daily Supervision Tasks
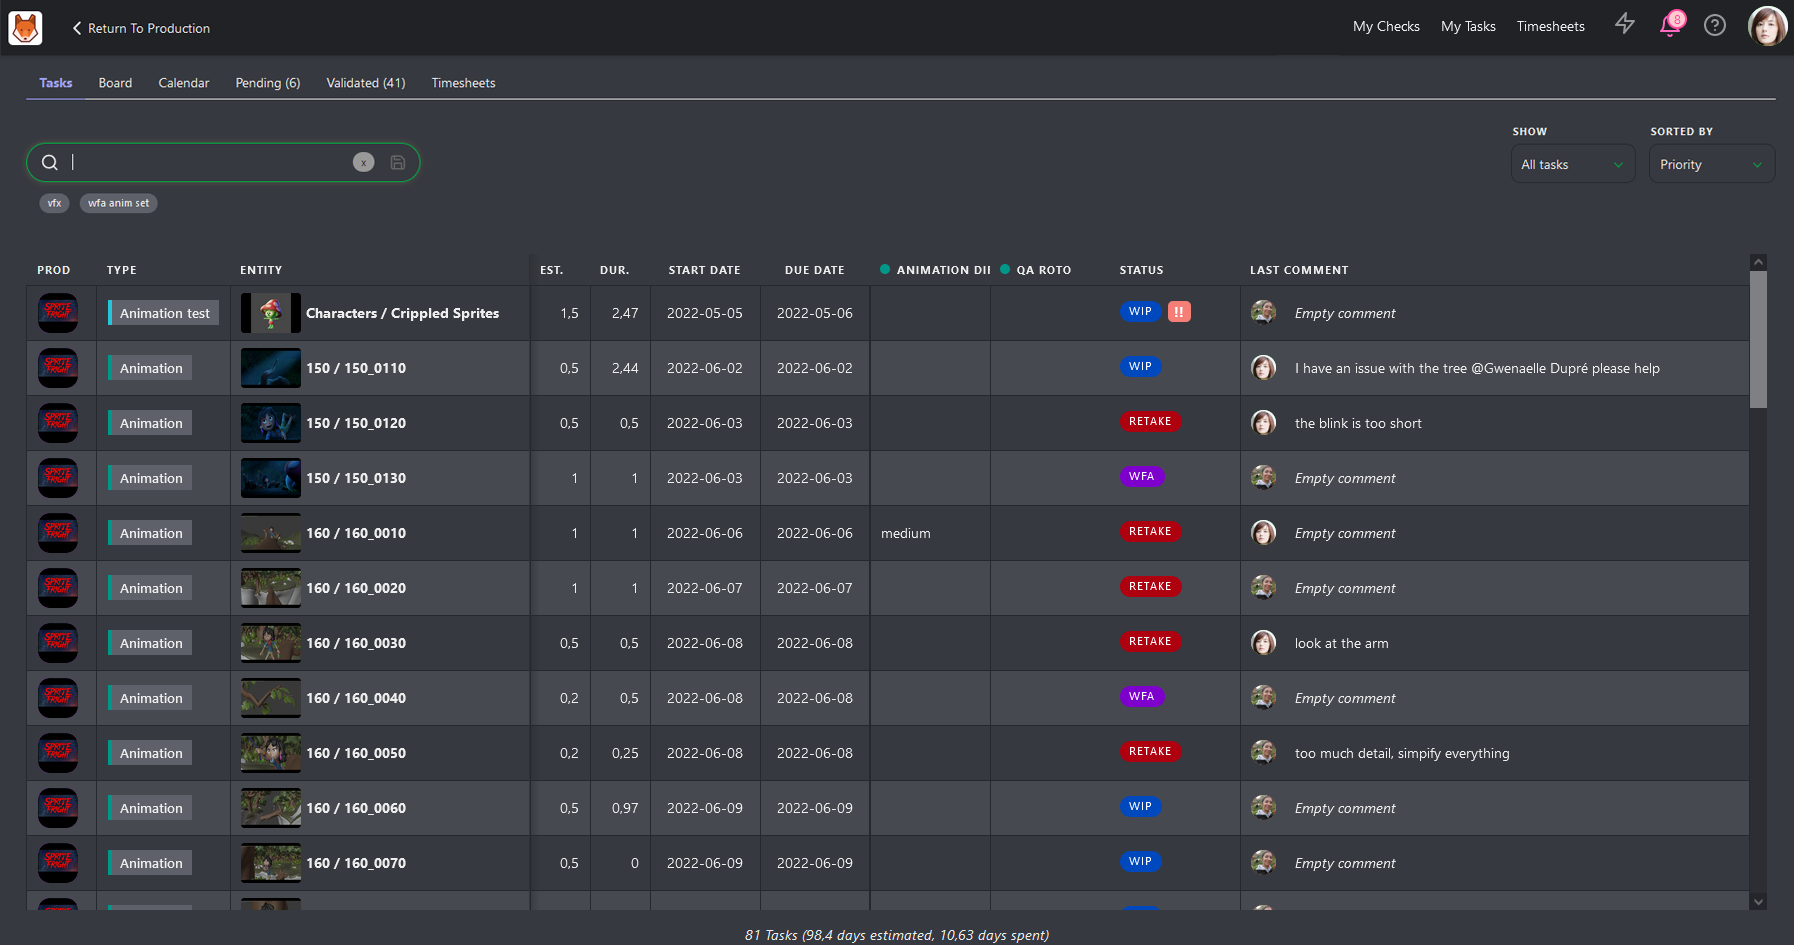
Your My Tasks page is your main hub for assignments and opens automatically upon login. Here you can see a list of tasks you are assigned along with some key information.
Key Information Available:
- Production: The project your task is associated with.
- Entity: The specific asset or shot assigned to you.
- Estimates & Duration: Time-related information for your tasks.
- Due Date: The deadline for completing your task.
- Status and Priority: Key details to understand task urgency.
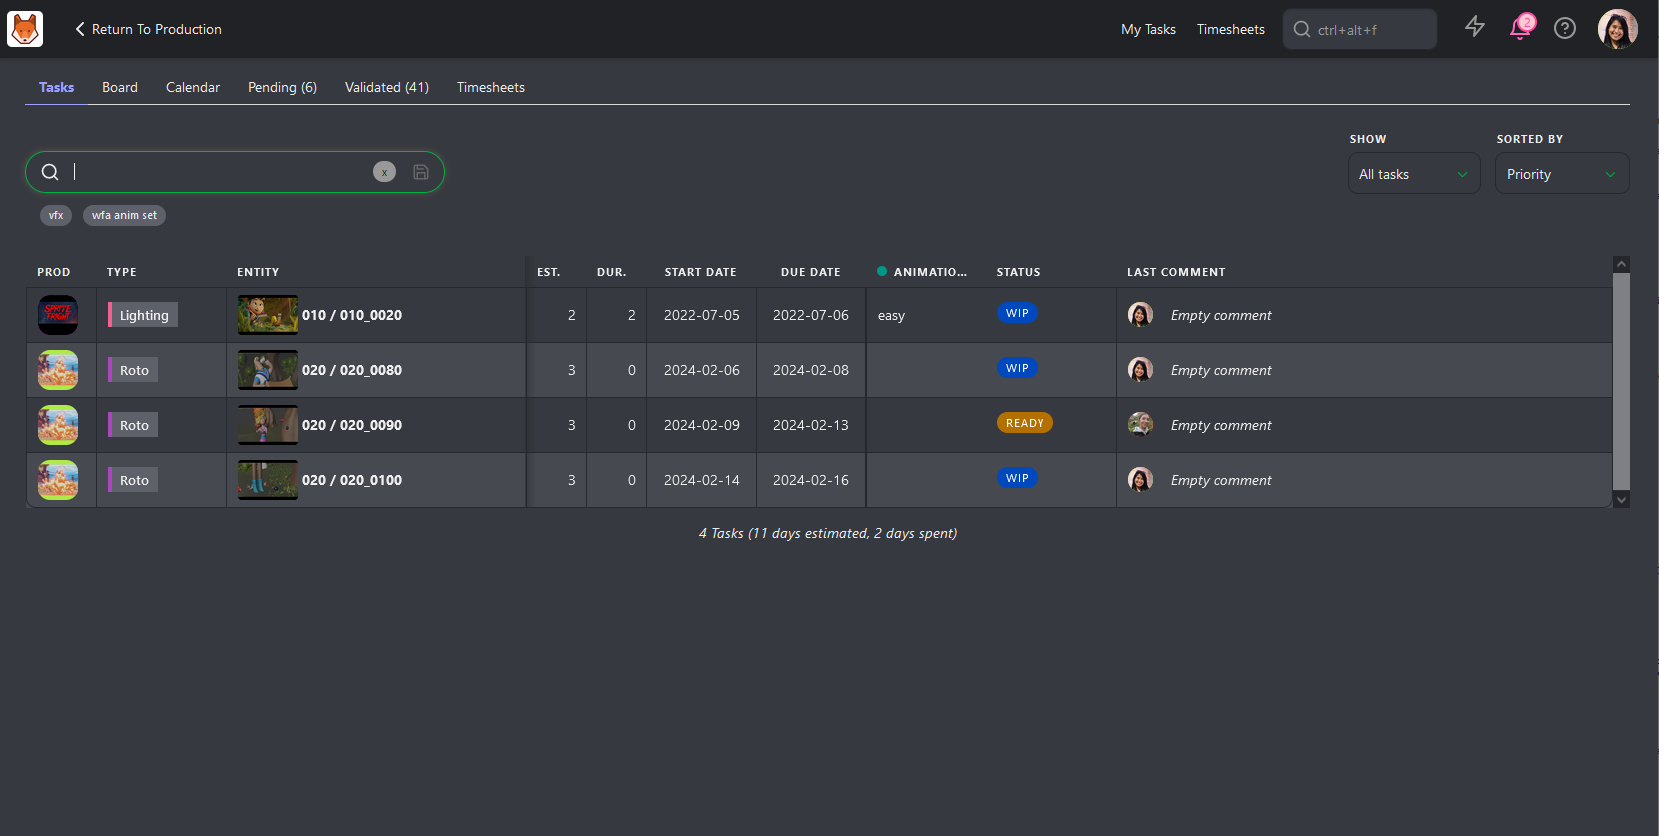
Additional Features:
- Under the Show dropdown, you can choose to display All Tasks or focus on those Due This Week.
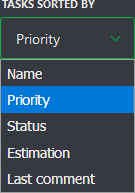
- Under the Sorted By dropdown, you can sort tasks by Name, Priority, Status, Estimation, or Last Comment.
- Use these filters to narrow down your list of tasks, or use the search box to find a specific task.
You can access My Tasks via:
- The shortcut at the top of the screen.
- The User section of the main menu under MY TASKS.
- Clicking the Kitsu logo.
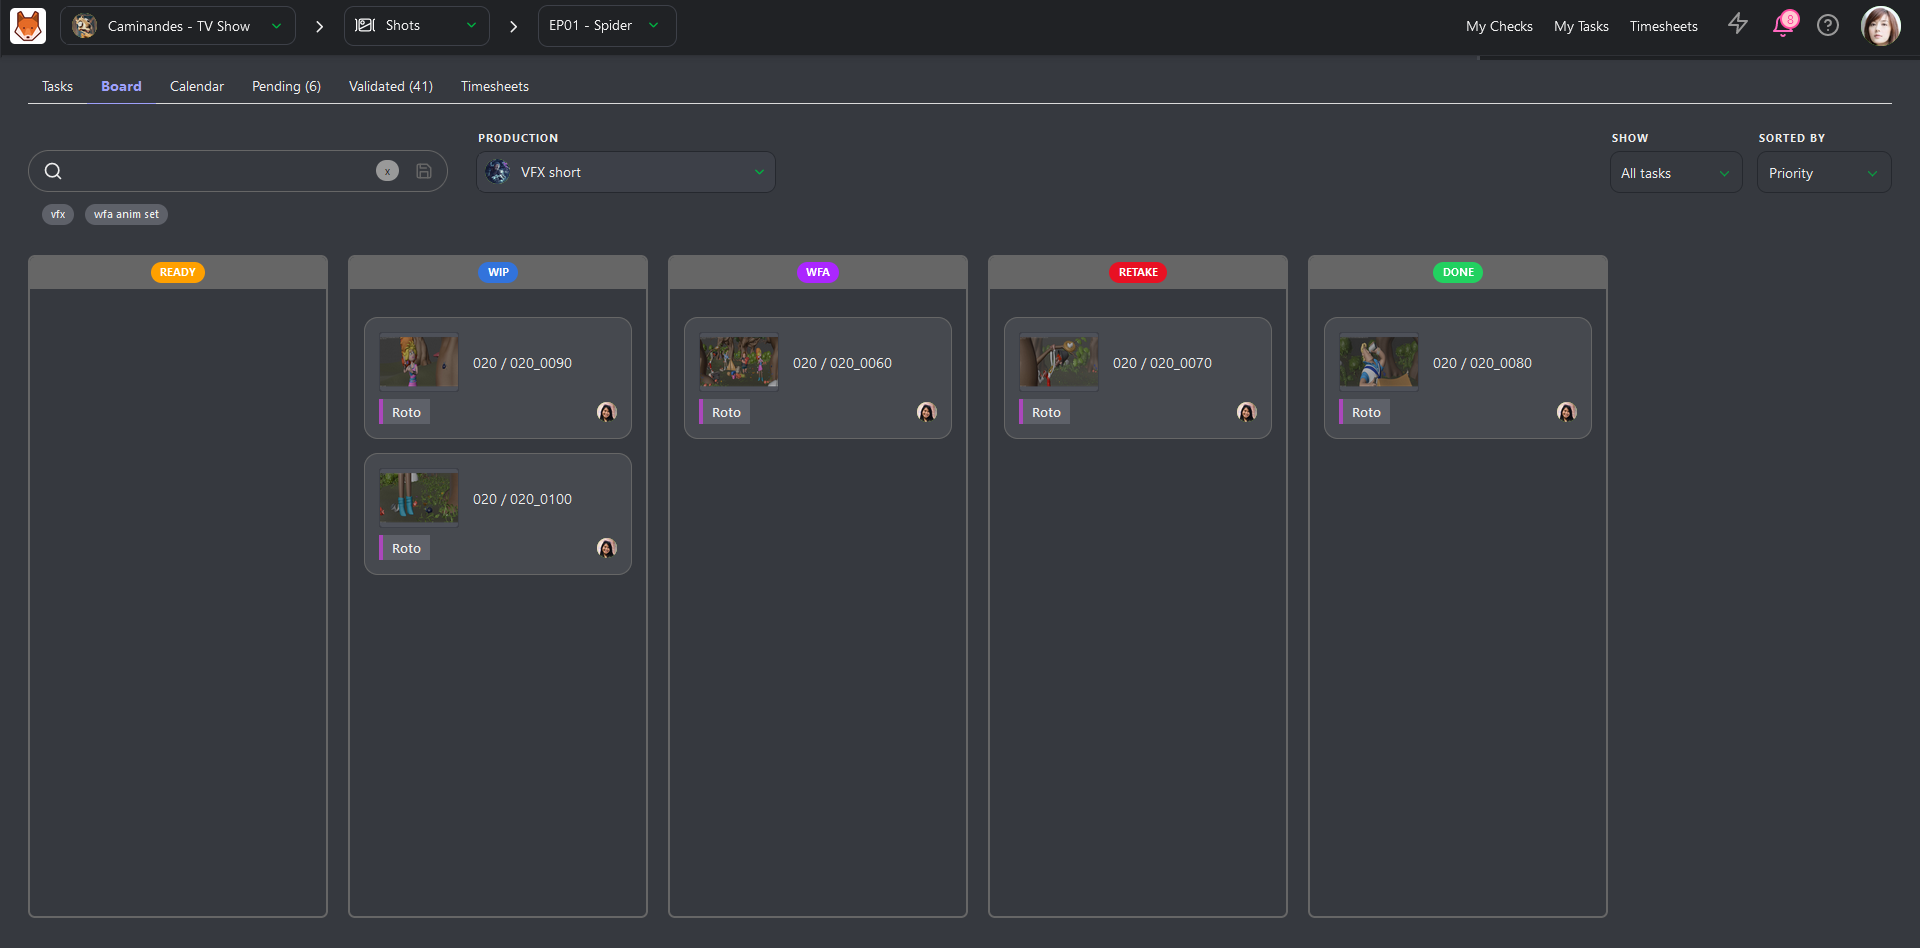
View Your Assignments (Board View)
The Board Tab displays tasks organized in columns based on their status. Each task card includes:
- A Thumbnail
- Task type name
- Entity name
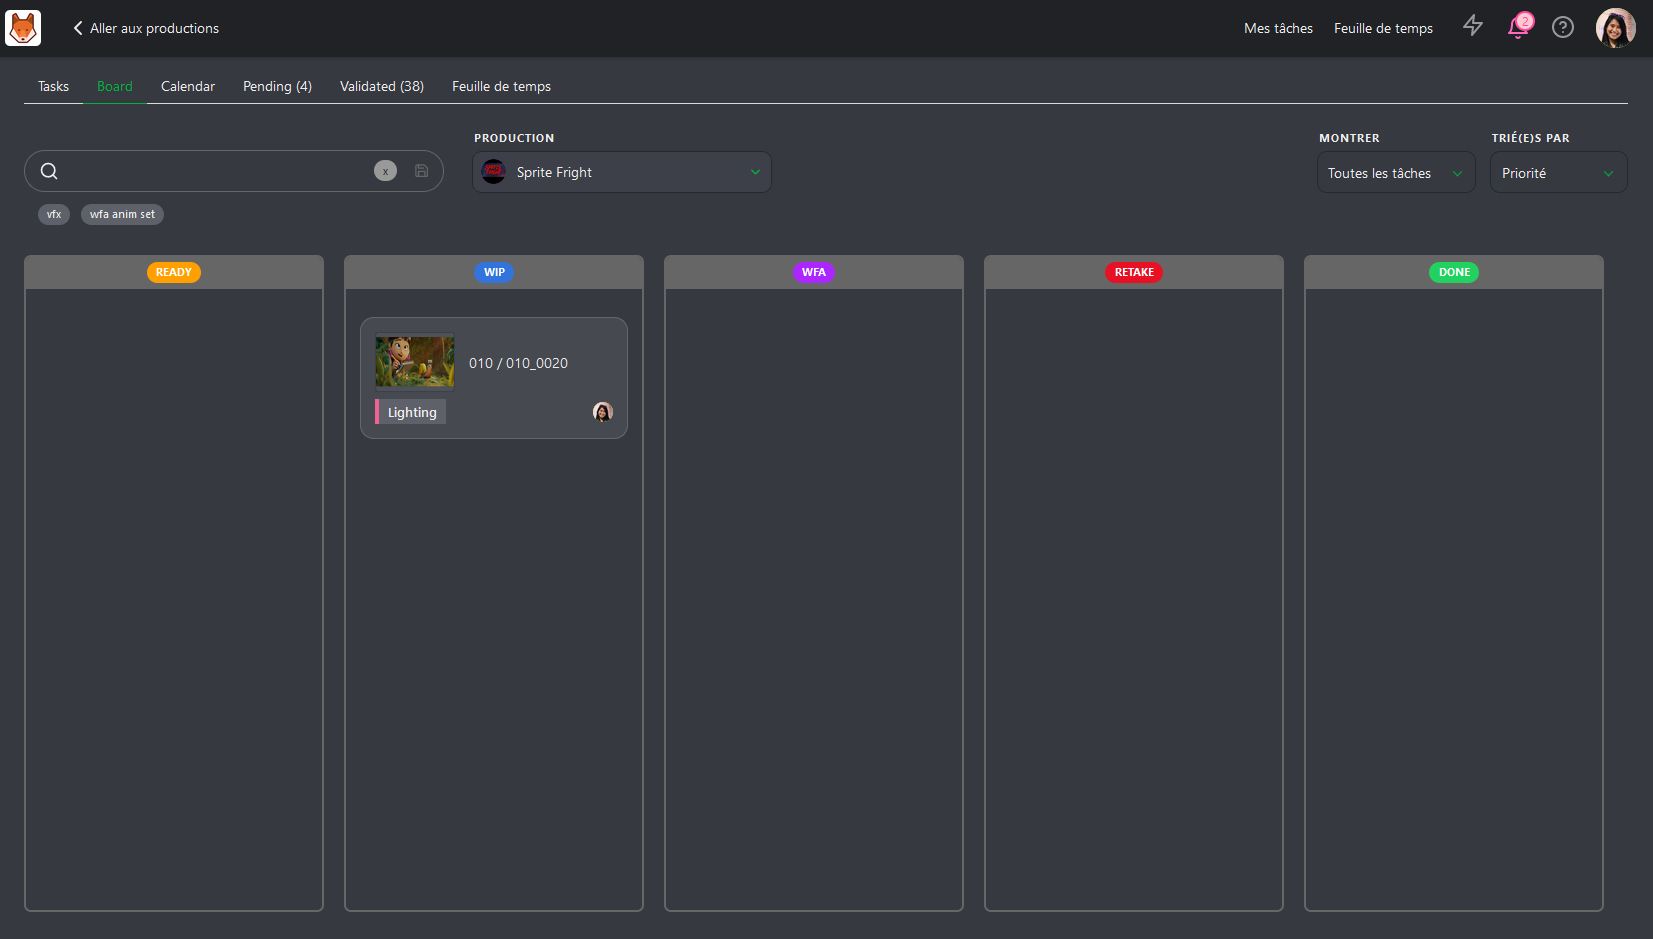
- Clicking a card opens a panel on the right to view or add comments.
- To update a task’s status, drag it to the desired column.
View Your Assignments (Calendar View)
The Calendar View displays tasks according to their Start and Due Dates. Tasks spanning multiple days are visually extended across the calendar.
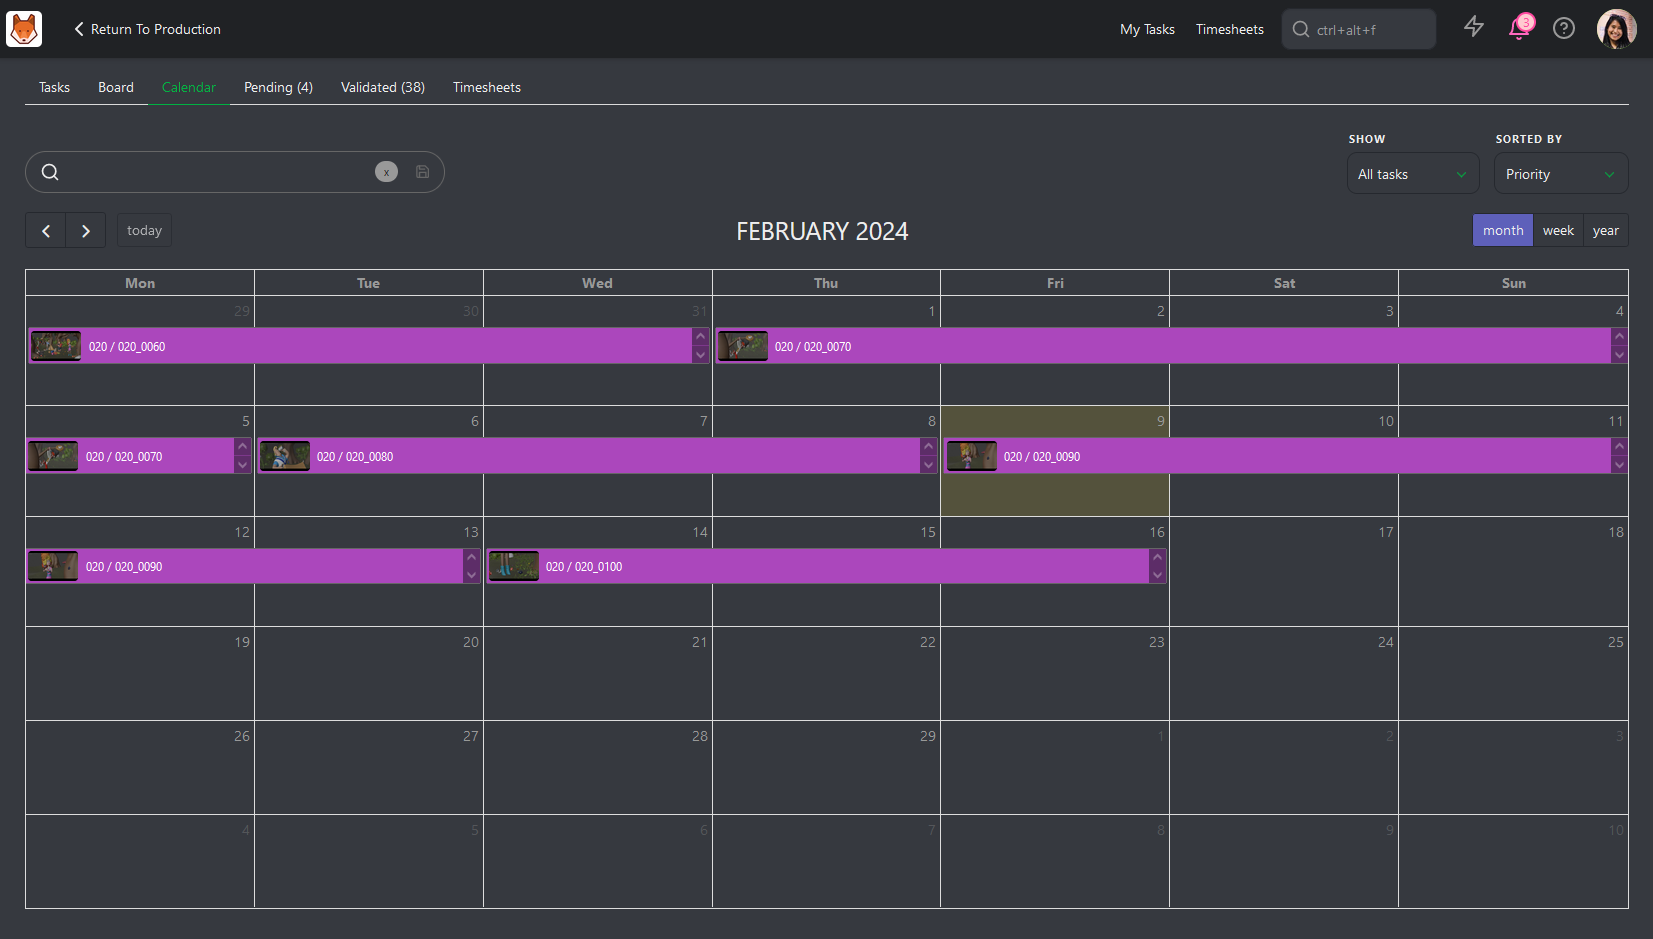
- Clicking a task opens the right-side panel for updates and comments.
- Like other views, you can sort and filter tasks here.
Check Your Tasks
A supervisor will typically have tasks assigned to them in addition to supervising your department. This means you need to split your time between completing your work and managing your team. Here's how to effectively manage what tasks you need to do.
When you log into Kitsu, you'll notice the My Tasks button at the top of the screen. This provides direct access to your to-do list. By default, the list is sorted by priority, so the task at the top are the ones recommended address first.
On the My Tasks page, you can filter the task list by Production, Task Type, Status, and other criteria.
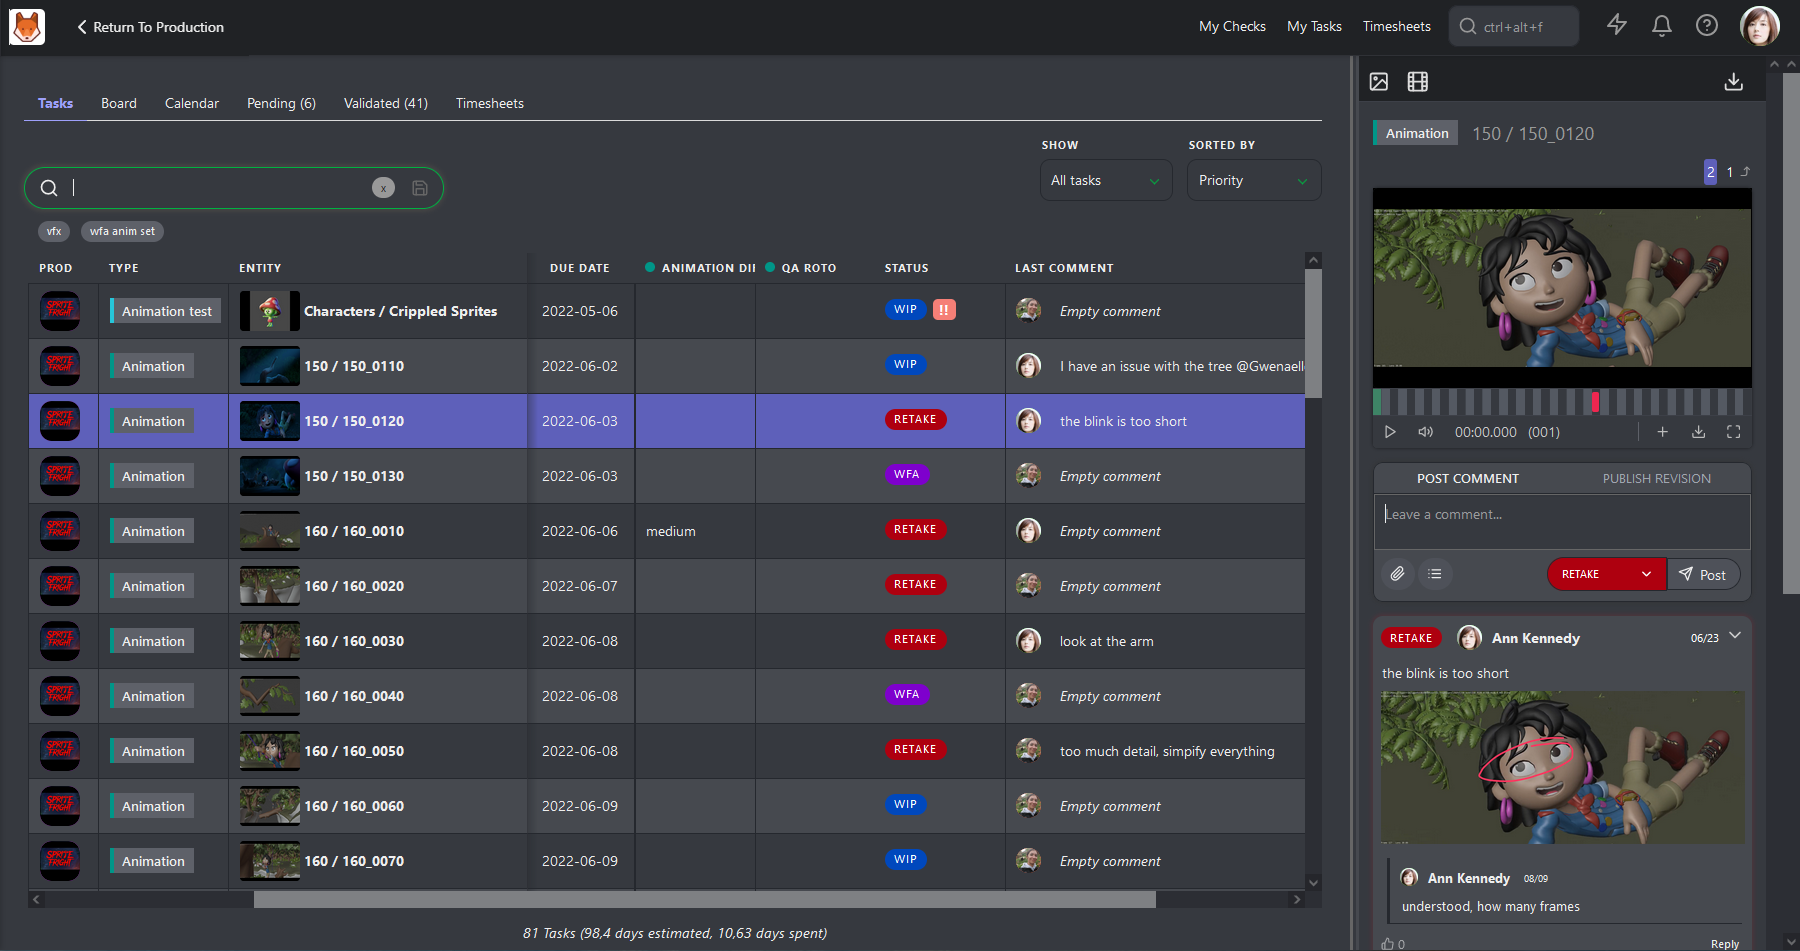
To view more details about a task, click on its Status to open the comment panel. Here, you can comment on the task and publish a new revision if needed.
You can also use the Board to quickly update the status of multiple tasks by dragging and dropping into each status column.
Daily Supervision Tasks
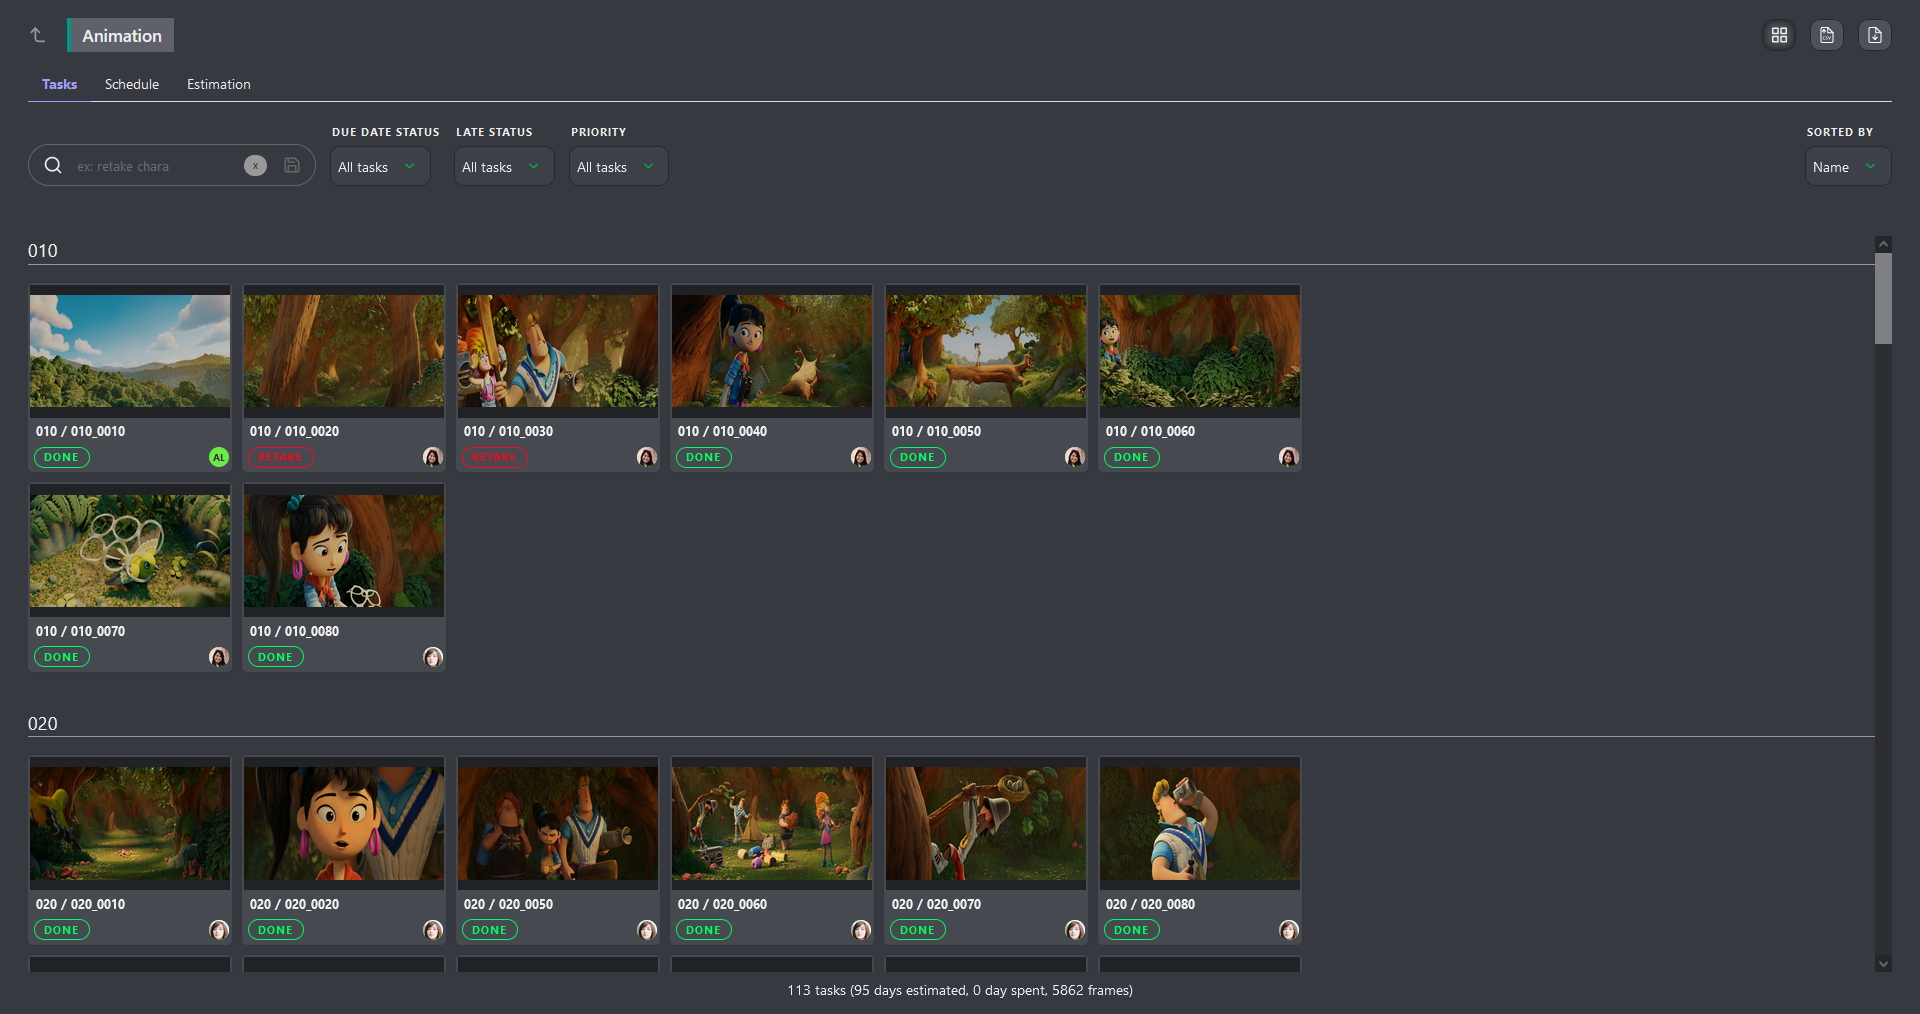
Once the assignments and estimates are done, you can focus on the day-to-day operations. To easily see an overview of tasks from your department, you can click on your task type name from any page.
Once on the detail page, your first action is to click on the Display tasks as a contact sheet  button.
Now, you can easily hone in on tasks that require your attention using the built-in filters. For example, say you want to see only the tasks that are yet not complete yet. In this case, you can filter our tasks with the -done status, along with adding a Due Date Status filter, to show tasks that are Due This Week.
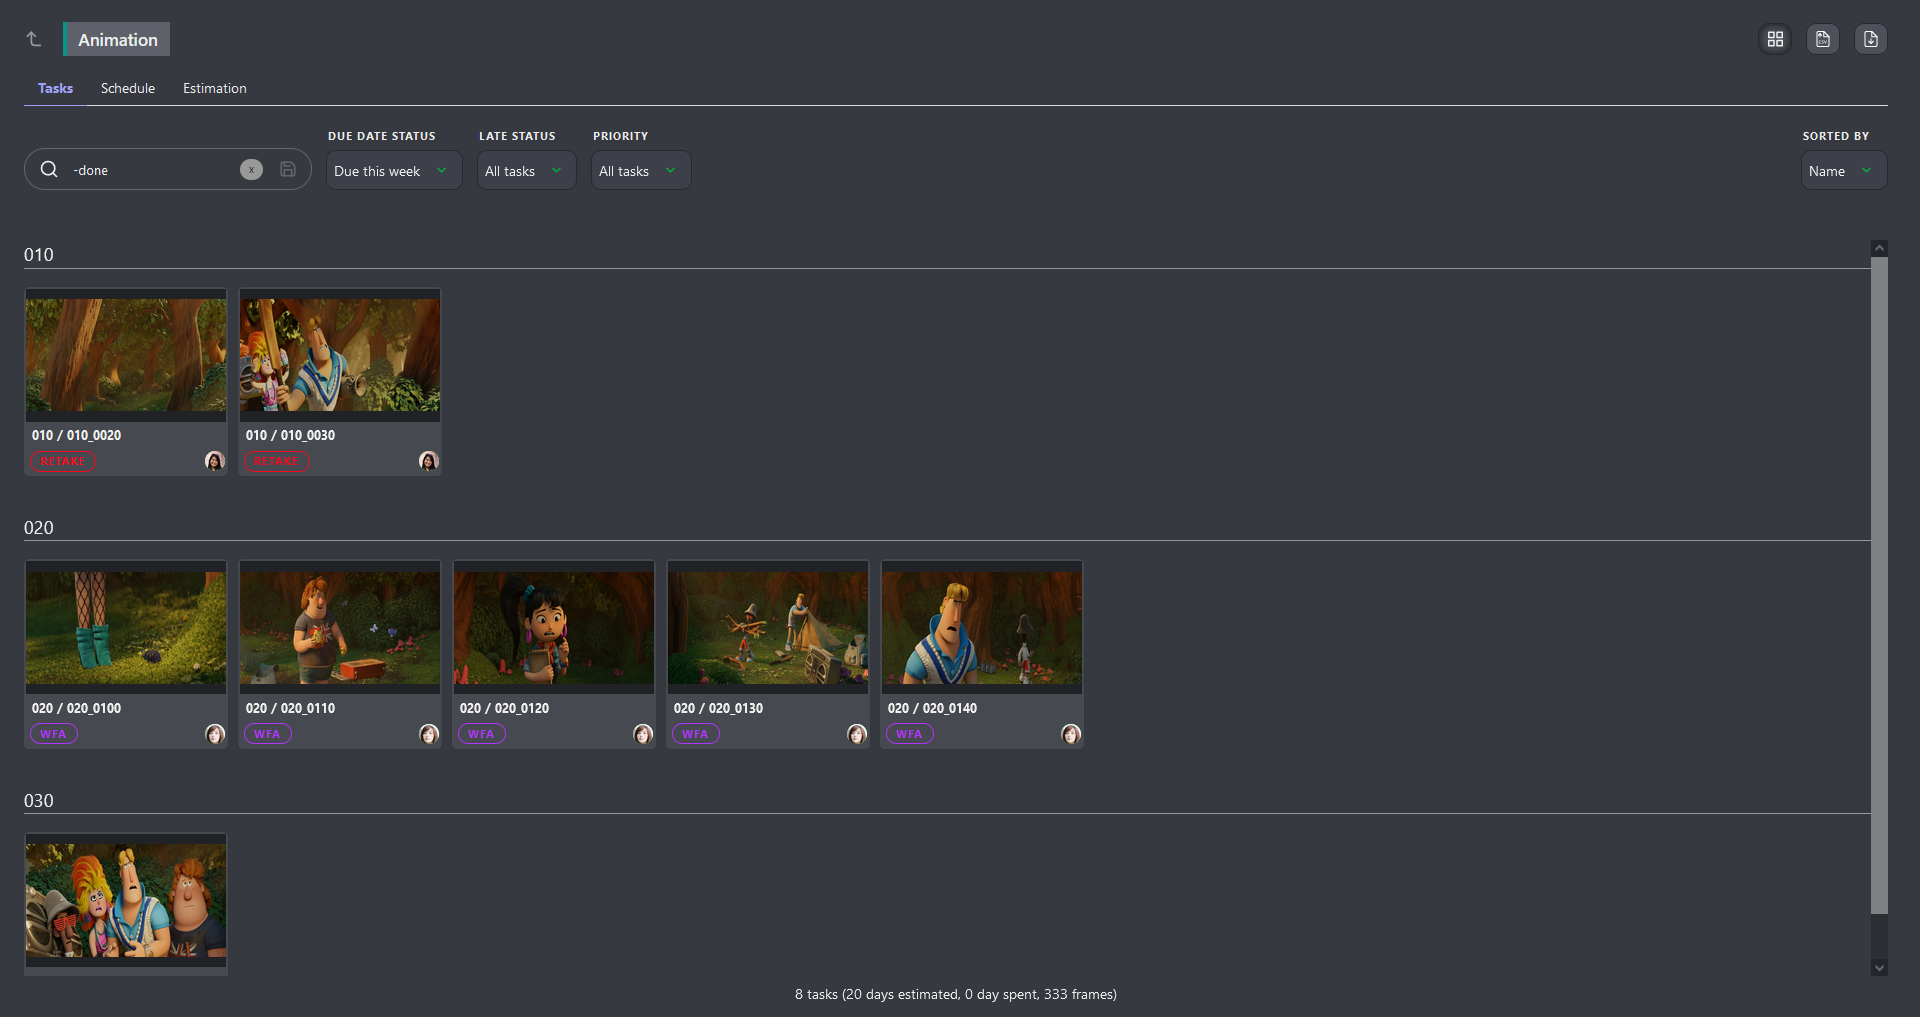
You can easily enable / disable filters to quickly hone in on the right information.
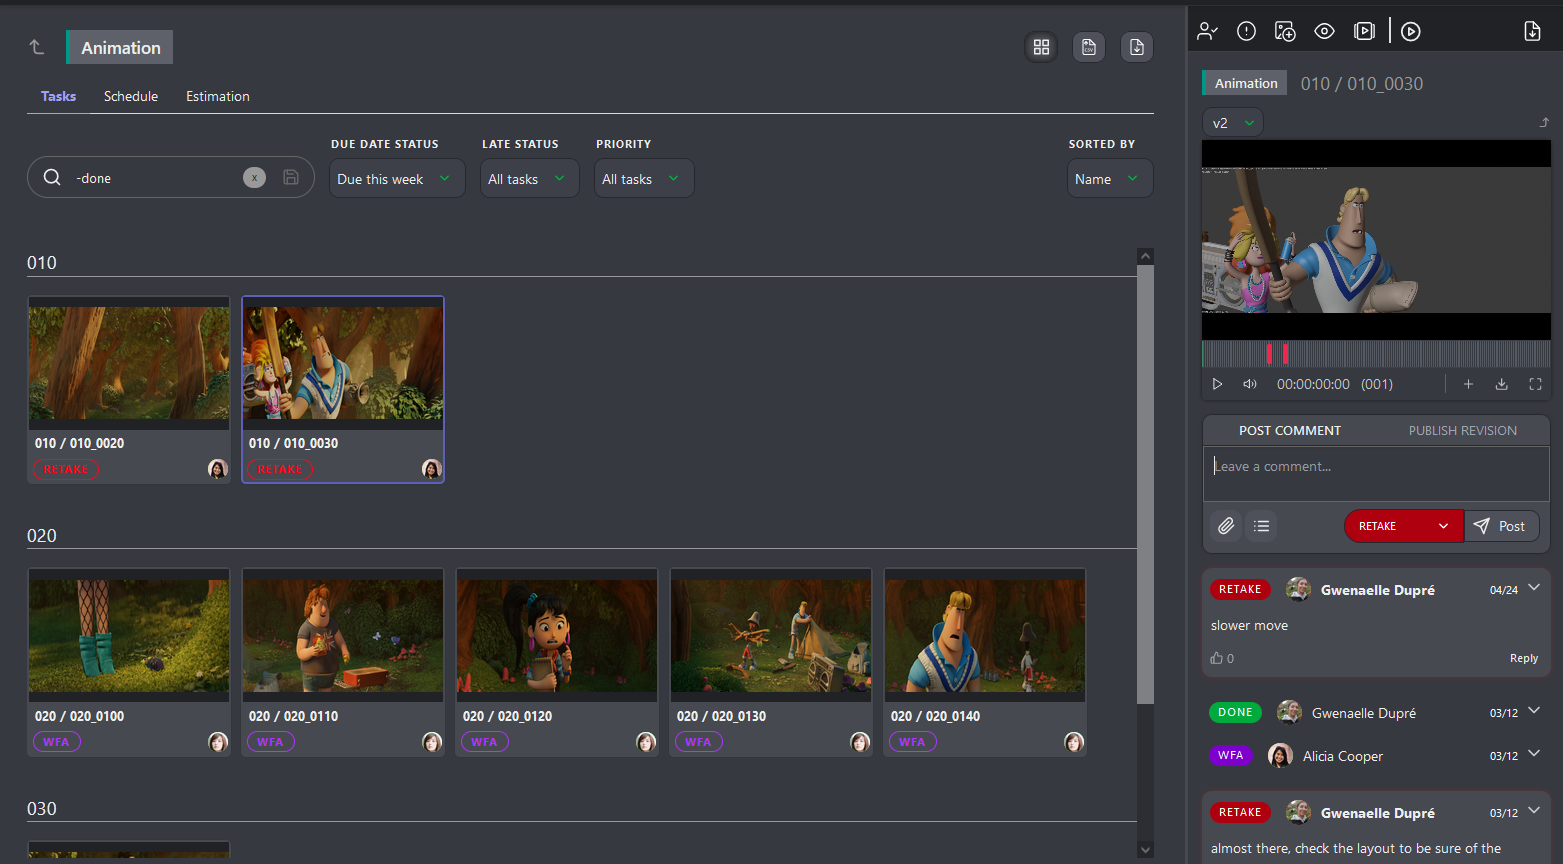
TIP
If you need more information about a task, click on it's name to open the comment panel on the right.
5. Team Schedule
Production Schedule
As the Studio Manager, you can use the global schedule as a reference for your production. The main purpose of this schedule is to track the milestones linked to your contract. This is referred to as your Reference Schedule.
In order to start filling out your global schedule, you need to populate the production with assets and shots and define your task types.
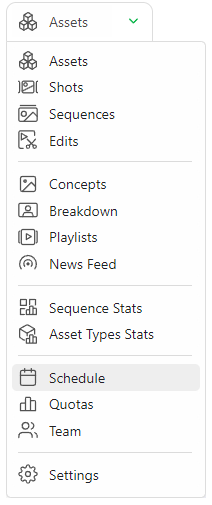
In the drop-down menu, choose SCHEDULE.
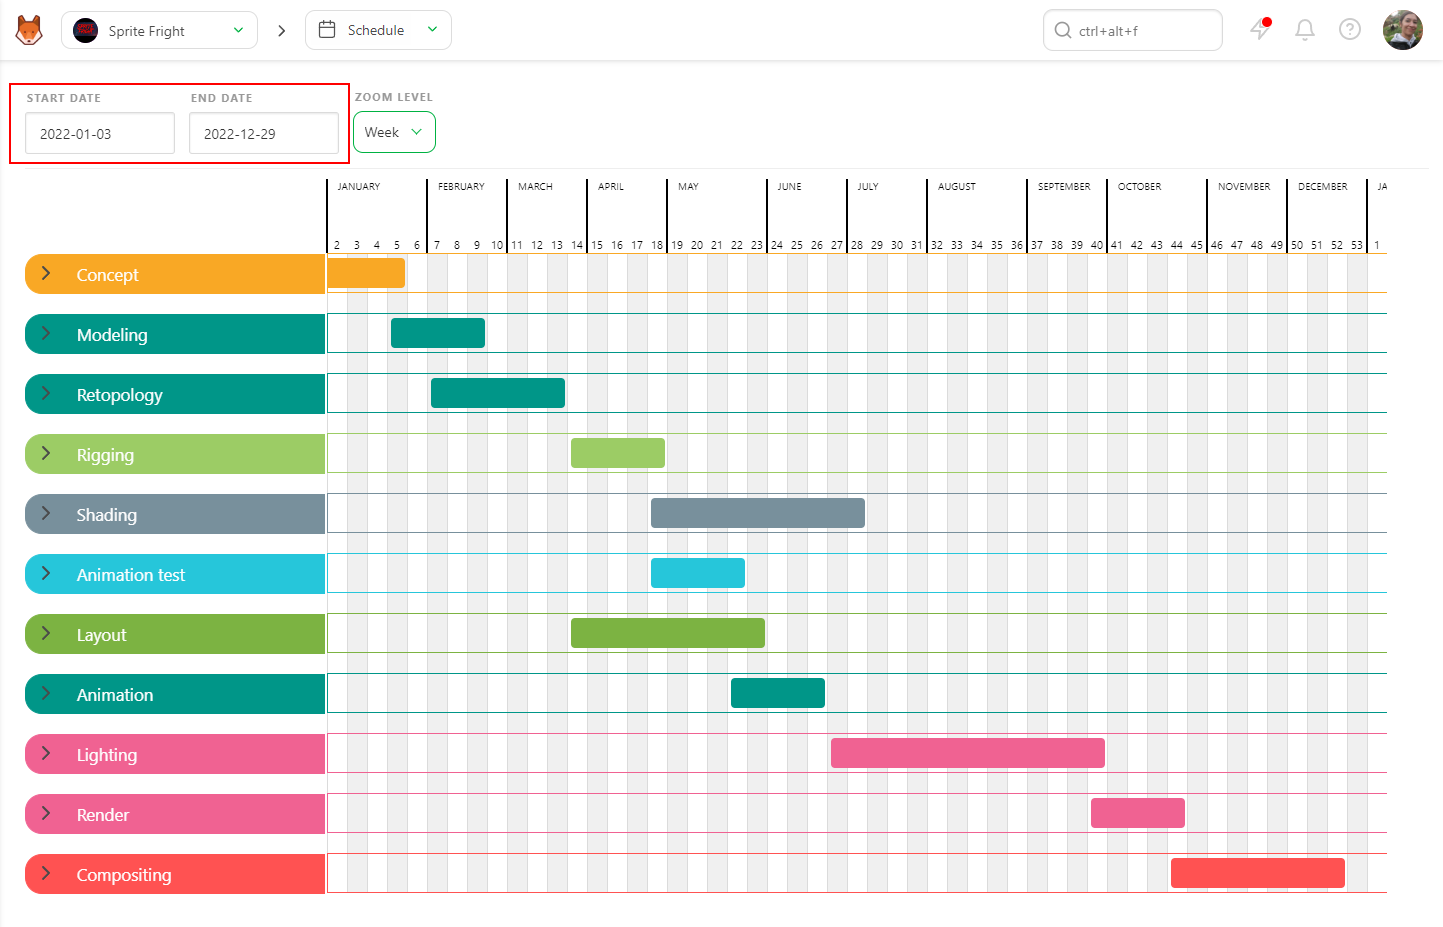
The Production Schedule Gantt Chart
At the top of the schedule, you can see the project's start date (1) and the end date (2), which was defined when creating the production. You can modify these dates by clicking on the box to open the calendar and pick a date.
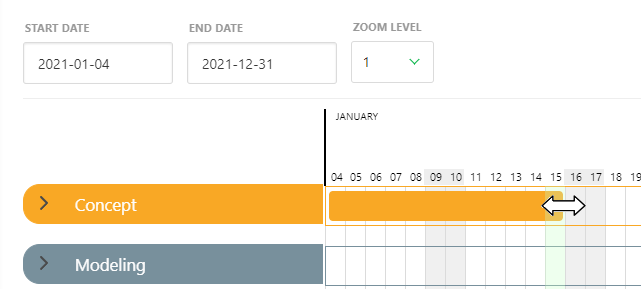
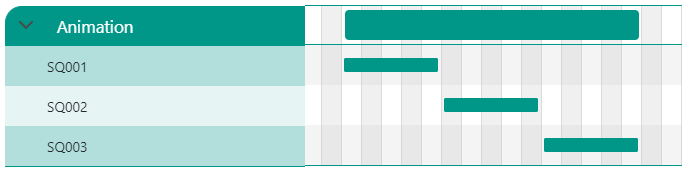
You can modify the start and end dates for each of your task types on the Gantt schedule in one of two ways: the first is by moving the bar directly, and the second is by entering the date on the settings page under the task type section.
For the former, place your cursor on the start or end date; the cursor changes to a double arrow. Then, drag and slide to the desired date.
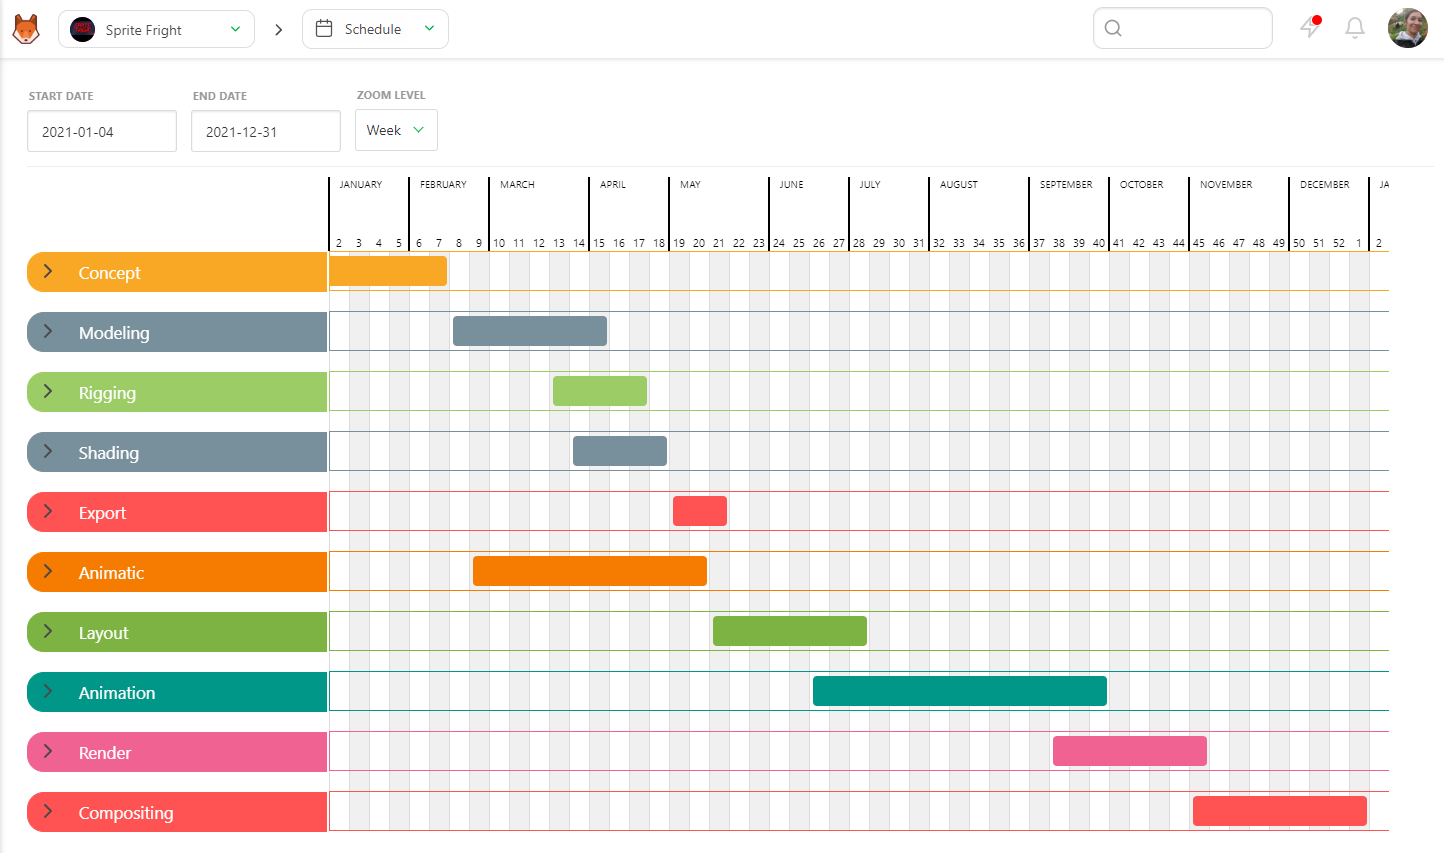
After setting the start and end dates for your task types, you should be able to see at a glance the flow of your production.
TIP
You can select all the Gantt chart bars and move them simultaneously with CTRL / CMD + Left Click.
With that complete, the next step is to unfold each task type to reveal the associated shots sequences / assets types.

You can set the start and end dates the same way you would for the task type. You can also define the work period for all asset types.

You can do the same for the shot task types and determine the start and end dates for the sequences.
Milestones
A milestone is a significant point in a project that marks the completion of a major phase or task and serves as a checkpoint to assess progress. When hovering over a date in the schedule, you'll see  appears.

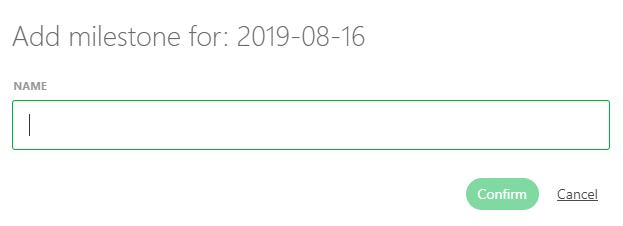
When you click, you'll be prompted to give a name to your newly created milestone.
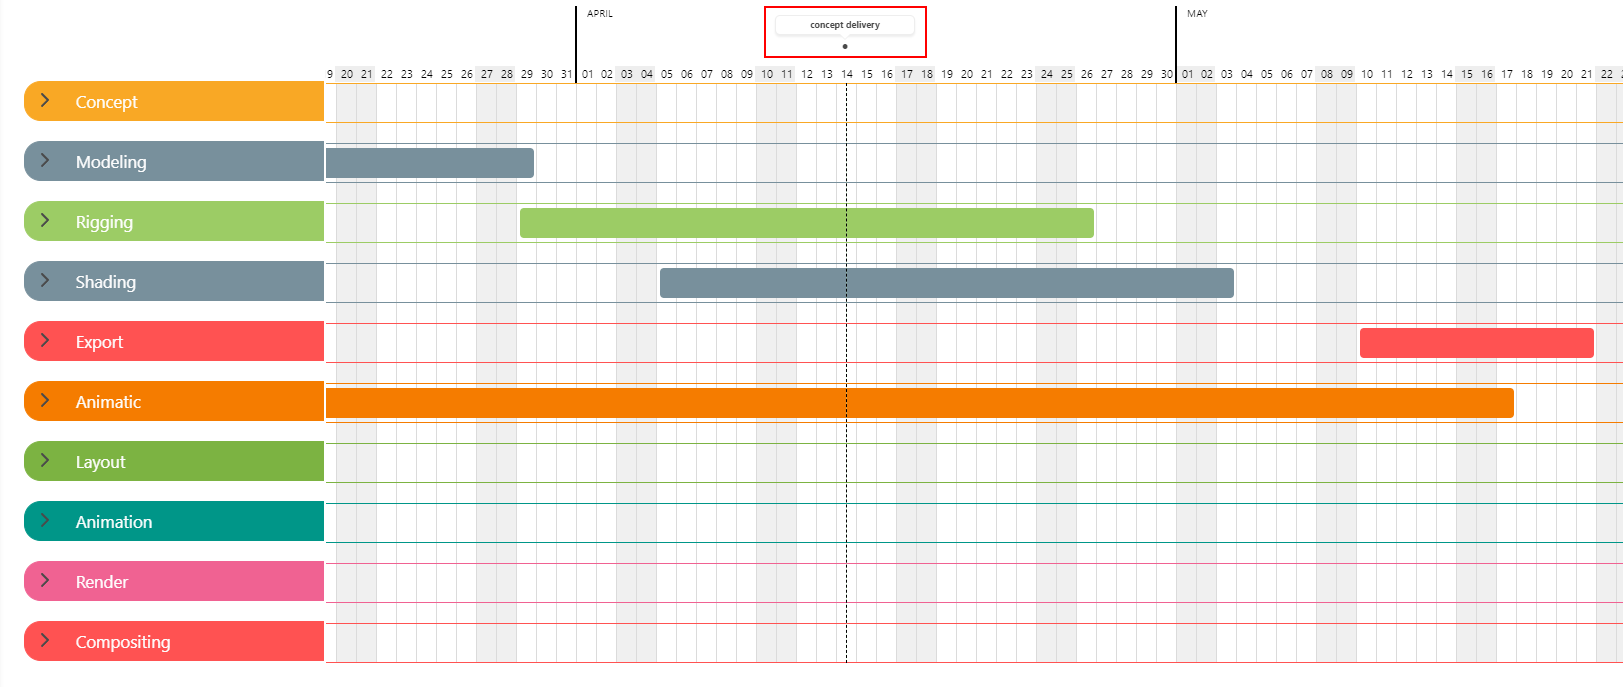
Milestones are represented by a small black dot on the date and a vertical line on your schedule. If you hover over the little black dot, the milestone's name appears.
This is a great way to quickly reference important upcoming dates or deliverables in your production against your productions schedule.
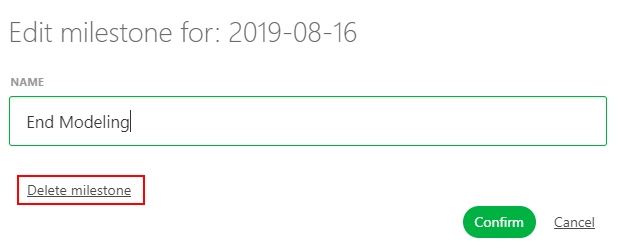
To edit a milestone, click on the  or anywhere on the milestone name. From there, you can rename or delete the milestone.
Everyone assigned to the production can access the global schedule page, but only the Studio Manager can modify it.
To view specific tasks in more detail, click on the task type's name. This will lead you to the Schedule tab of the task type page.
Task Type Schedule
Whereas the Global Schedule is used to references task types across the entire production, the Task Type page is used to drill down into the details for tasks in a specific task type.
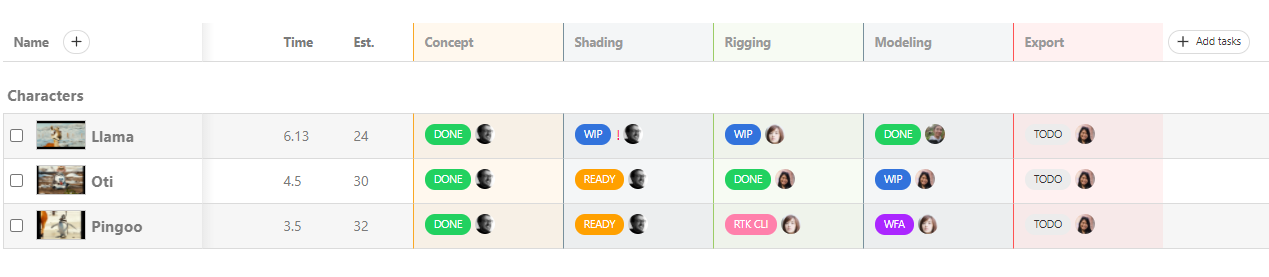
There are 3 tabs on this page: Tasks, Schedule, and Estimation.

There are two ways to set the artist's Schedule.
The first method is via the Tasks tab, where you will set Estimated Time and the Start Date. As we saw previously, setting both of these will automatically fill out the Due Date. Once those details are filled out, the Gantt chart on the Schedule tab will be automatically generated.
TIP
Remember that on the Gantt you can click and drag to modify the start / end date, but the duration of the task will always be auto-calculated using the end date and duration
The second method is to set the length directly (Estimate), Start Date, and Due Date from the Gantt chart.
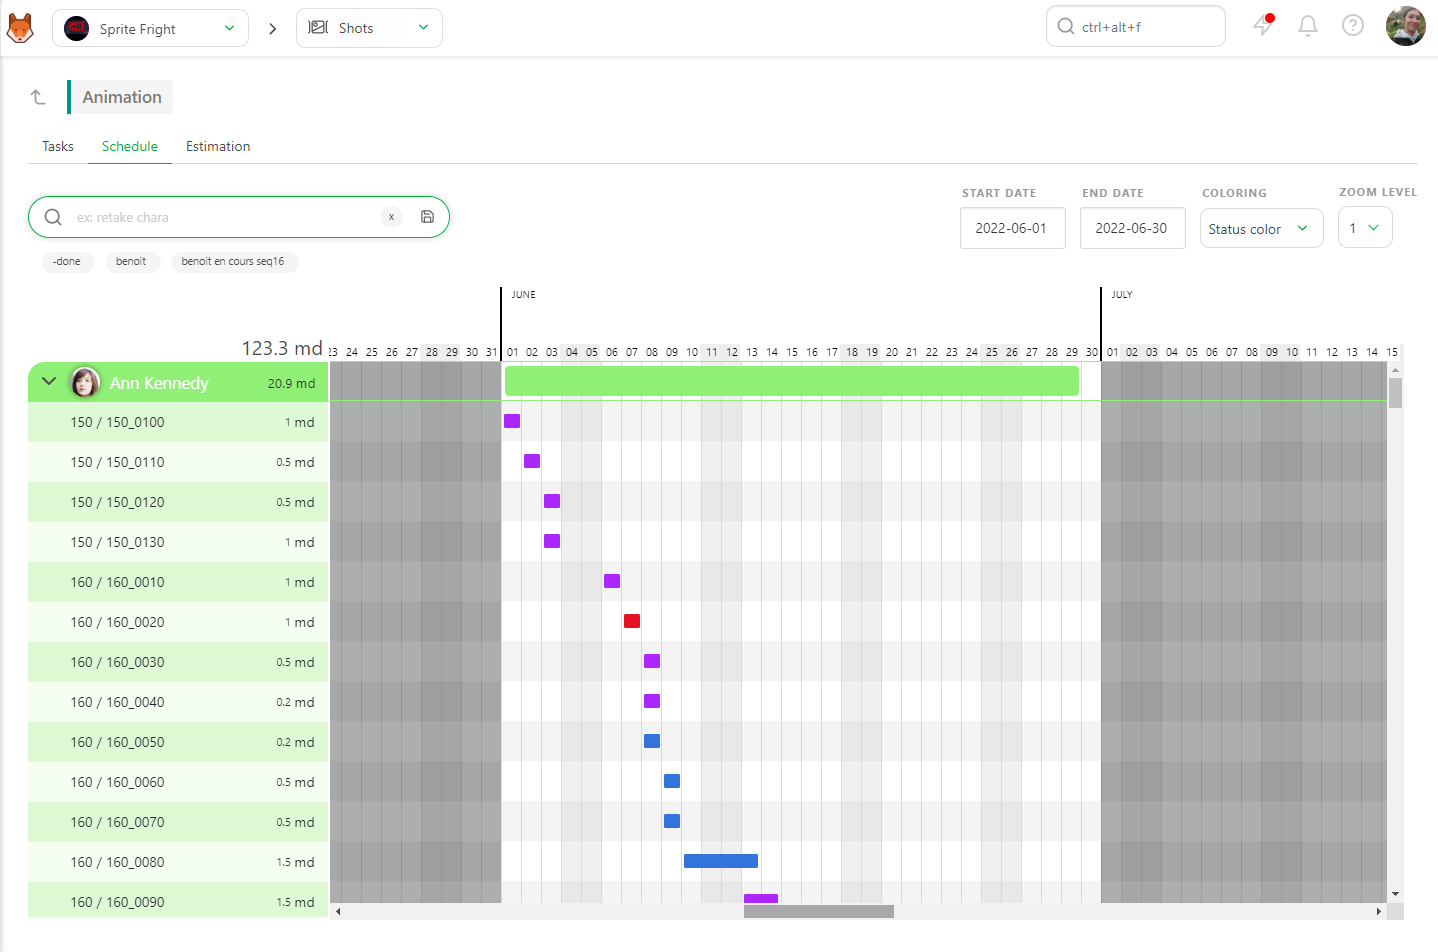
Put your cursor on the start date, and the cursor will change to a double arrow. Then, drag and slide to adjust the start date. Define your Due date by filling in the MD.
You can use the search bar (1) to narrow down a specific set of tasks. For example, you can search by status, asset type, sequence, asset name, shot name and artist name. (Note that you do not need to add the name of the task type as you are already on a specific task type page)
You can also expand or collapse each Artist (2) section to make the schedule easier to read.
You can change the bar's color in the Gantt chart (3). By default, the coloring is set to Status Color.

Status color changes the bar's color based on its status. For example, blue is for WIP, red is for RETAKE, purple for WAITING FOR APPROVAL, and green for DONE.
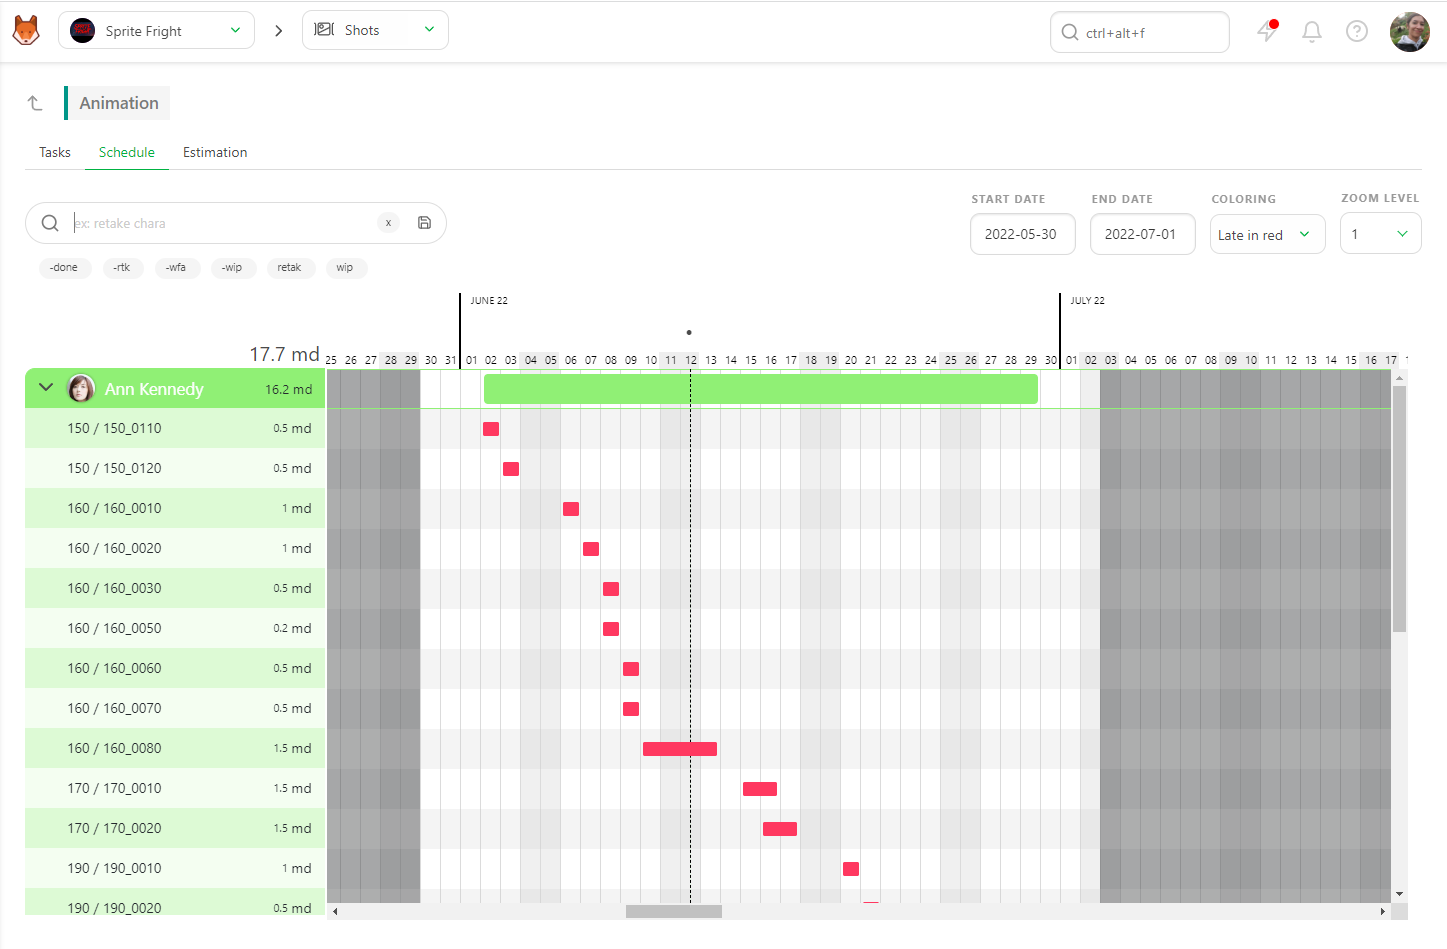
You can quickly assess the status of your elements and team. From this view, you may want to visually identify tasks that are behind schedule.
From the Coloring dropdown, select late in red. This view will highlight tasks where the due date has passed but that have not been approved yet. This indicates that they are behind schedule and will show on the Gantt chart as red.
Changes made on the Gantt chart are reflected in other pages in Kitsu.
The Start date and the Due date are displayed on the Tasks tab of the task type page.
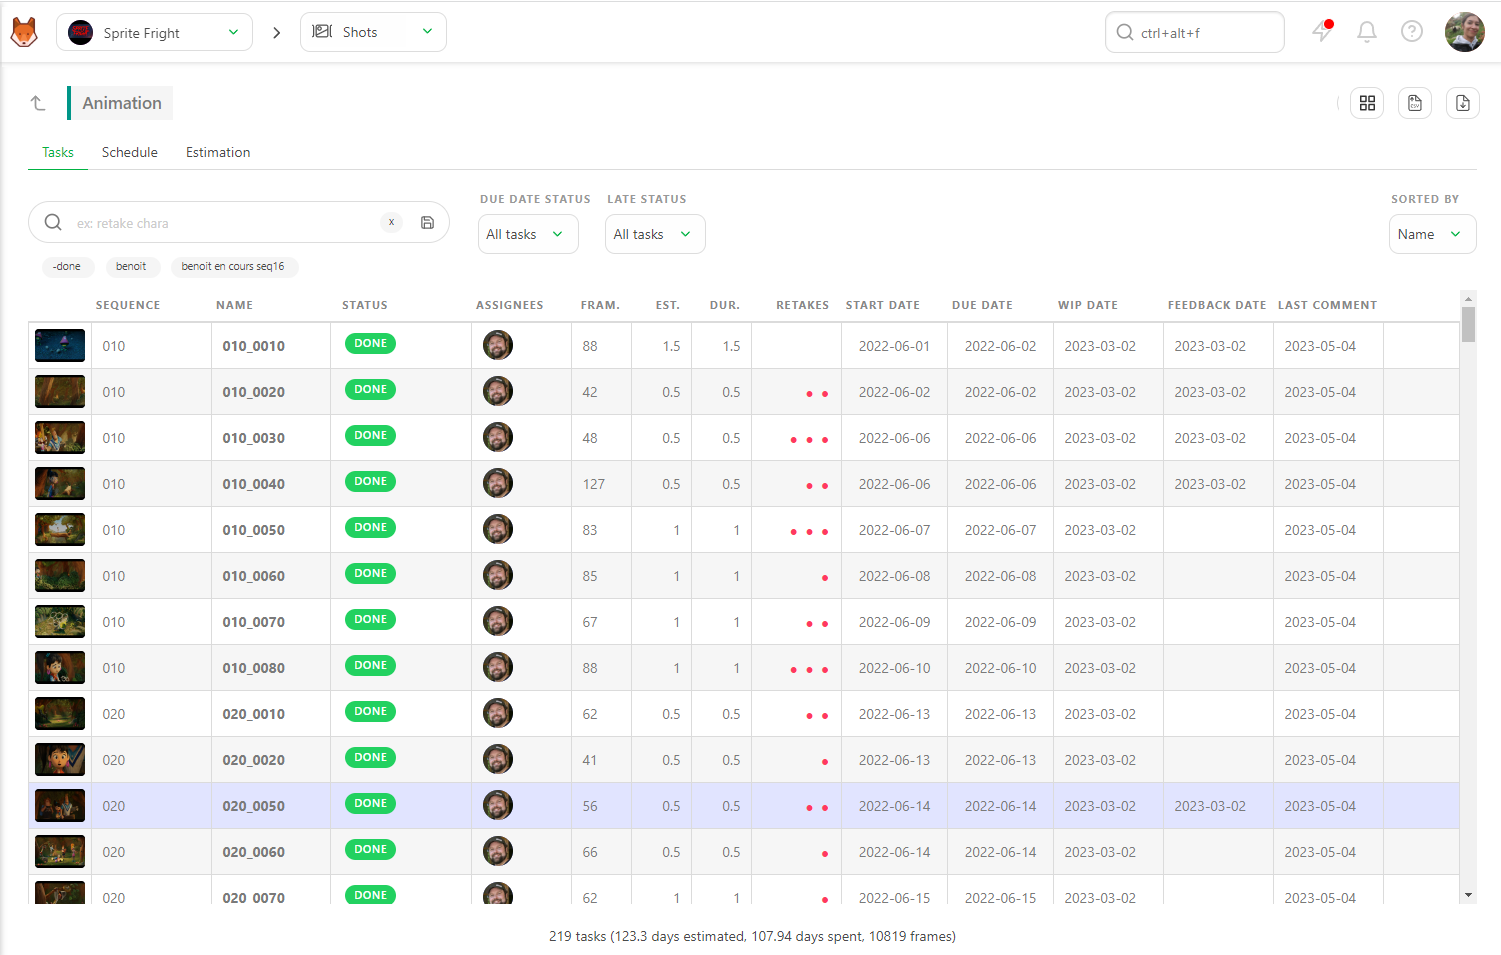
Additionally, you can view the Due date and Estimation days on the Todo Page of an Artist.
Access to this page is visible to everyone, but only the Studio Manager can modify it.
Asset and Shot Schedule
On the detail page of an asset or a shot, you can access the Schedule tab.
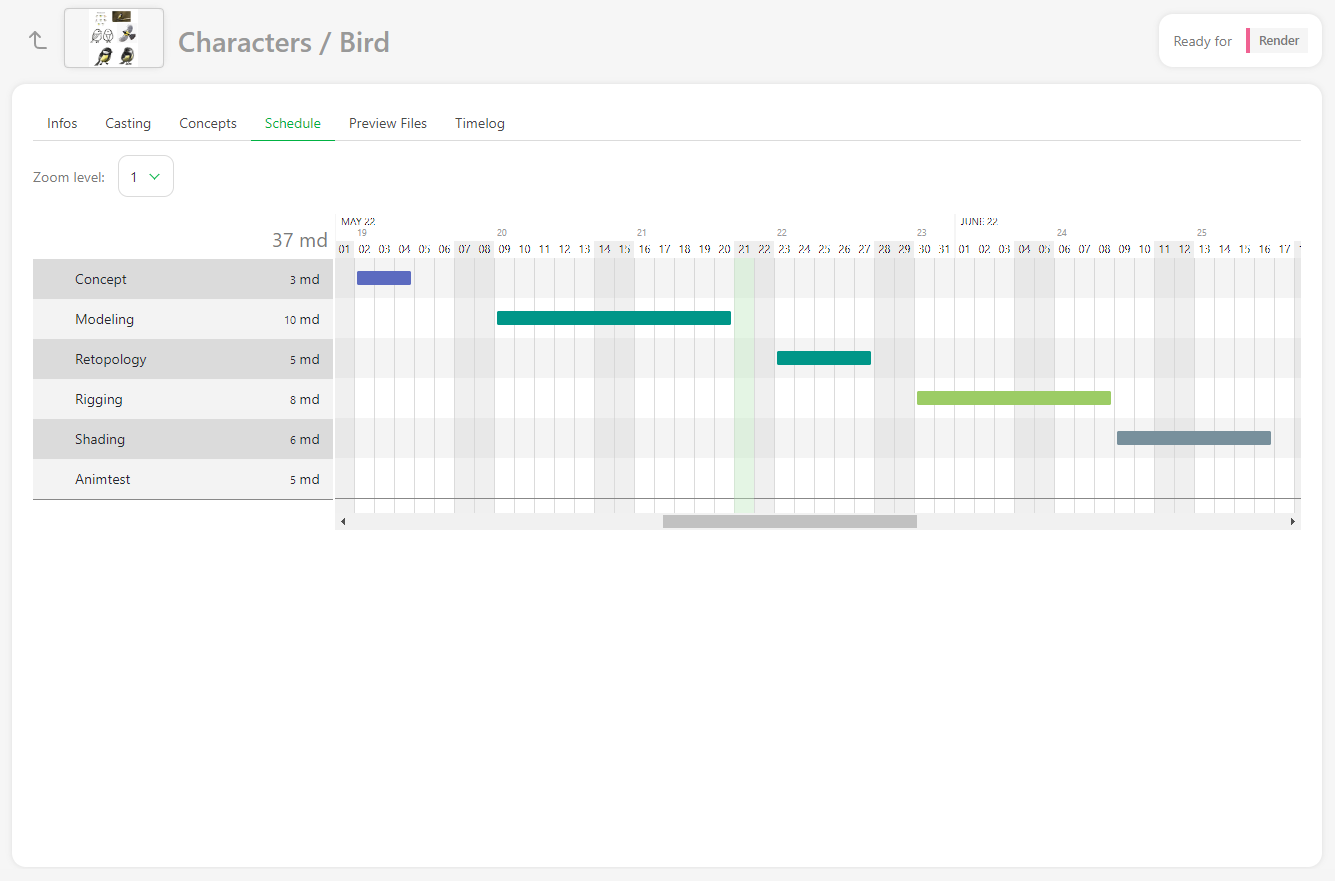
If you have entered a start and due date on the Task Type schedule, the Gantt bar will be displayed.
From this page, you can modify the length, start, and end dates of each task in the asset or shot.
Studio Schedule
As a production manager, you have access to the Studio Schedule, which consolidates all production schedules in one place, aiding in better preparation for your productions.
To access the Studio Schedule, navigate to the main menu () and click on Main Schedule under the Studio section.
Here, you'll find all your productions listed on each row, including their start and end dates. Additionally, you can view the number of days planned for each production within the specified timeframe. Furthermore, you can see the milestones you've defined for each production.
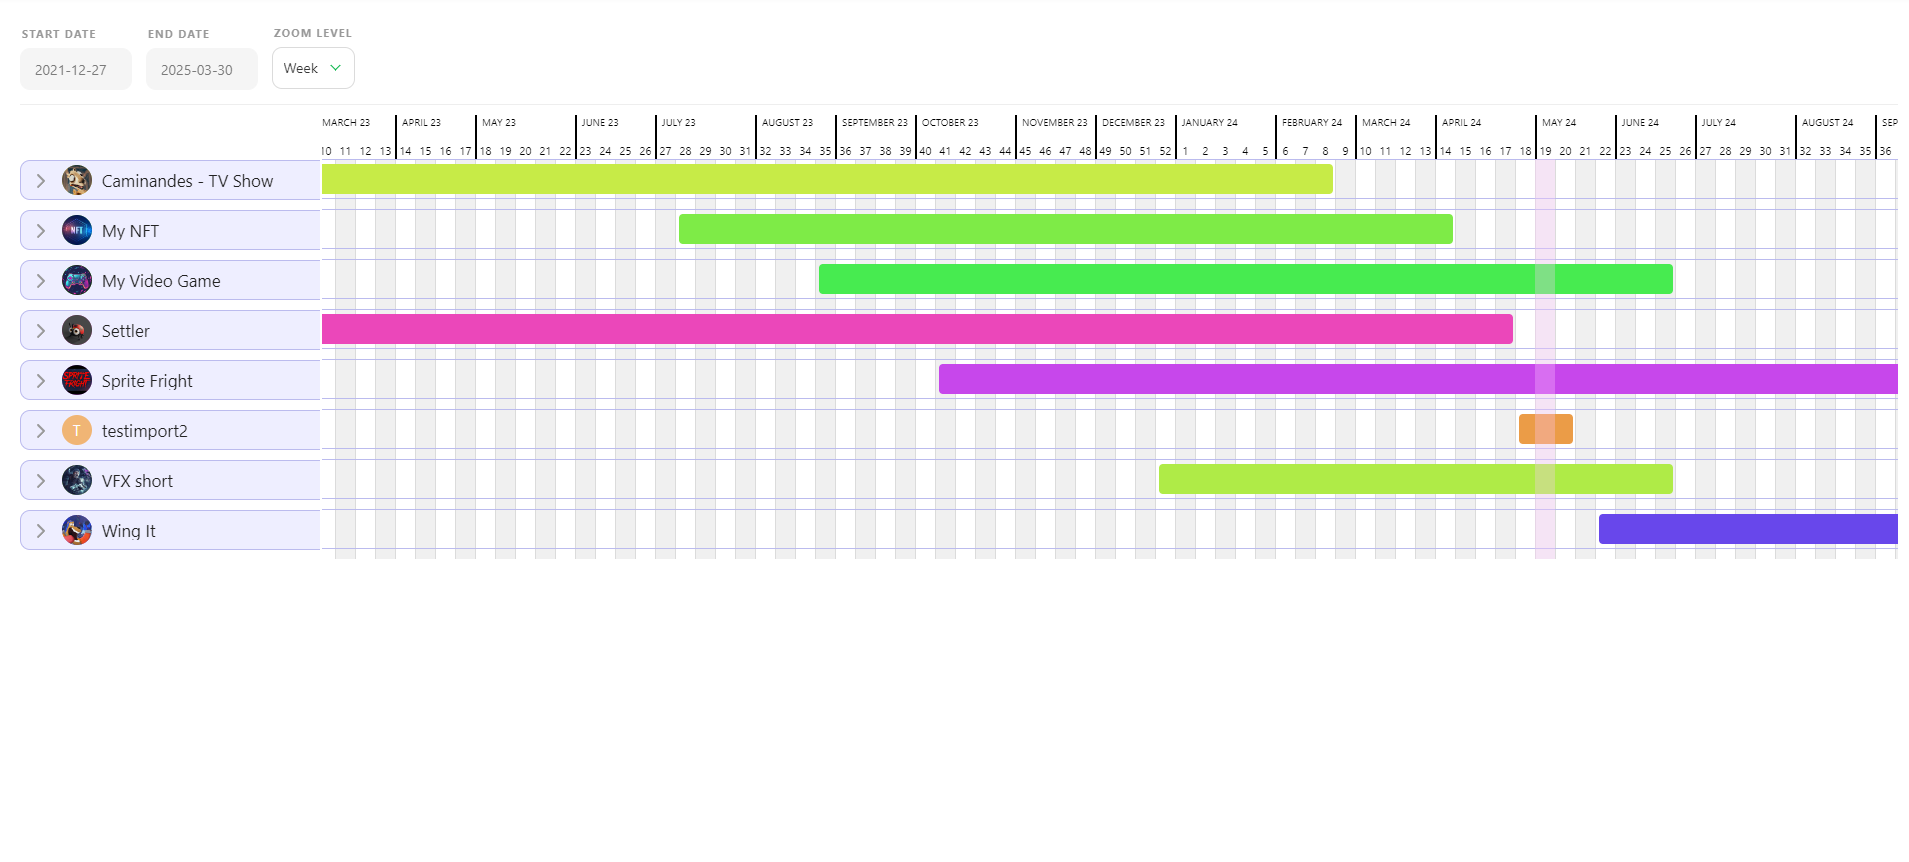
When you click on a production name, you can expand the view to see full details of each task type. The color scheme corresponds to the columns on the global pages.
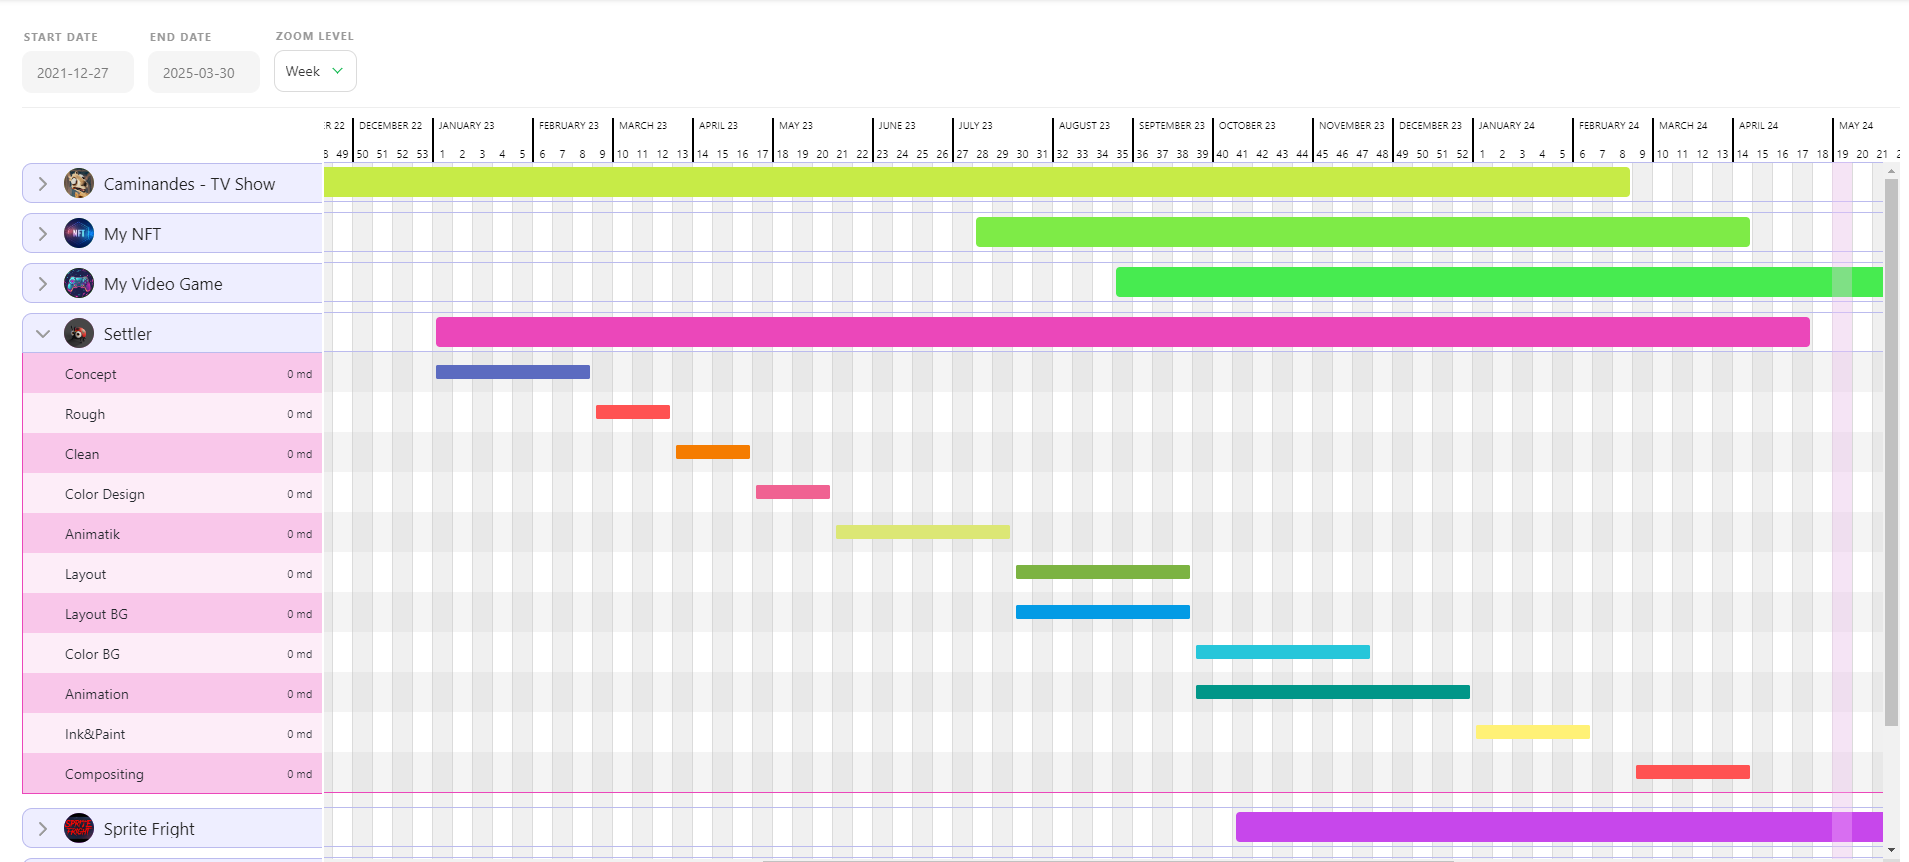
It's important to note that you cannot modify your production schedules directly from this page. To make adjustments, you'll need to navigate back to the specific production schedule page you wish to modify.
Access to this page is restricted to the Studio Manager.
Team Schedule
As a studio manager, staying informed about team activities is crucial. For a comprehensive overview of each department's activities, the Team Schedule provides valuable insights.
To access the Team Schedule, navigate to the main menu () and click on Team Schedule under the Studio section.
In the Team Schedule, on each row you'll find a list of all personnel in the studio.
At the top of the page, you can adjust the displayed timeframe by selecting the Start Date and End Date, as well as adjust the Zoom Level for a more detailed or broader view.
Additionally, you have the option to hone in on a specific Department or individual Person.
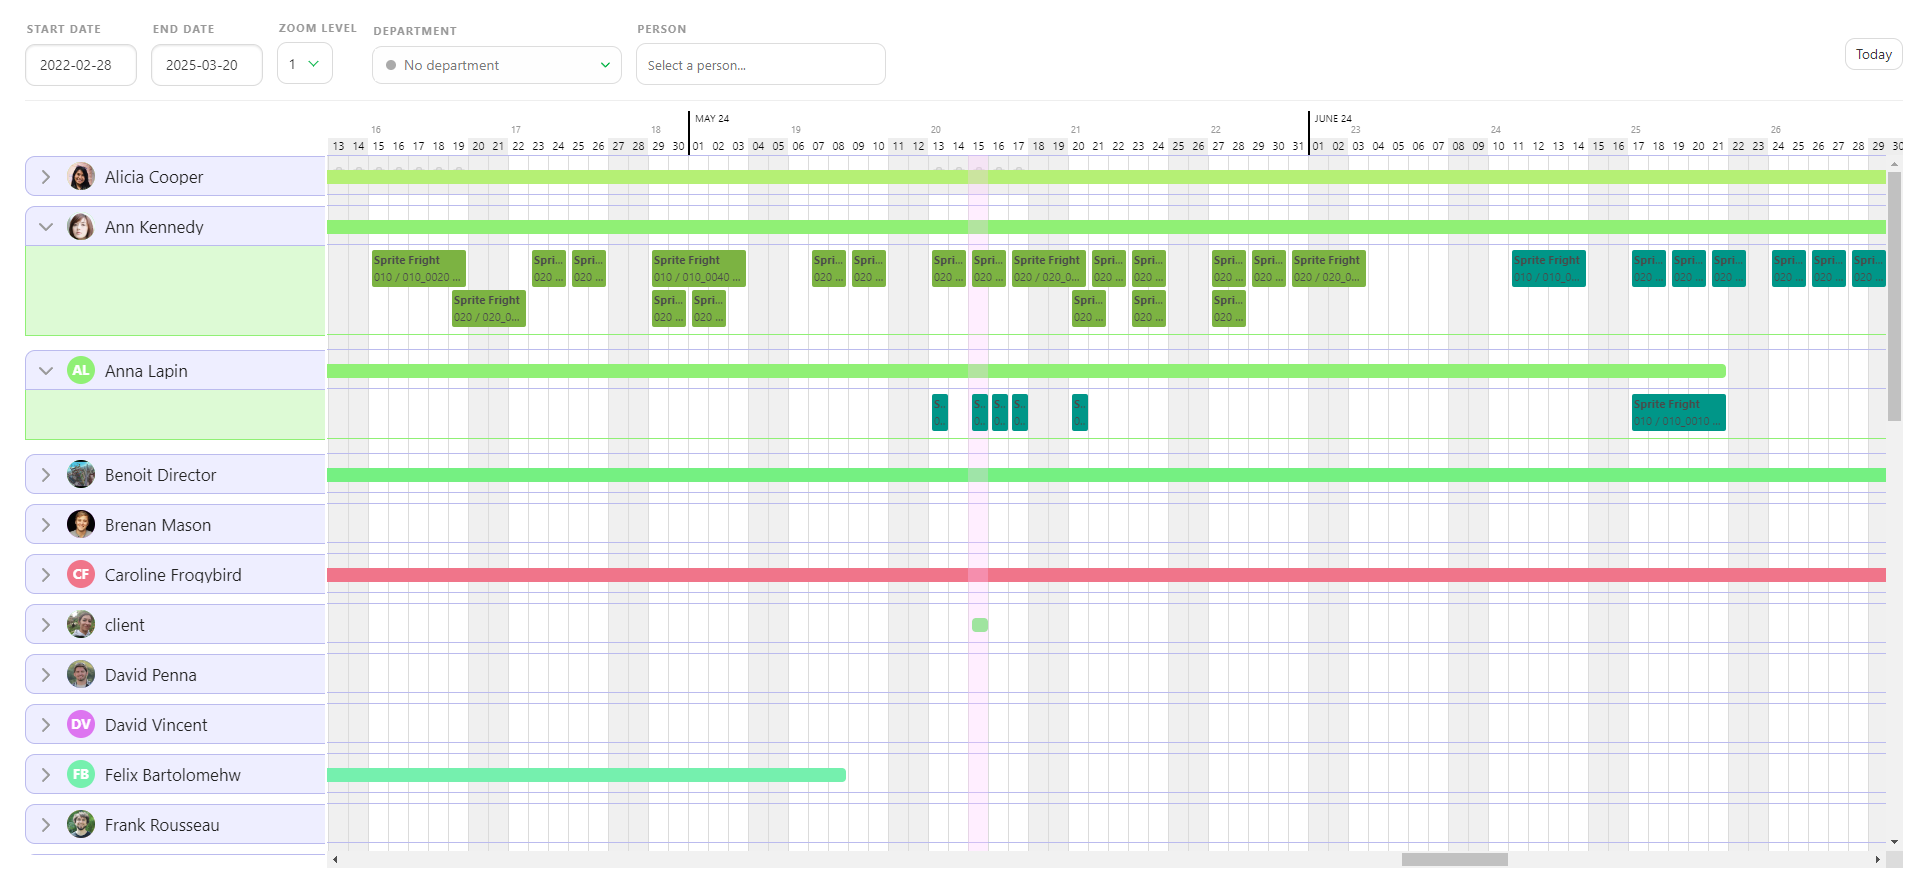
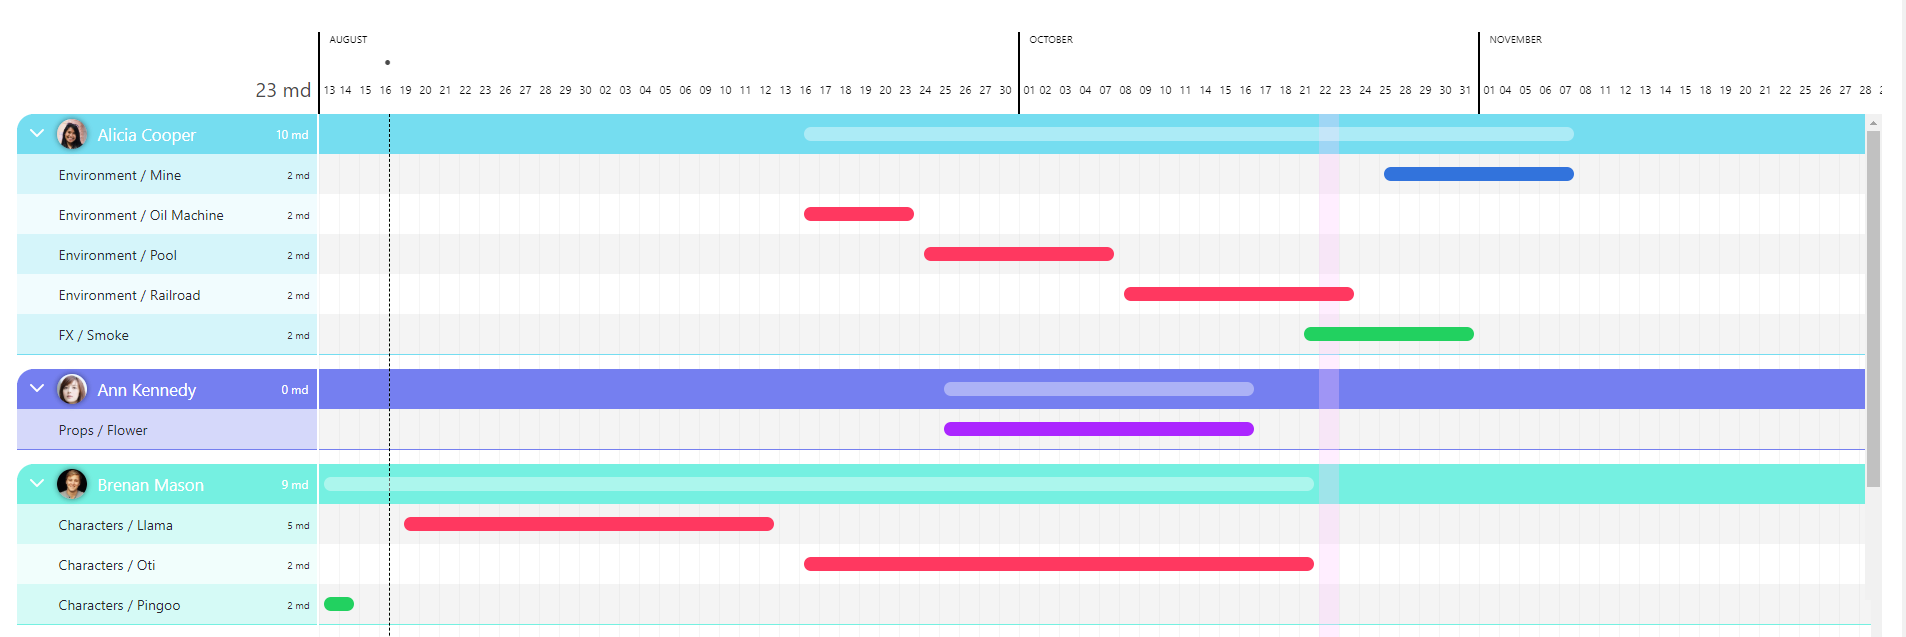
In cases where an artist has multiple simultaneous tasks, these tasks will be stacked atop one another for clarity.
You can manipulate each task by selecting and moving it around as needed. These tasks are directly linked and reflected in the task type schedule, and can be edited in both areas.
Managing Your Department's Schedule
As a Supervisor, you can access your team's schedule from the main menu under the Studio > Team Schedule section.
From this page, you can see all the artists in your current department working on your project. You can expand a person's schedule to see the details of their tasks.
From there, you can:
- Move tasks to change their start and due dates.
- Adjust the length of tasks.
- Drag and drop tasks to reassign them to different team members.
- See days off.
6. Timesheets
WARNING
All of the previous chapters are based on the fact that Estimation and Duration are filled for each task.
Everybody has to do their part. You and the supervisor will handle the estimation, while your team will fill out their timesheets.
Navigate to the main menu and select the Timesheet page.
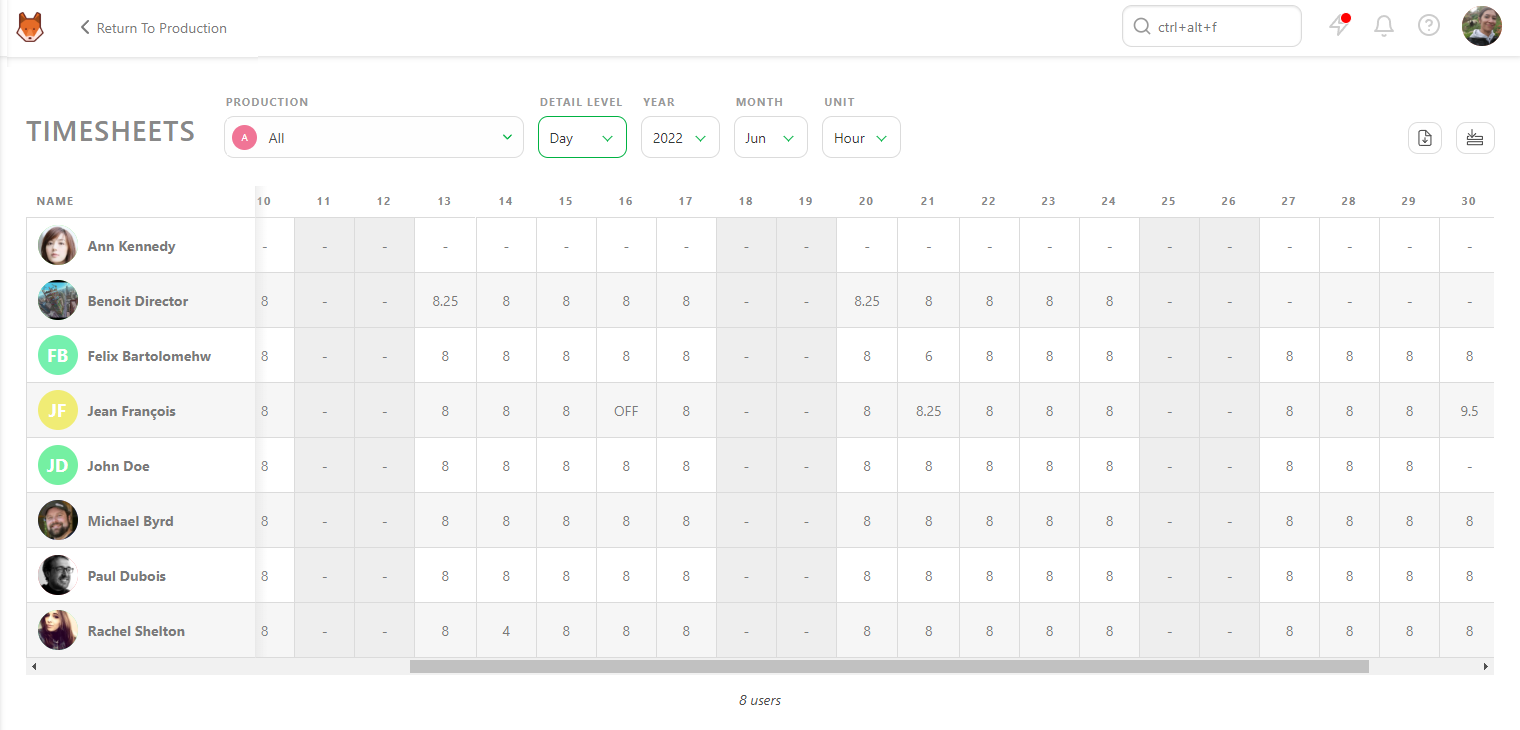
Viewing Timesheets
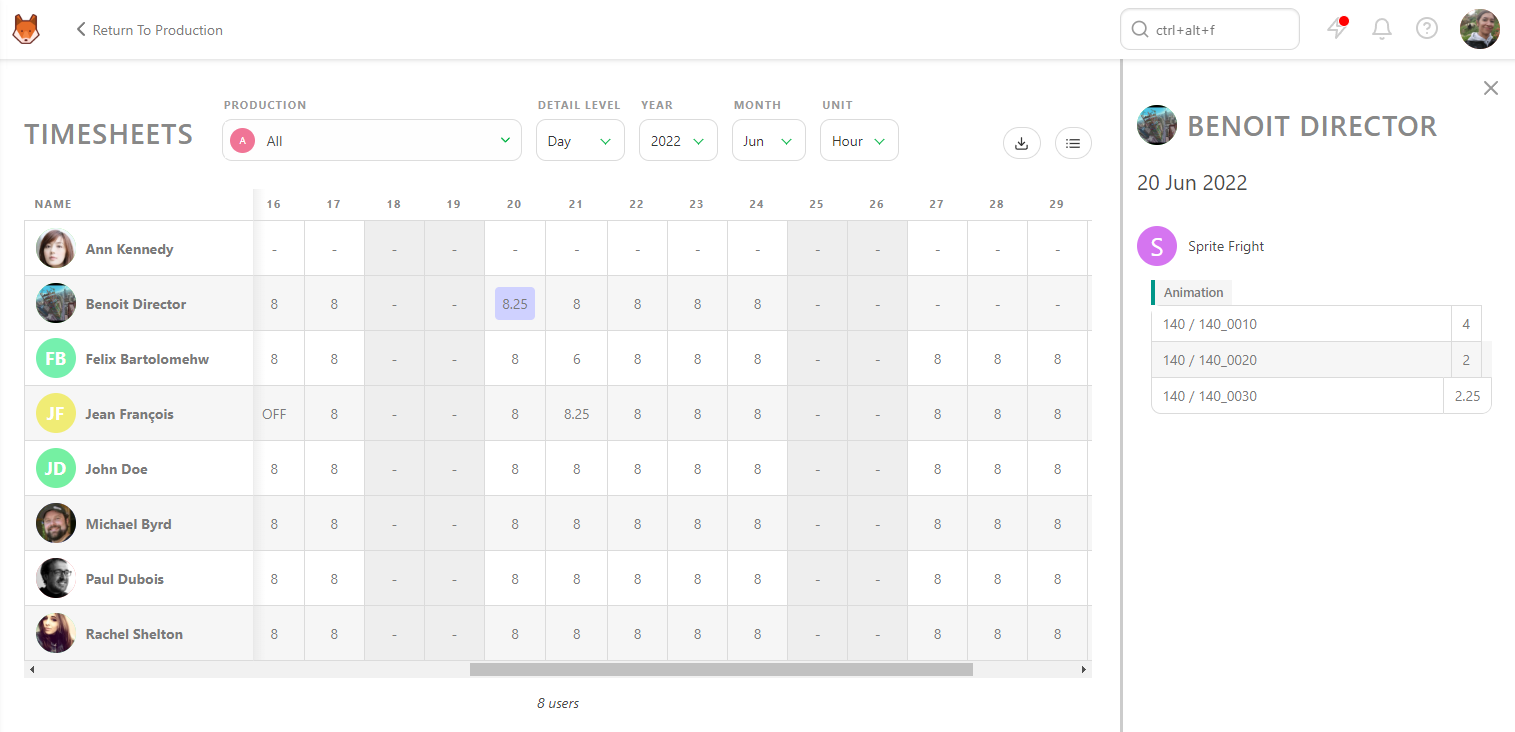
On this page, you can view each team member's timesheet by day. This allows you to check whether they fill it out daily, took a day off, or worked extra hours.
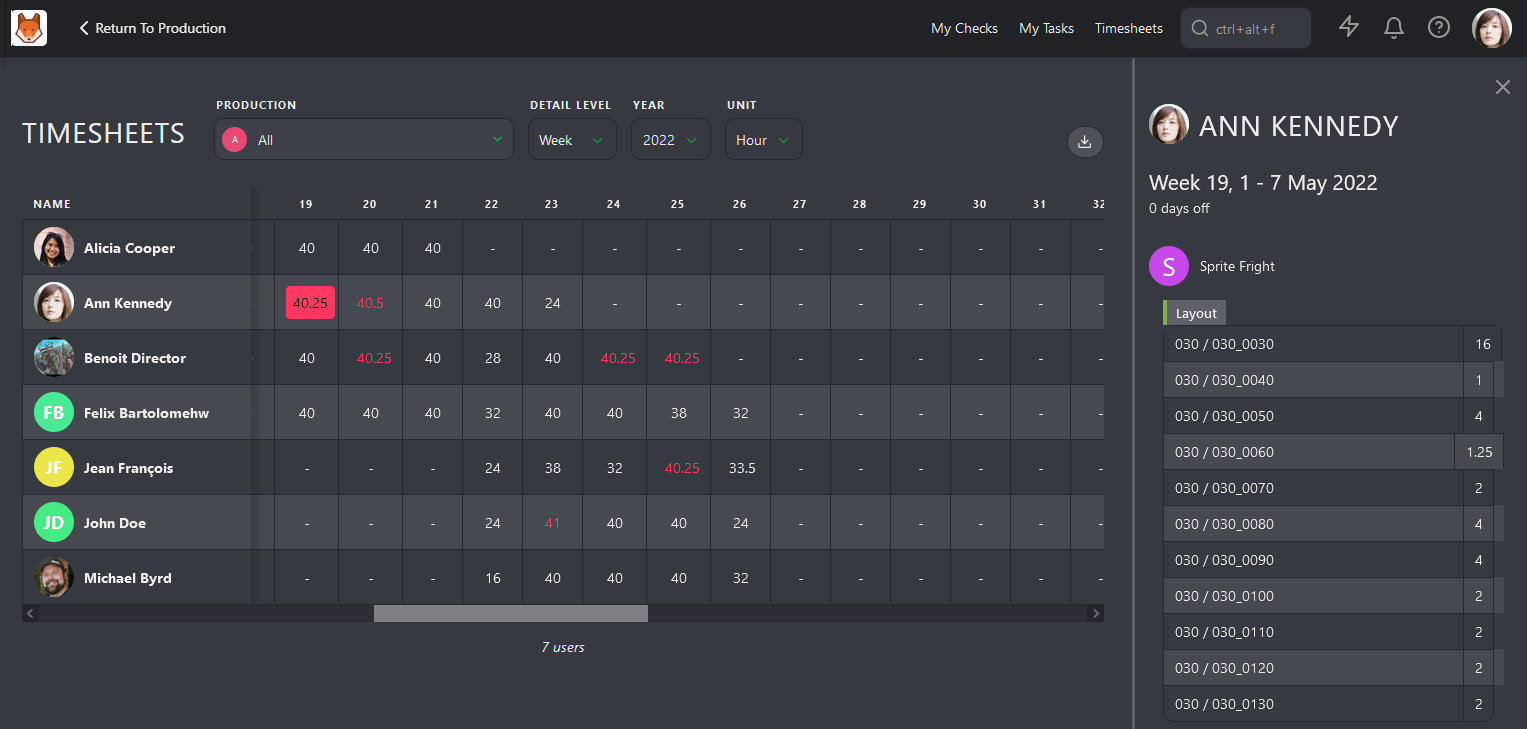
If you have a question about a timesheet entry, click on it to see the details of the production, task type, and specific task.
Once everything looks good at the day level, you can change the Detail Level from Day to Week, Month, or Year.
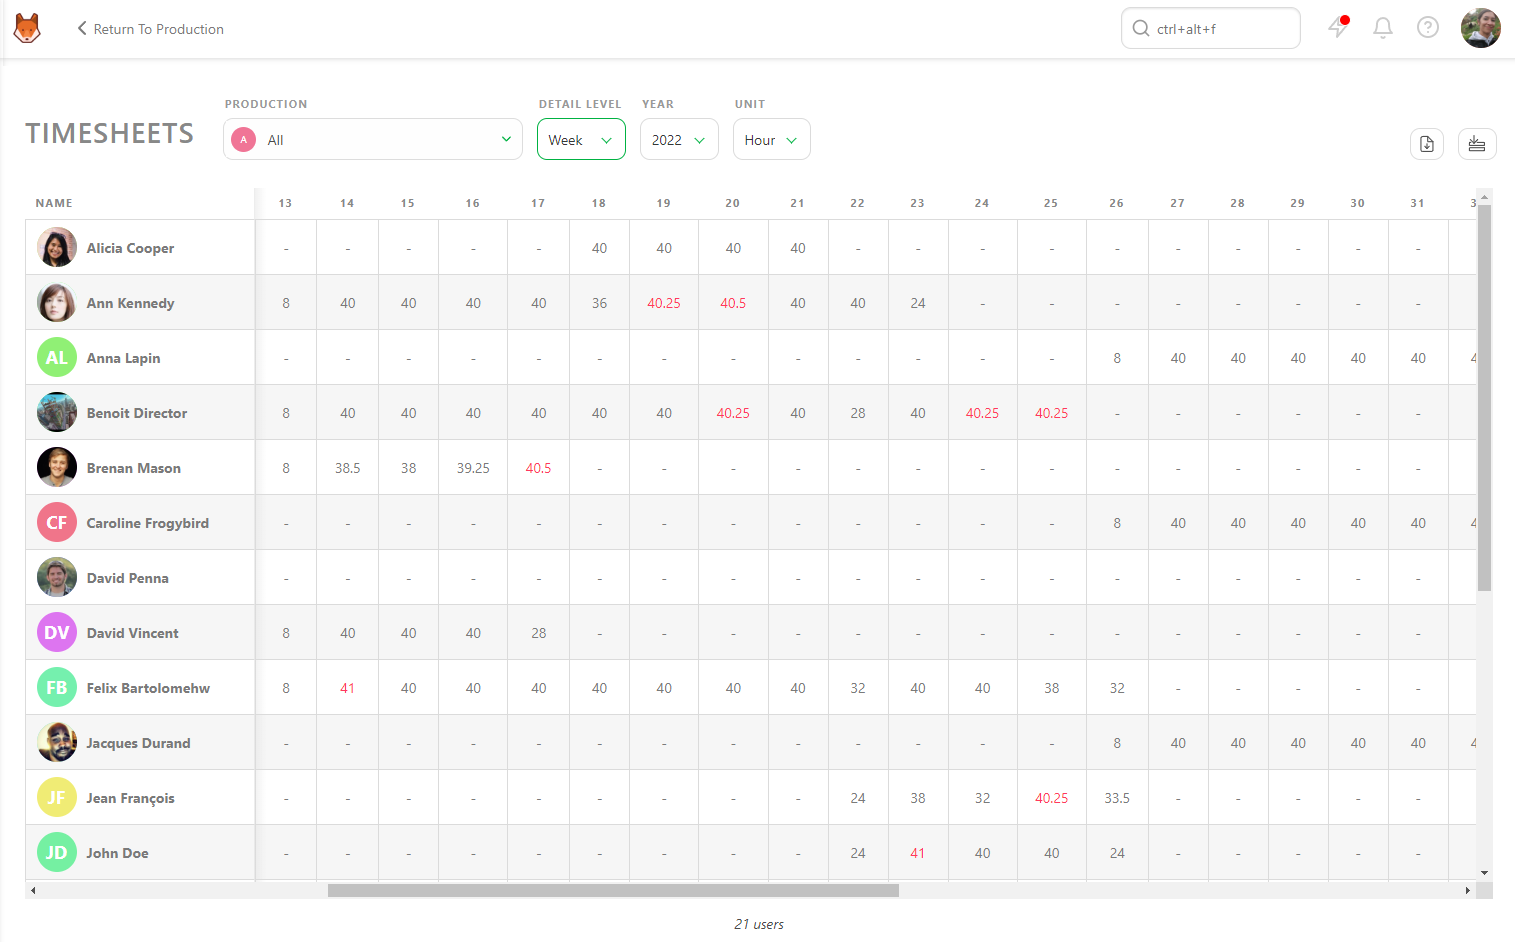
You can view all the productions you manage simultaneously or look at each production individually.
Exporting Timesheets
As with all other pages in Kitsu, you can export the timesheet data as a CSV file and open it in spreadsheet software for further analysis.
Complete Your Timesheet
If your production requires it, you can log your time spent using the Timesheets tab or the Timesheets shortcut button at the top of the screen.
How to Log Time:
- Use the slider next to each task to record hours spent.
- For quick input, use the 1, 4, or 8 hours buttons.
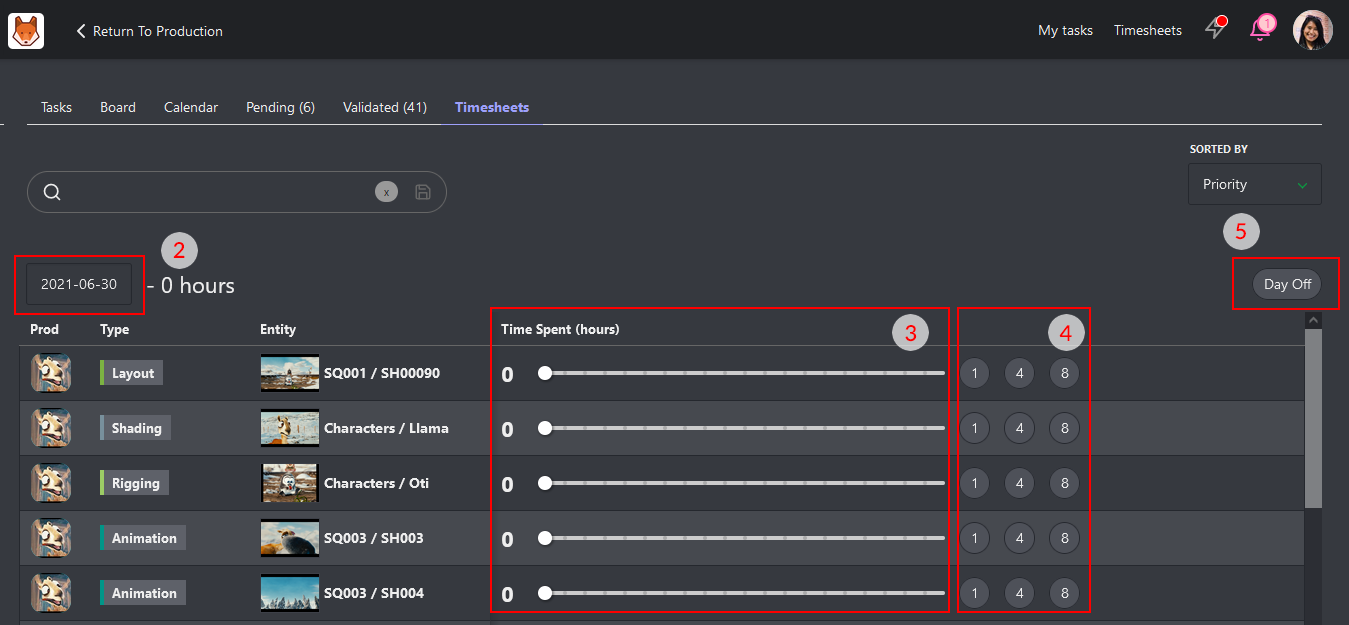
Missed a Day?
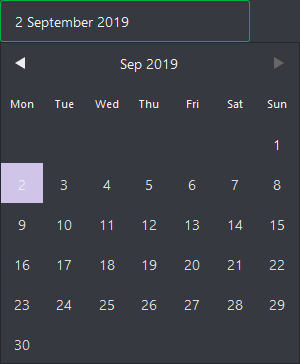
Click the date picker to backfill entries. You can also mark days as Day Off if you weren't working on that day.
Department Timesheets
As a Supervisor, you may also be responsible for monitoring your team's hours. The Timesheet page shows how many hours they work daily, weekly, and monthly.
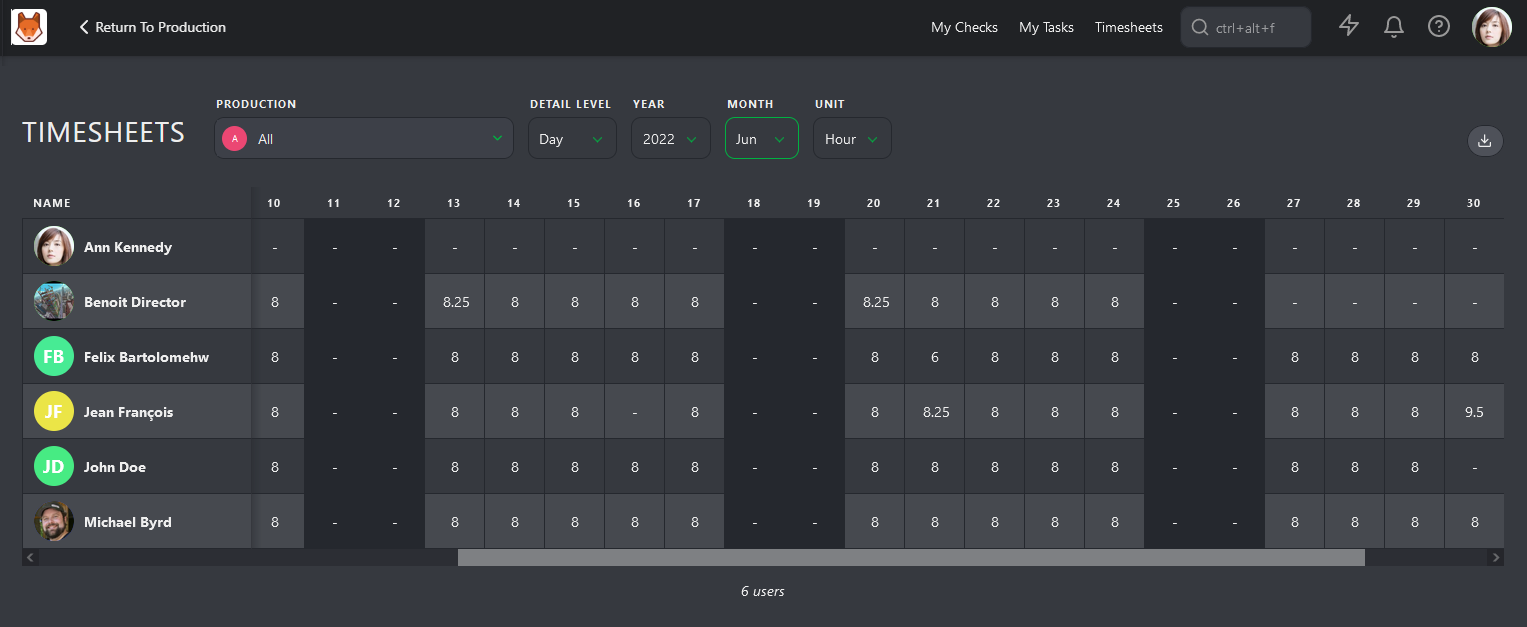
It's important to highlight abnormal patterns such as extra hours, sick days, or lack of vacation. The timesheet view can provide a high-level overview of where artists are spending their time, which can help you take care of your team to ensure they are not burning out.
7. Review Previews
Reviewing Tasks
When an artist needs someone to review their work, they can change the status of their task to  .
.
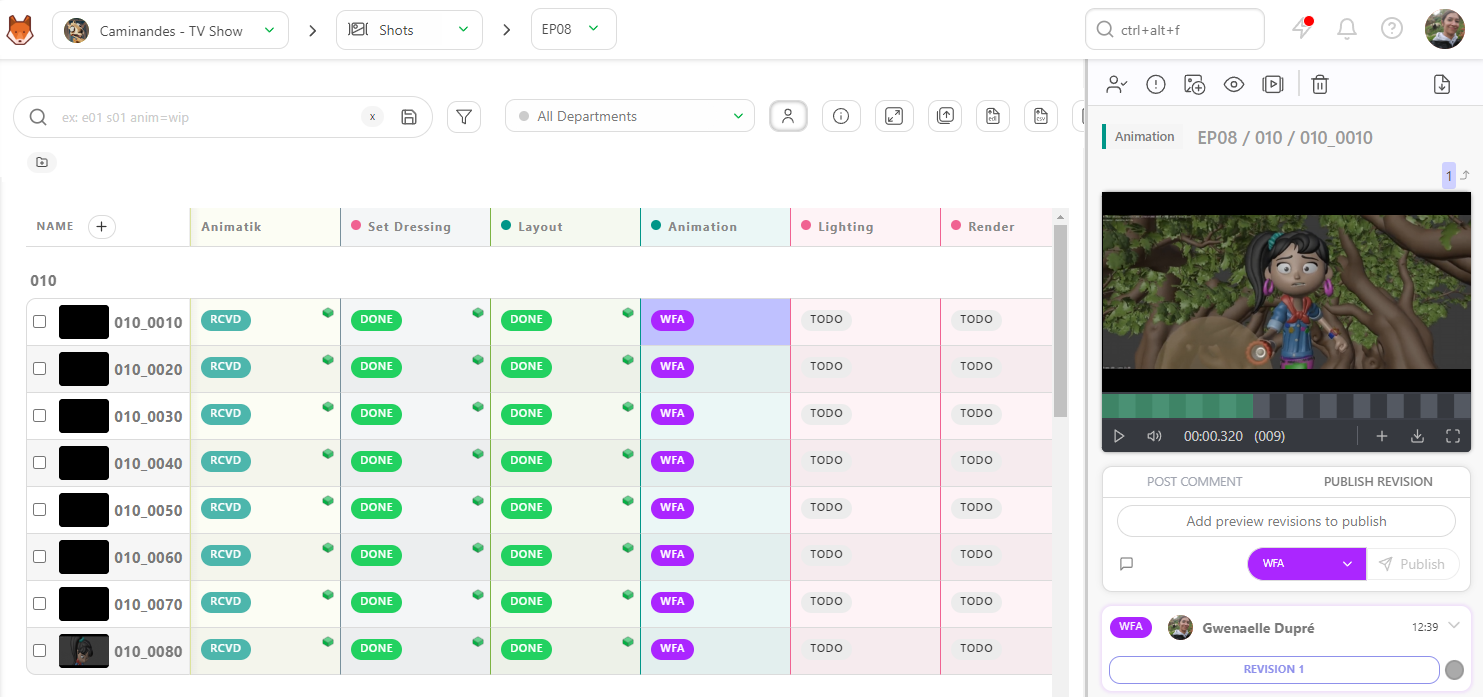
Click on the status to open the right hand panel and start the review.
You can watch the version from the right panel, enlarge it by grabbing the side of the panel, or even enter fullscreen by clicking this icon  .
.
In the same way, you can also review 3D files (.glb file) as a wireframe or add a .HDR file to check the lighting.
You can move around the 3D file by dragging and dropping your cursor and zooming in or out with the scroll wheel.
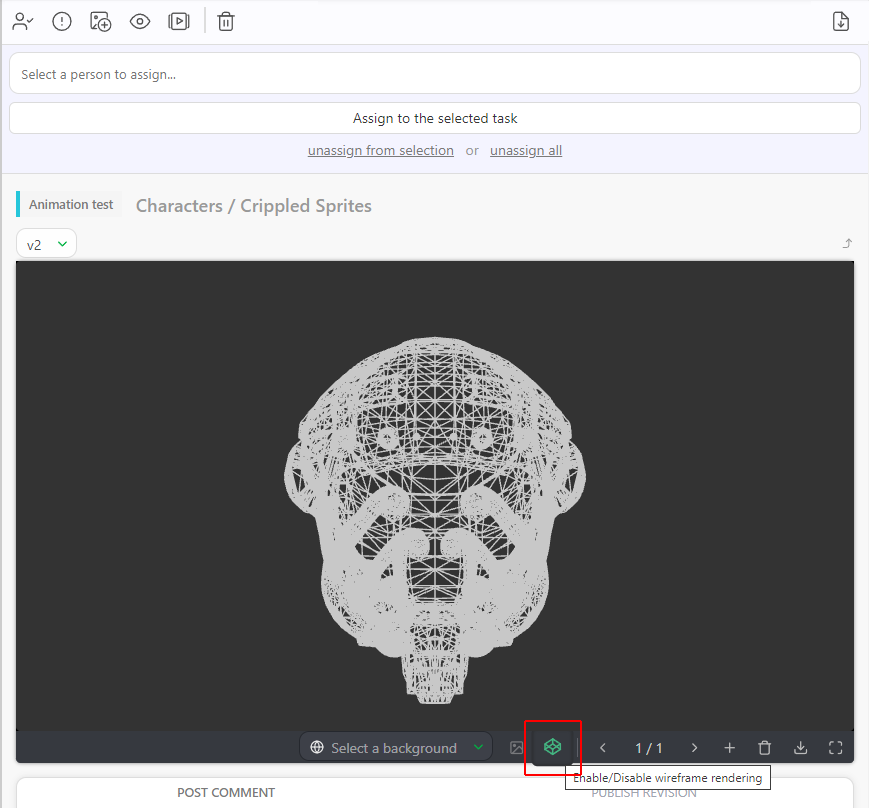
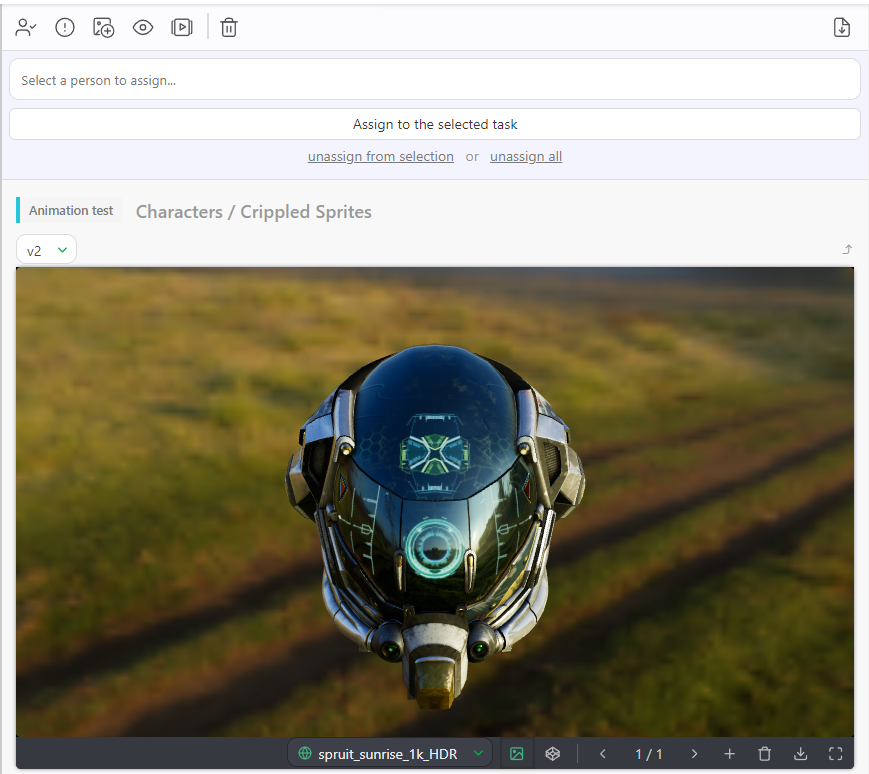
See the Customization section for more details. Pipeline Customization
You can select a color to use and then draw directly on the preview with the Pencil tool  .
.
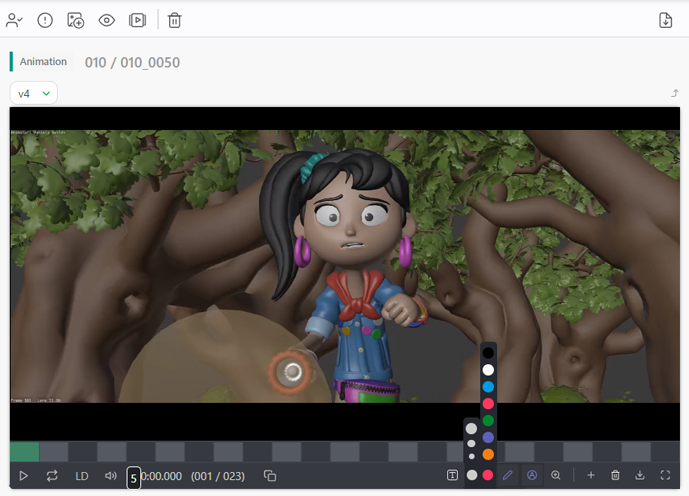
Drawing Annotations
You can also annotate the frame with text.
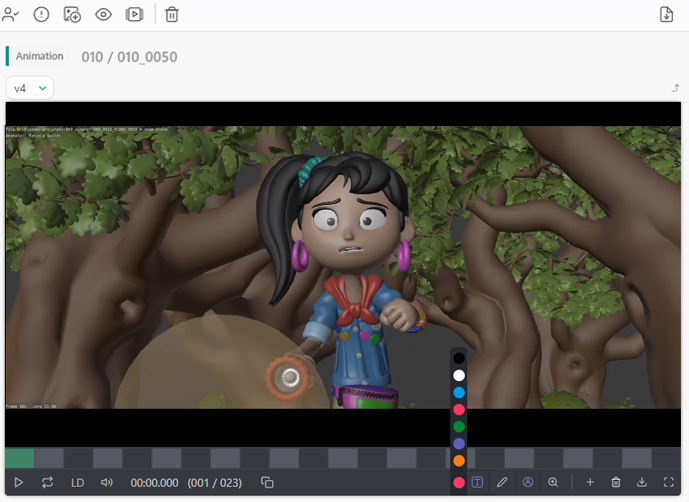
If you'd like to temporarily hide annotations, click the Fountain Pen button. 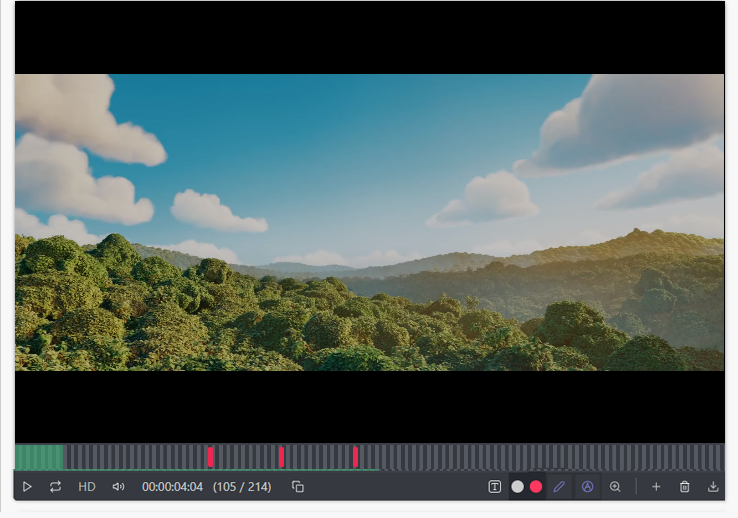
Shape Annotations
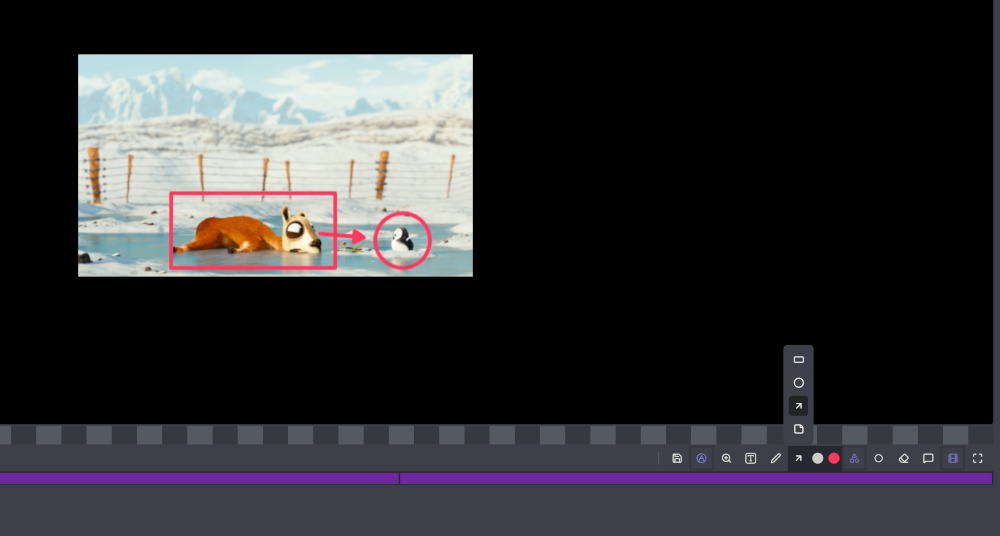
Reviewers can draw squares, circles, and arrows instead of being limited to freehand sketching alone.
Tagging Frames
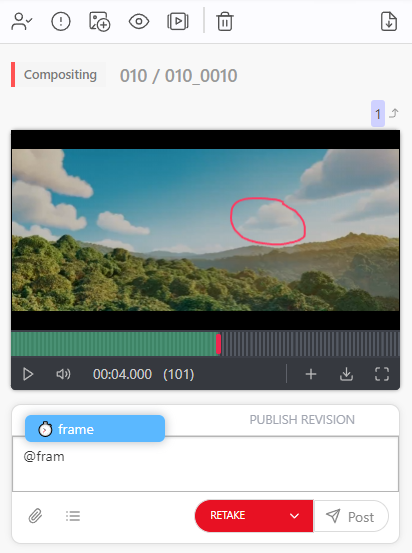
If you would like to refer back to a specific frame in your comments, you can easily tag a frame by typing @, which opens a sub-menu with the team list, and then start typing frame.
This will then add a timestamp of the current frame to this comment, and clicking on that timestamp will jump to said frame.
Exporting Annotations
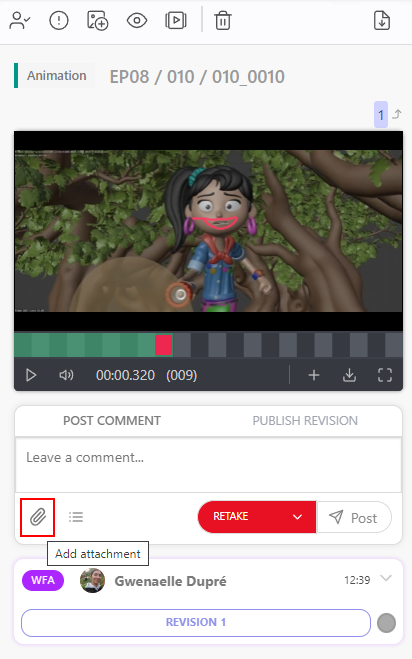
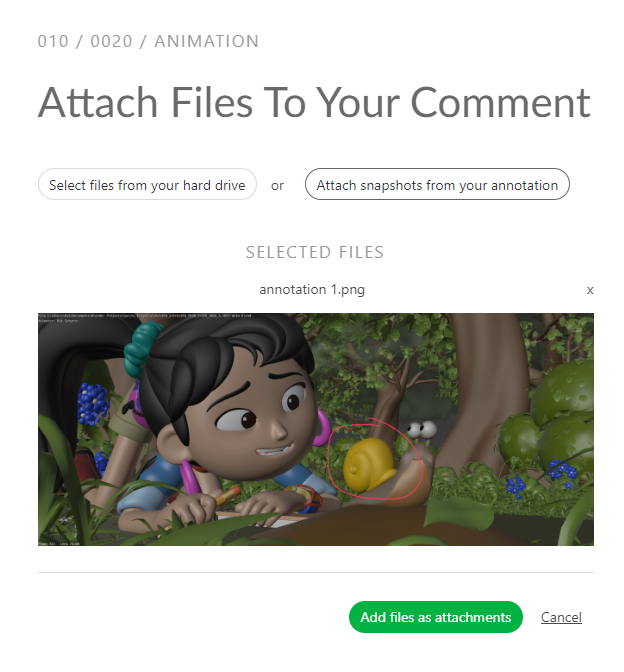
You can also export your drawings on each frame by attaching the screenshots as attachments.
Click on the Add attachment button.
You can also choose to Attach snapshots from your annotation in the attachment options. This lets you take annotated frames and add them as attachments of the comment, which can be useful if you want to highlight specific annotations in your feedback.
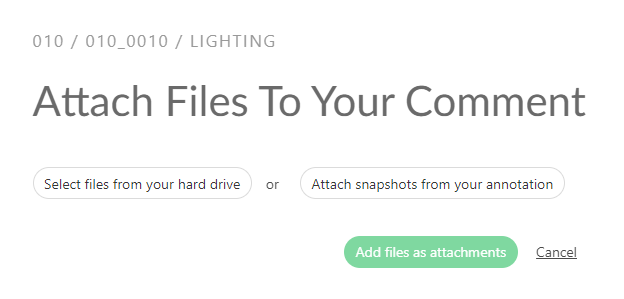
Once you click the button, Kitsu will grab all the frames with annotations and display the result. You can publish them with Confirm.
Deleting Annotations & Eraser
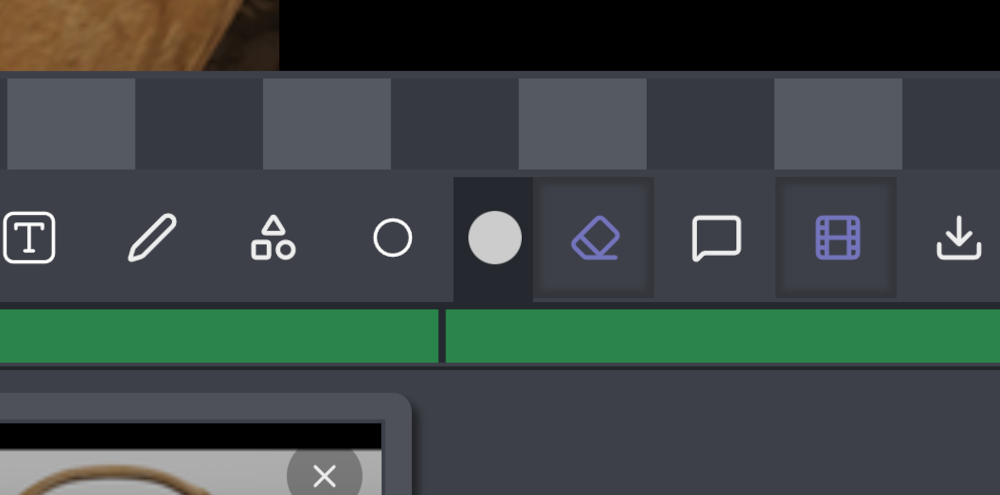
If you need to delete an annotation, click the Eraser icon:
Comparing Images
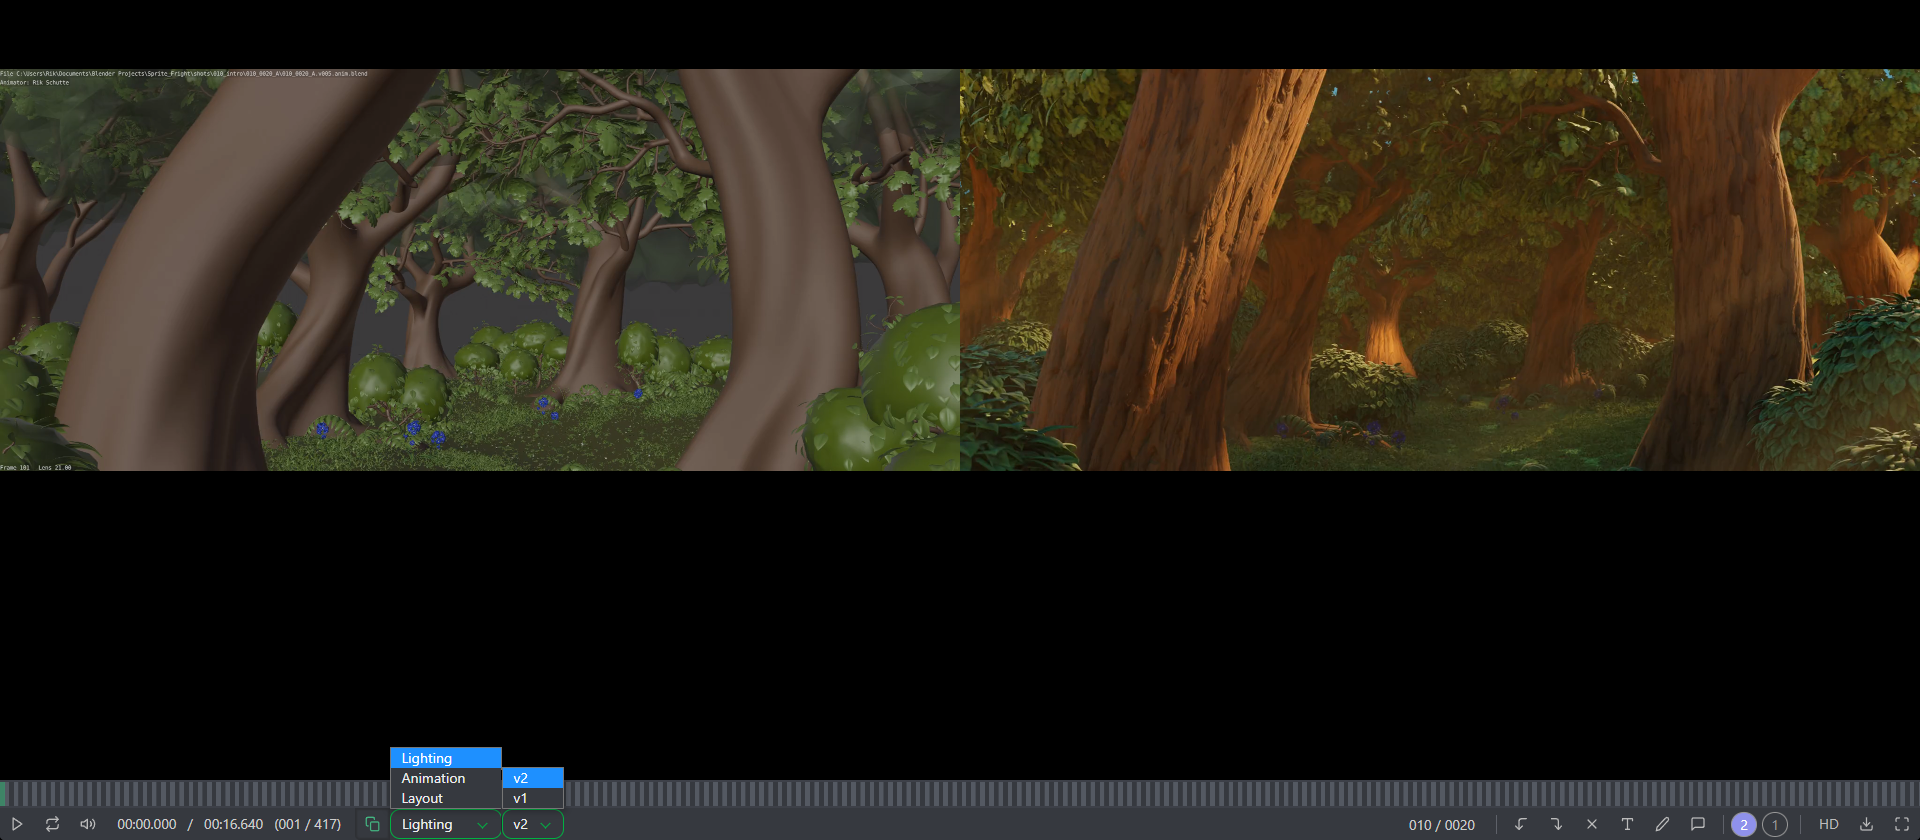
By entering Full-Screen, you can compare two task types or versions side by side by clicking on the Compare button  .
.
From here, you can change the status to  if you want the artist to make changes.
Alternatively, you can change it to  to notify the artist that their work is approved.
Onion Skinning
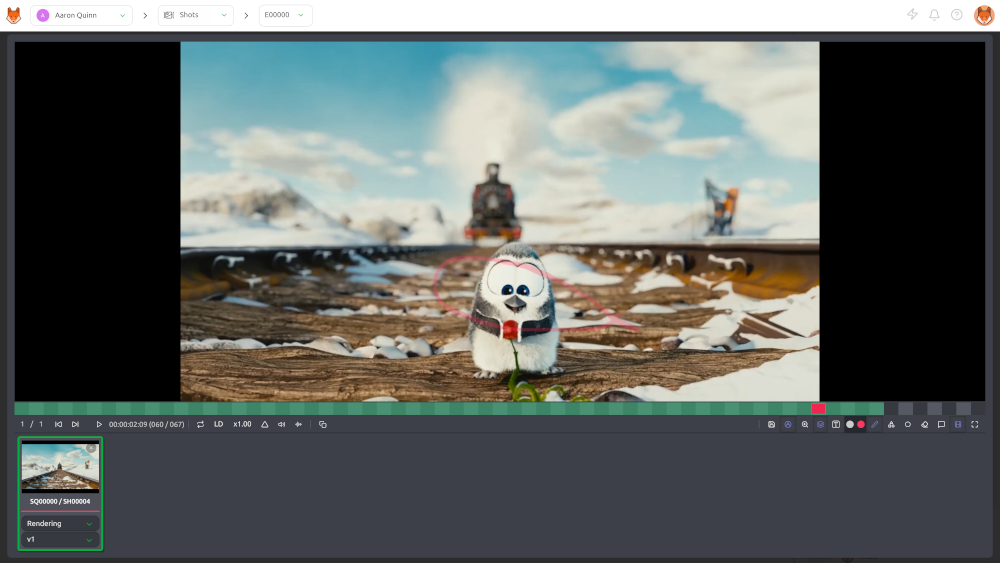
If you need to check frame-to-frame consistency while reviewing animation in Kitsu, you can use onion skinning for annotations.
Onion skinning overlays nearby annotation frames (up to 5 frames before and/or after the current frame) so you can see motion, spacing, and timing issues in one go without scrubbing back and forth.
Here is the annotated frame N:
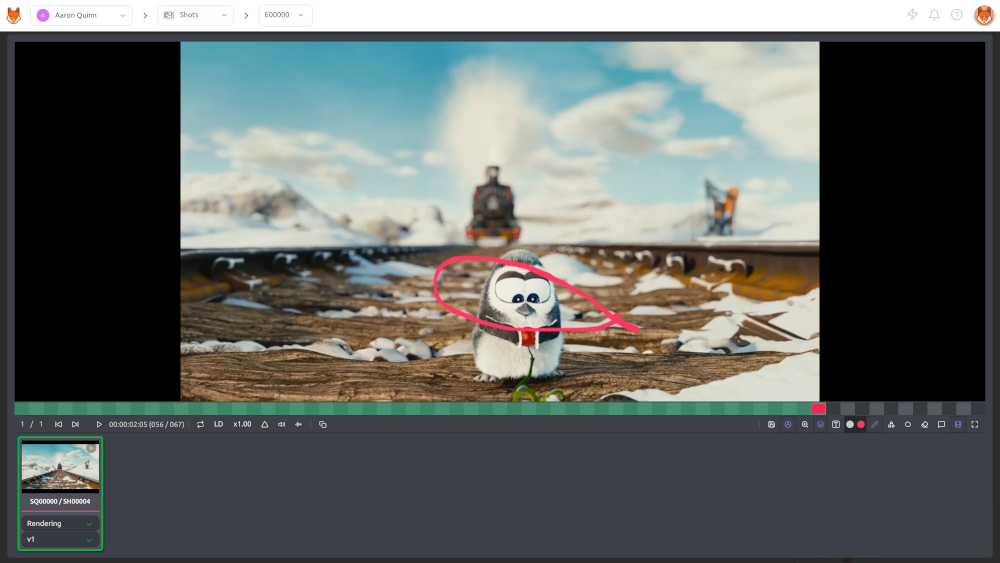
And here is how the overlay looks in frame N + 4:
Reviewing Previews
Now that everyone in your team knows what to do, you need to review their work. Typically, when an artist finishes a task, they will call you for a review. Frequent interruptions can be unproductive and make it difficult to maintain focus. To avoid this, set a specific timeframe for reviews. This approach benefits both you and your team by providing a structured schedule. Artists will know when they can expect feedback and can plan their work accordingly, while you can dedicate uninterrupted time to your own tasks.
Click the My Checks button at the top of the screen to see a list of all your department's WFA tasks.
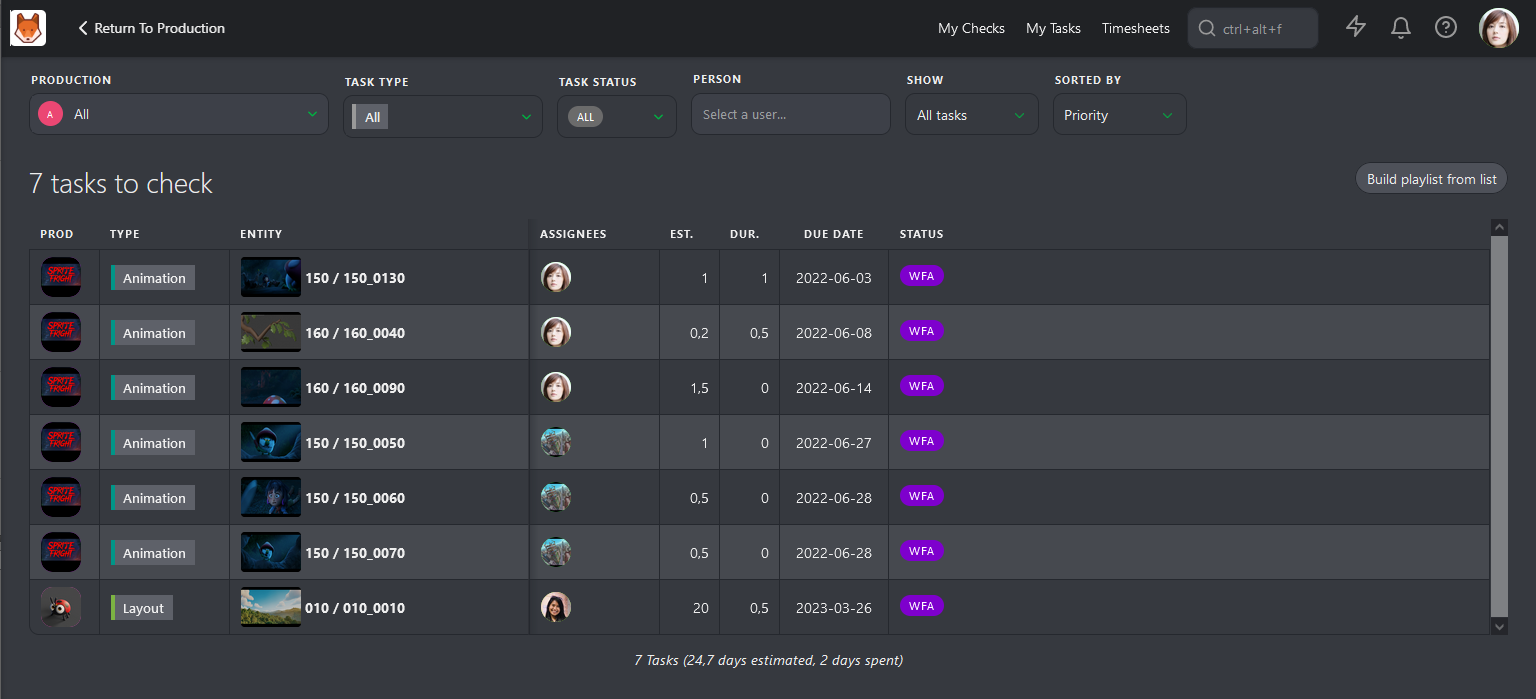
This list covers all relevant Productions, Task Types, and Task Statuses. As with other pages in Kitsu, you can click on a Status to open the Comment Panel on the right and review tasks one by one.
Alternatively, you can use the Build playlist from list button to create a playlist with all the tasks on the list. This playlist has the same options as other views, allowing you to open the comment panel, compare versions and task types, and add annotations.
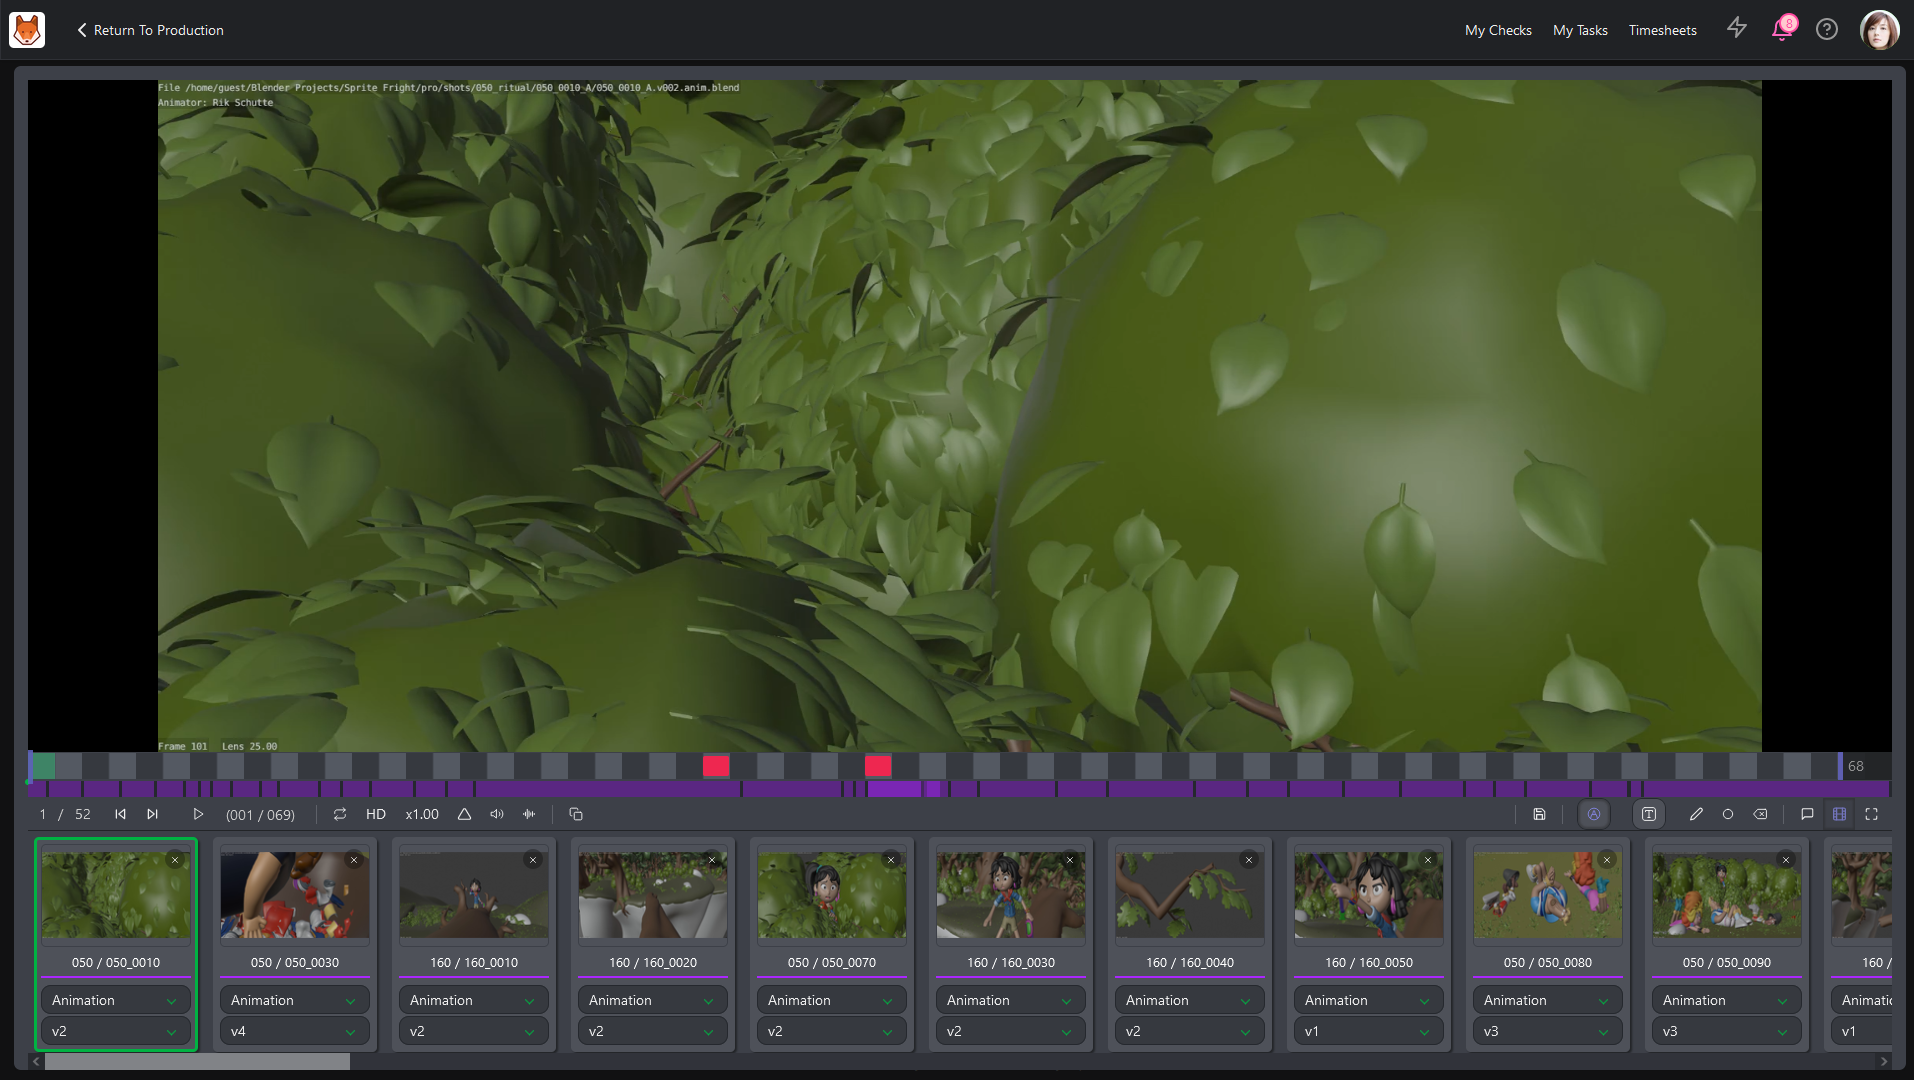
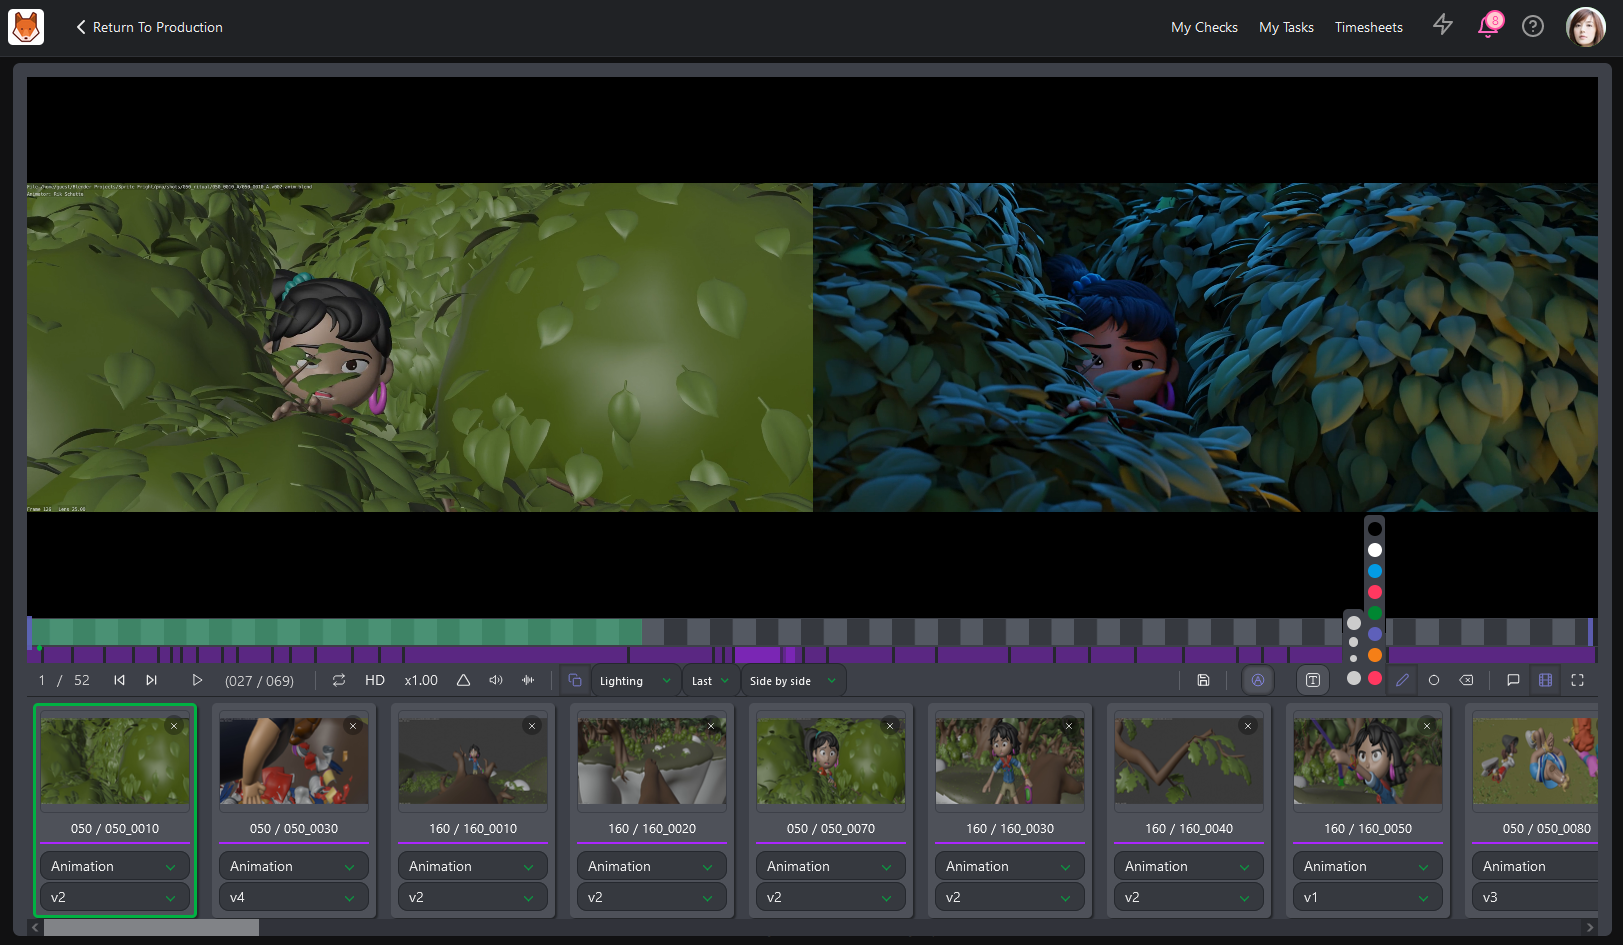
Another option is to go to the Task Type Page and change the Display as contact sheet. For example, you can filter by Due Date Status and select Due this week.
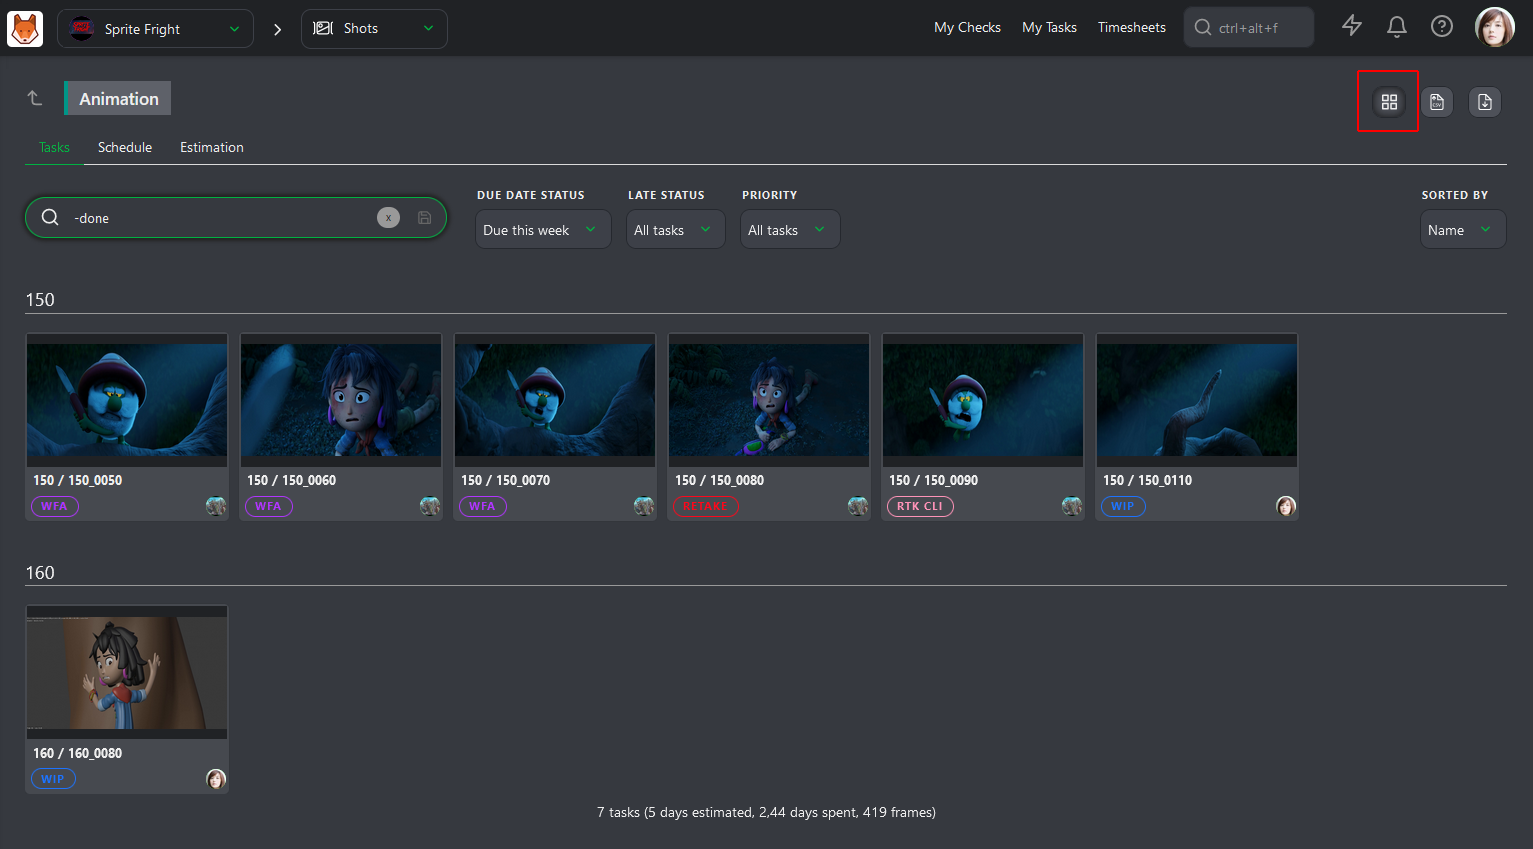
From here, you can click on the contact sheet to open the comment panel or select several tasks to create a playlist.
Reviewing Concepts
If you're a Concept Artist, you can upload and share concepts for review.
When your artists upload a concept, you can review it through the navigation menu at the top of the screen by selecting the Concepts page.
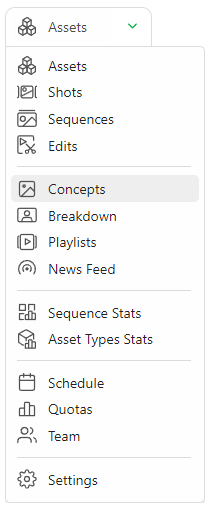
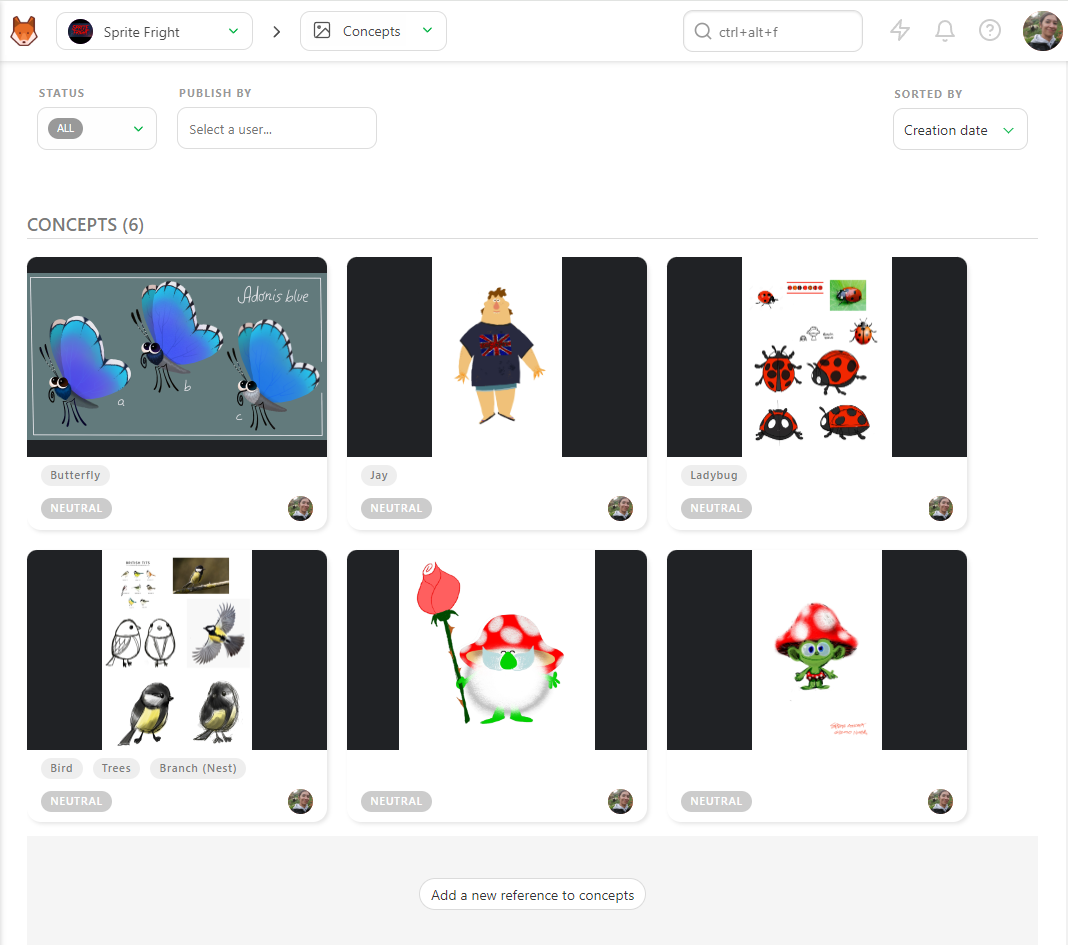
On this page, you can see all uploaded concepts along with their status, assignment, and linked assets.
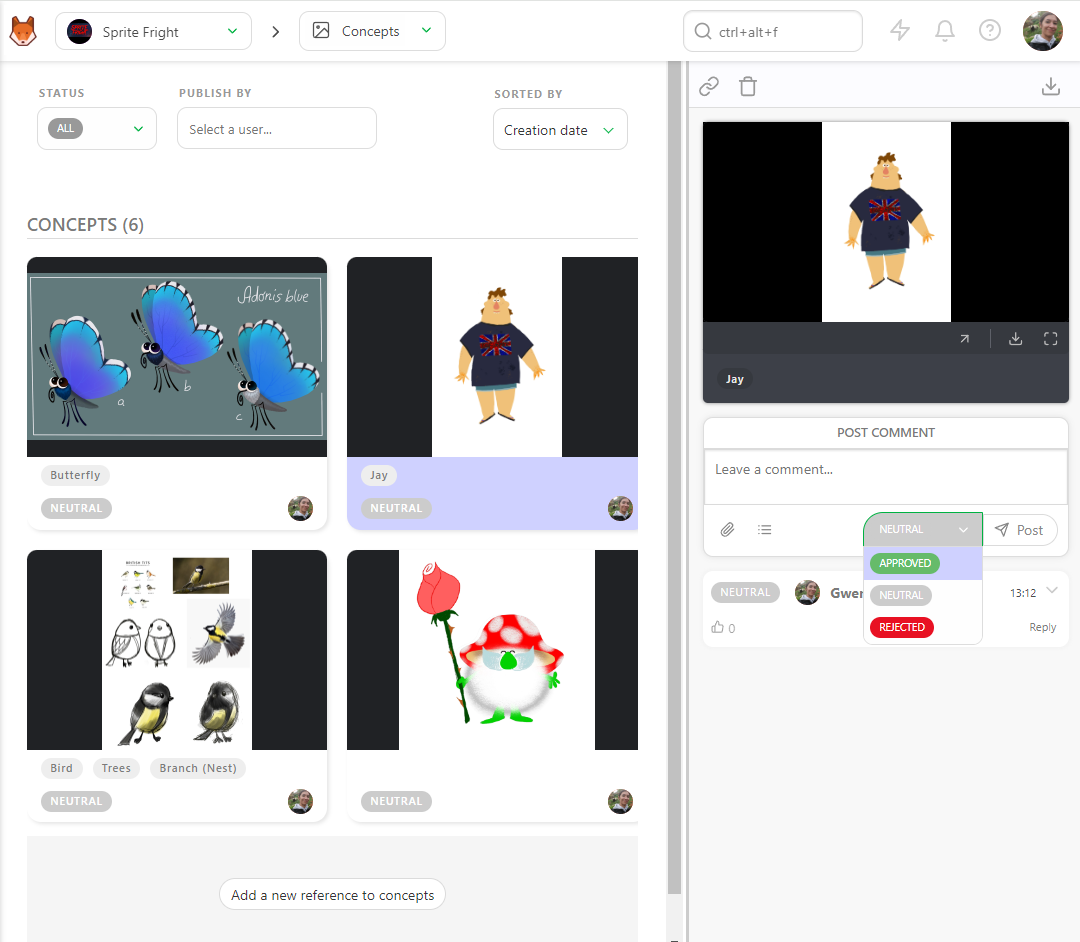
To review a concept, click on its status to open the comment panel. You can enlarge the comment panel or enter fullscreen. You can then write a comment, set the status as Approved or Rejected, and confirm your changes with the Post button.
You can narrow down the page using the Status filter to display all concepts with a Neutral status.
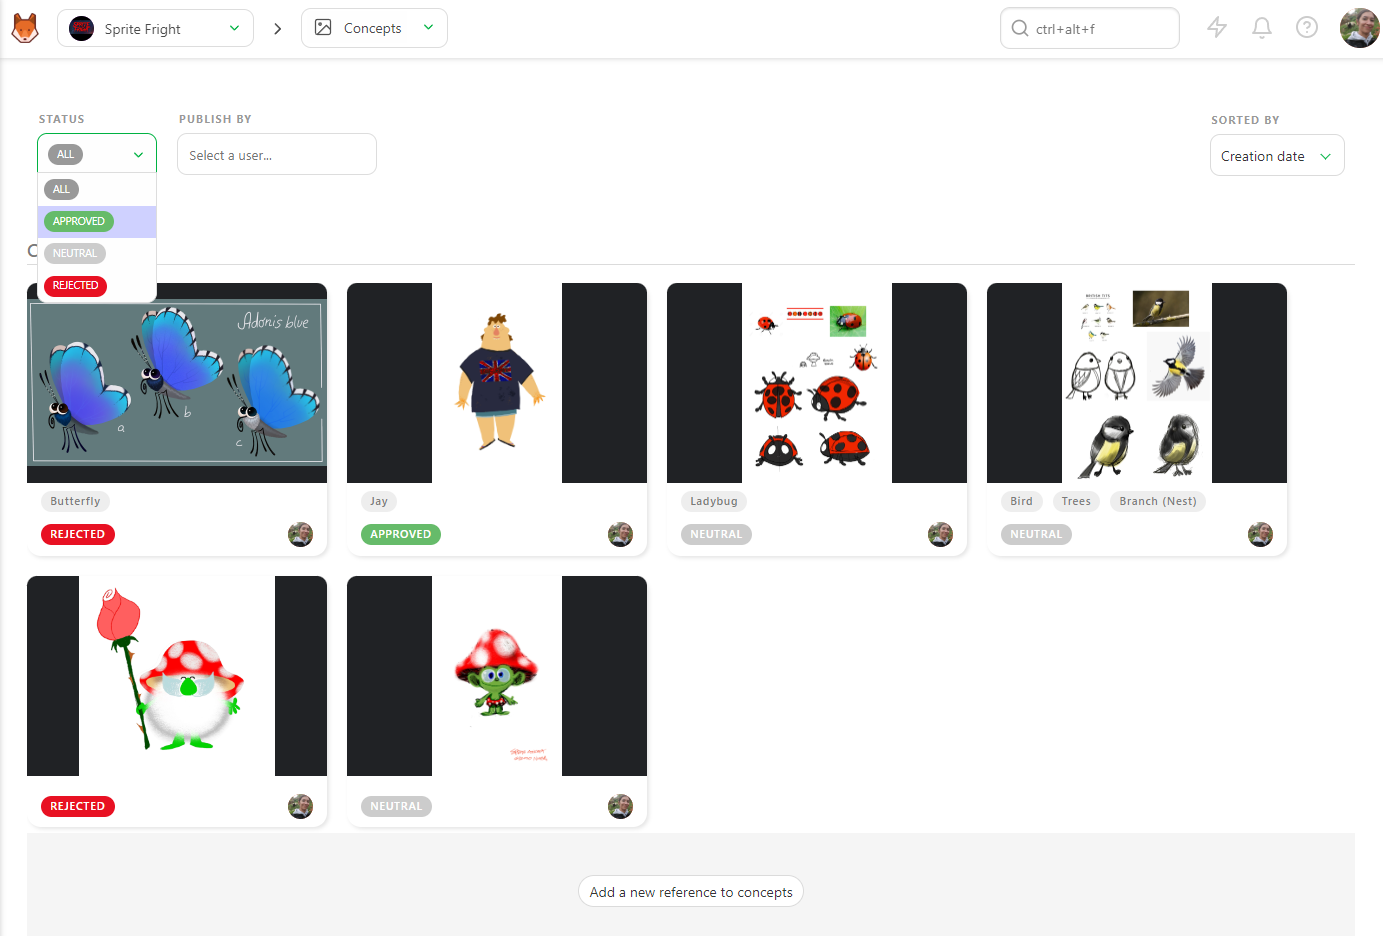
Additionally, you can filter by artist and change the sort order to better hone in on the data you need to review.
Reviewing Concepts
Once your artists upload a concept, you can review it with the supervisor or the director.
To review the concept, use the navigation menu at the top of the screen and select the concept page.
You can see all the uploaded concepts, their statuses, assignments, and linked assets.
To review a concept, click on the status to open the comment panel. You can enlarge the comment panel or go fullscreen.
Then, proceed to write a comment, select the status Approved or Rejected, and confirm with the Post button.
You can filter the page with the Status filter to display all the concepts with a Neutral status. You can also filter by artist and change the sort order.
8. Review Concepts
Publishing a Concept
To publish a Concept, navigate to the Concepts page from the project navigation menu.
To upload a concept, click the Add a new reference to concepts button. You can upload one or several concepts simultaneously.
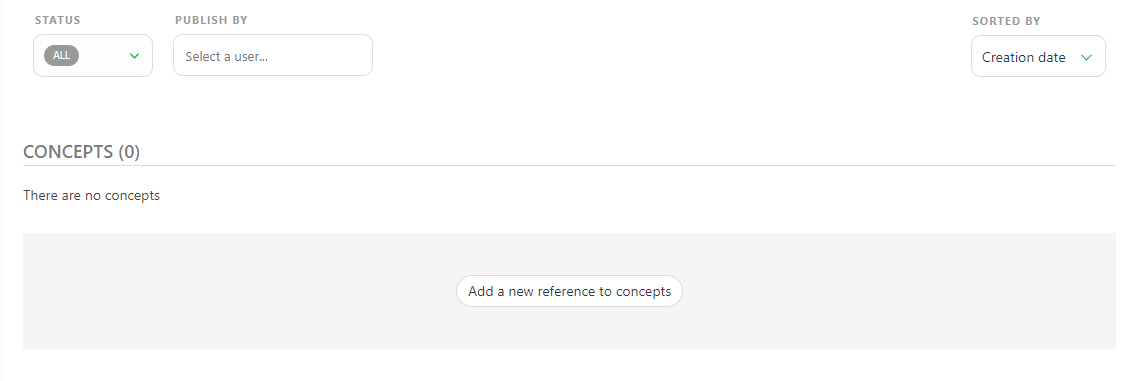
After the upload is complete, previews will be generated and visible from your concepts page.
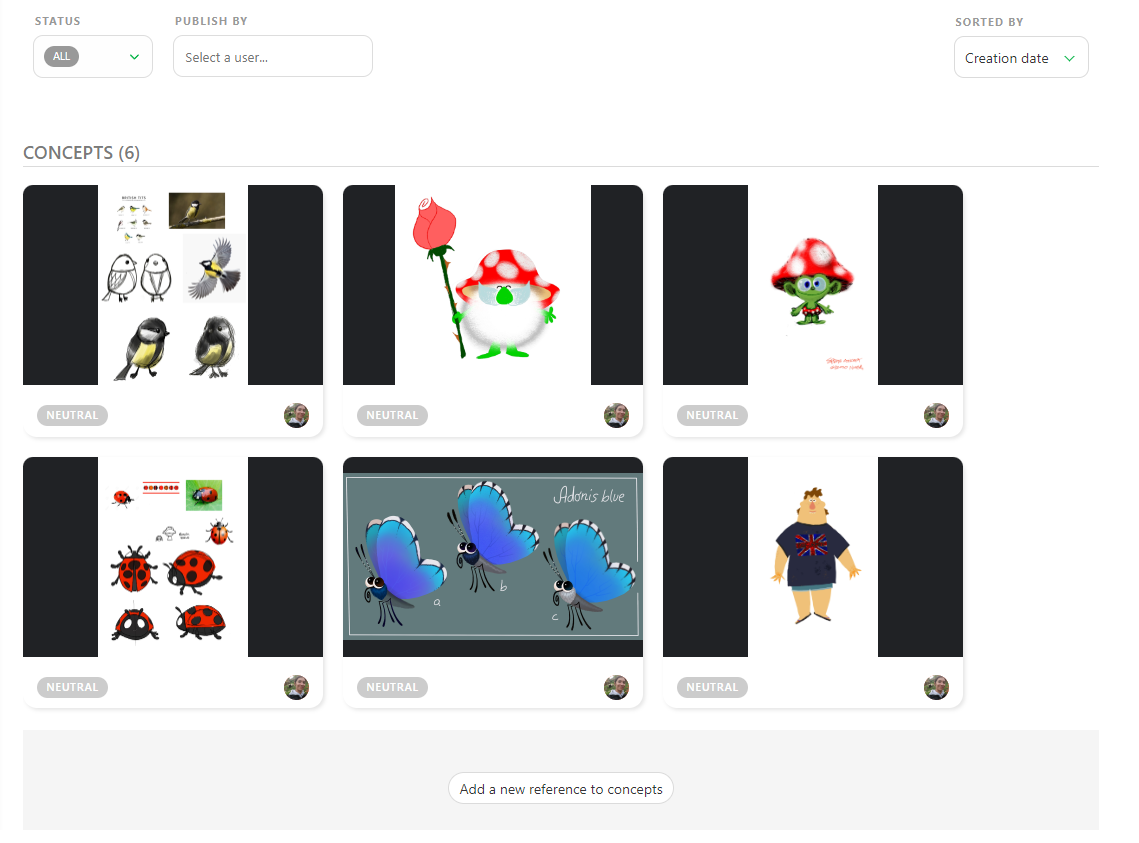
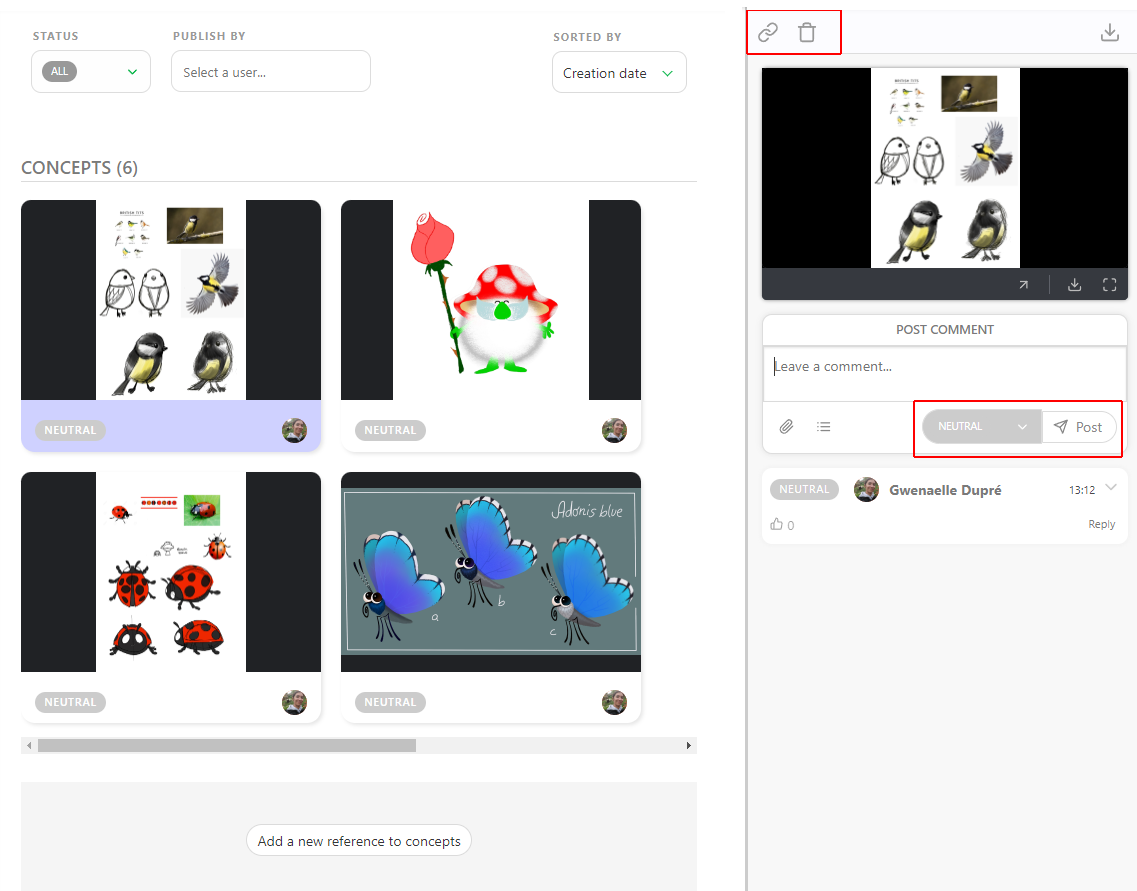
Click on the thumbnail to see an enlarged preview of your concept, or click on the status to open the Comment Panel on the right.
With the comment panel open, you have two options:
- You can link a concept with an existing asset / delete and existing link.
- You can comment and change the status of the concept.
It is good practice to only have one version per Concept. If the concept is not approved and requires additional changes, then it's better to version-up that concept.
Publish a Preview as a Version
To publish a preview, picture, or video, access the task's comment panel and select the PUBLISH REVISION tab.
Kitsu automatically switches to the Publish Revision tab when using a status with the IS FEEDBACK REQUEST option, such as the WFA Status.
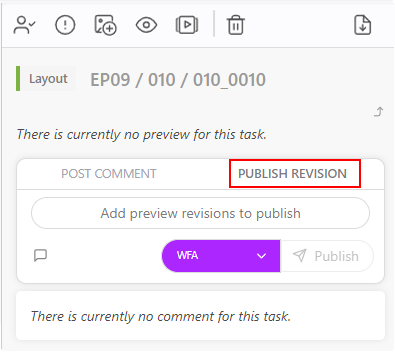
You can add one or several previews to any comments. These can be a picture (.png, .jpg, .jpeg, .gif), a video (.mp4, .mov, .wmv), or a .glb file. Additionally, you can review all the previews from the browser or mix everything.
You can also review a .glb file as a wireframe or add a .HDR file to check the lighting. See the Customization section for more details.
Other files like .pdf, .zip, .rar, .ma, or .mb cannot be viewed in the browser and need to be downloaded to be reviewed.
Then, click on the Add preview revision to publish button. The explorer opens, allowing you to choose your file or several files.
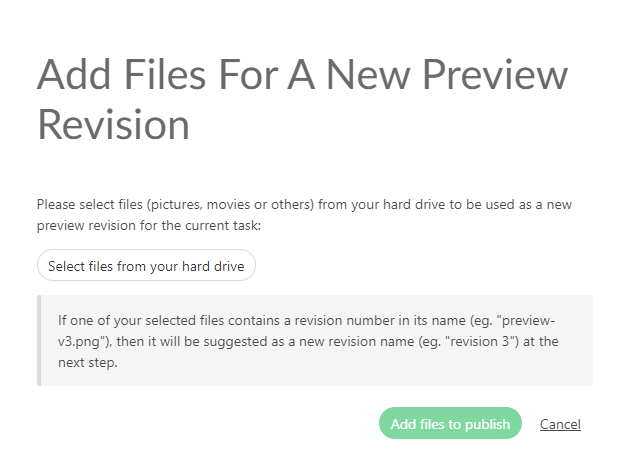
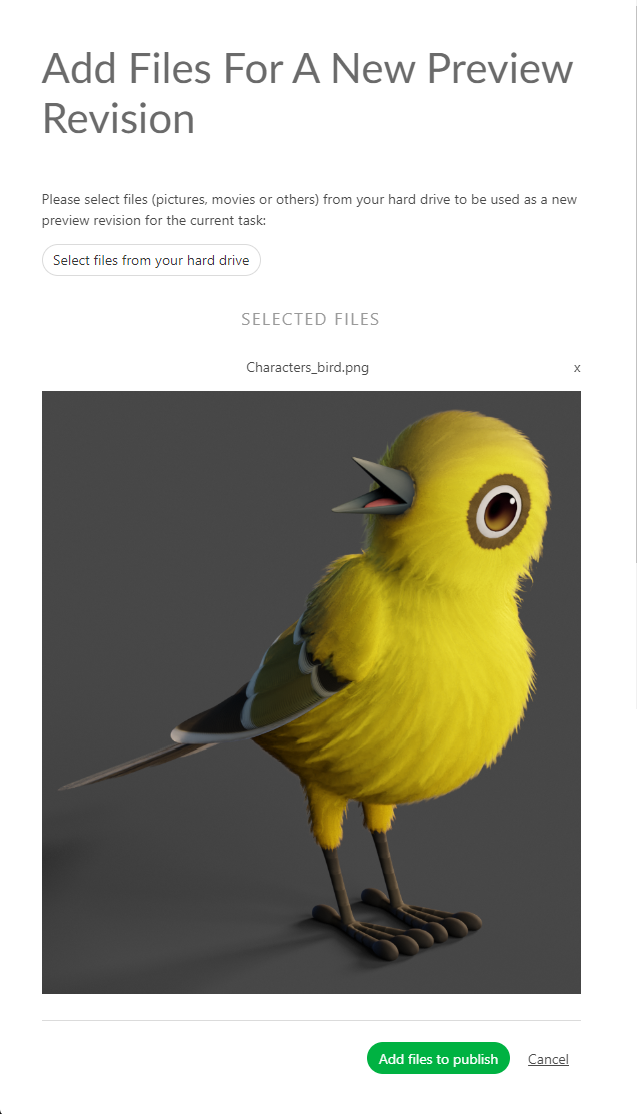
You can also copy-paste a screenshot from your clipboard into this upload dialogue, without needing to download it first. Once your file is selected, you will see its name near the Add files to publish button.
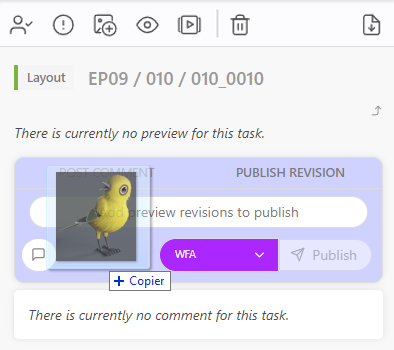
You can also drag & drop files that you wish to upload into the comment section to automatically start the upload process.
On top of your preview, you can add a Comment. Click the Leave a Comment button to unfold the comment section.
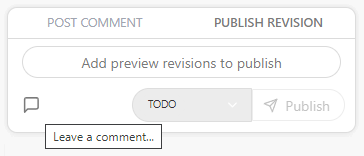
You can then select your status and publish your preview with the Post Button.
For more information on using publishes as thumbnails, see this section here on thumbnails.
Combining Previews Into a Version
You can add multiple images simultaneously, or once you have uploaded an image, you can add another one.
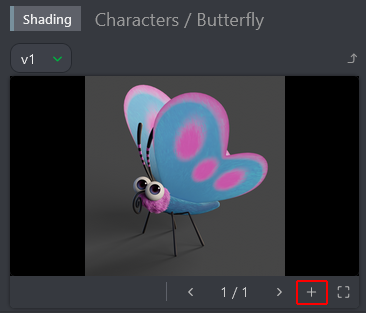
The Add preview pop-up asks you to choose a file. You can navigate through the pictures uploaded.
You can change the preview order by clicking the number and then dragging and dropping them.
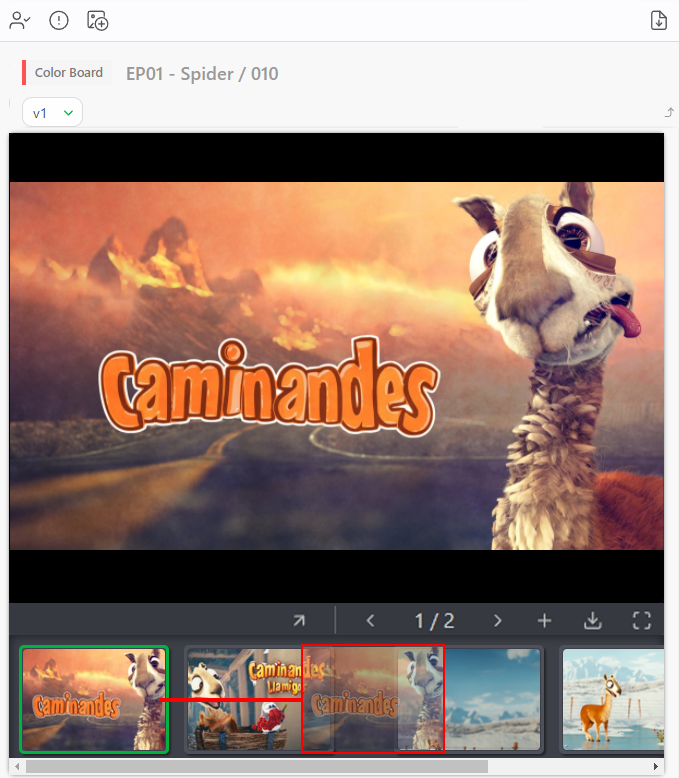
To delete an additional preview, enlarge the comment panel, click on the number of versions, and then click on the  .
.