
Getting Started As A Client
This guide will help you get started and understand the Kitsu's key features as a client.
1. Initial Profile Setup & Customization
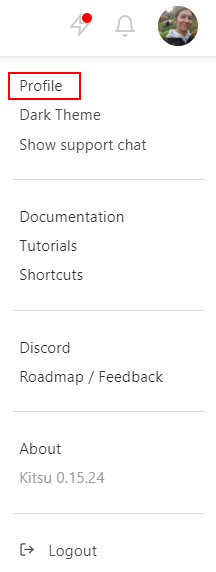
On your first connection, we encourage you to fill in your contact information into your profile. Click on your name on the top right of the screen (1), then on Profile (2).
NB: A link to this Documentation is available (4), and you can switch to the Dark Theme in this menu, too (3). You can also jump on our Slack (5) or look at our roadmap (6).
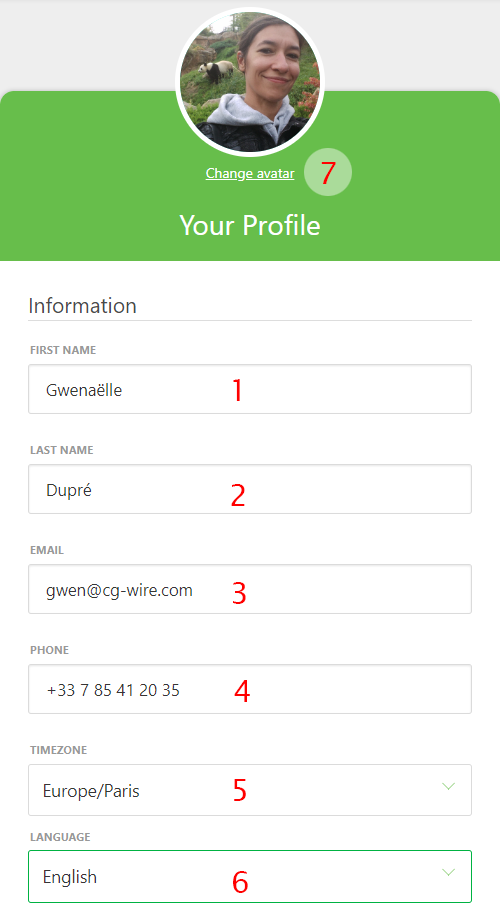
On this new page, you can check your name (1) (2), your email (3), fill in your phone number (4), change the timezone (5), the language of the website (6), and post a pic of yourself as your avatar (7). It helps to recognize who is doing what!
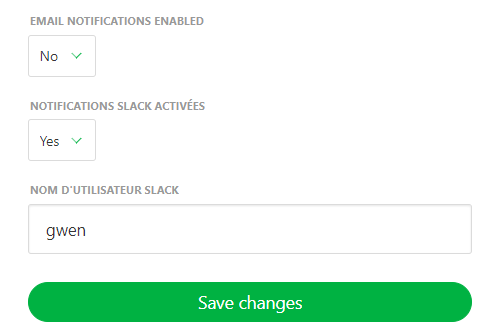
You can also define what kind of notification you want: email or Slack.
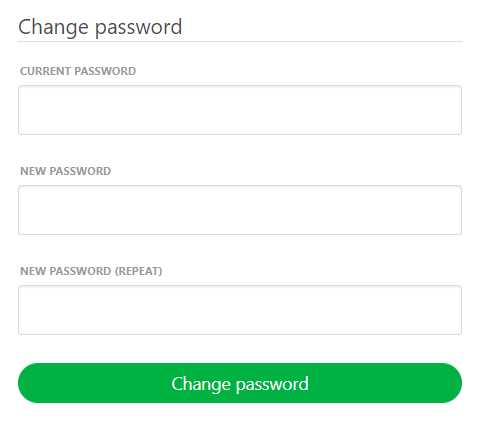
If you keep scrolling, you can also change your password if you want. We encourage you to change the default password with one of your own.
Initial Setup and Profile Customization
Start by setting up your profile to update your personal details and customize Kitsu’s interface. This will help your team recognize you and allow you to tailor notifications and settings to fit your workflow.
Access Your Profile: Click your avatar at the top right of the screen, then select Profile.
Customize Your Experience:
- Update your name, email, phone number, timezone, and website language.
- Upload an avatar photo to help others recognize you.
- Choose notification preferences (email or Slack).
- Customize the Theme color and toggle the Support Chat visibility.
Pro Tip
This section also provides quick links to Documentation, Tutorials, our Discord community, YouTube channel, and our public Roadmap, ensuring you have access to helpful resources at any time.
For security purposes, it’s highly recommended to replace the default password with a strong and unique one.
2. See your Playlists
A playlist is a list of curated versions / previews compiled for review and approval.
Accessing your Playlists
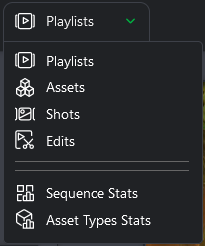
Production team members can find the Playlists page in the drop-down menu.
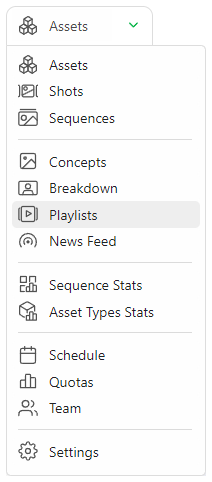
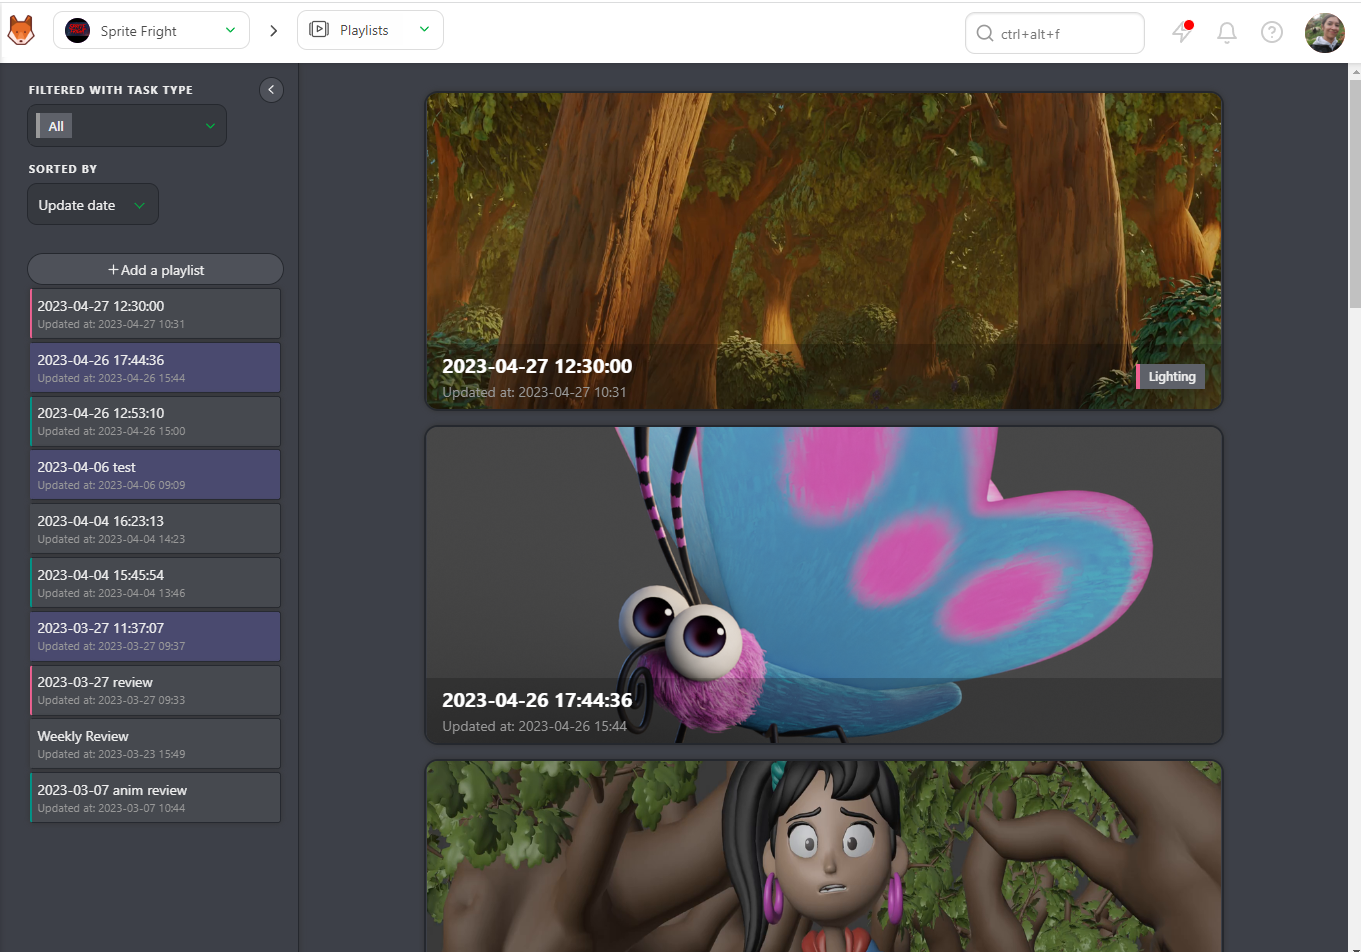
The Playlist page is separated into two parts:
- (1) A list of your playlists where you can create a new one or load an existing one.
- (2) The last created playlists and the last modified playlists.
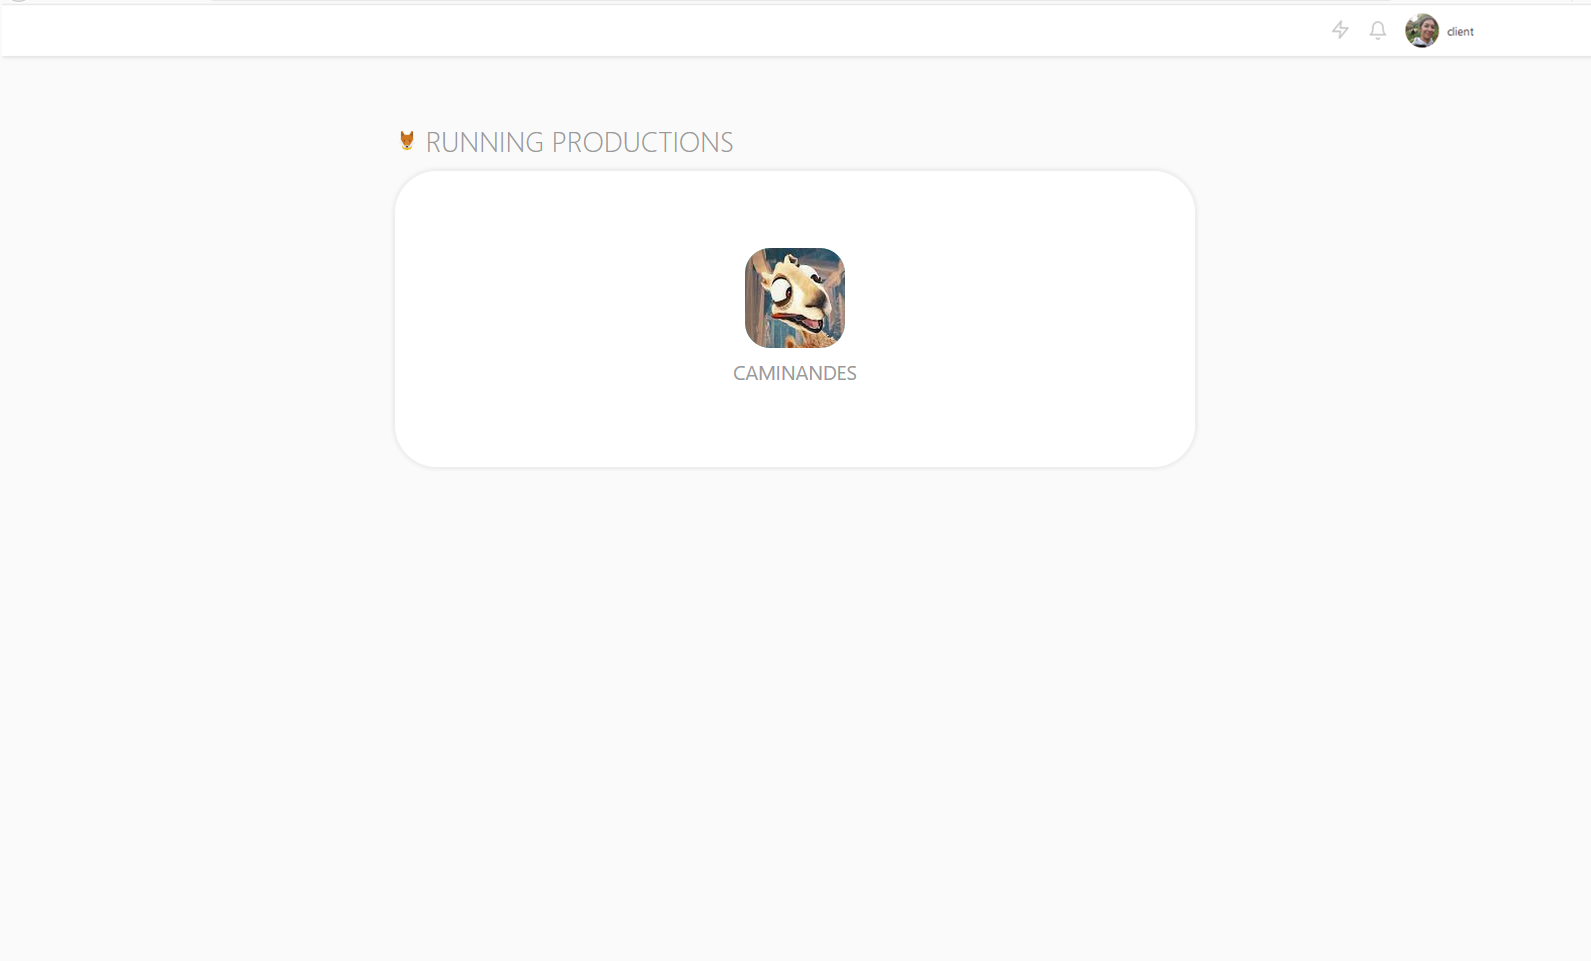
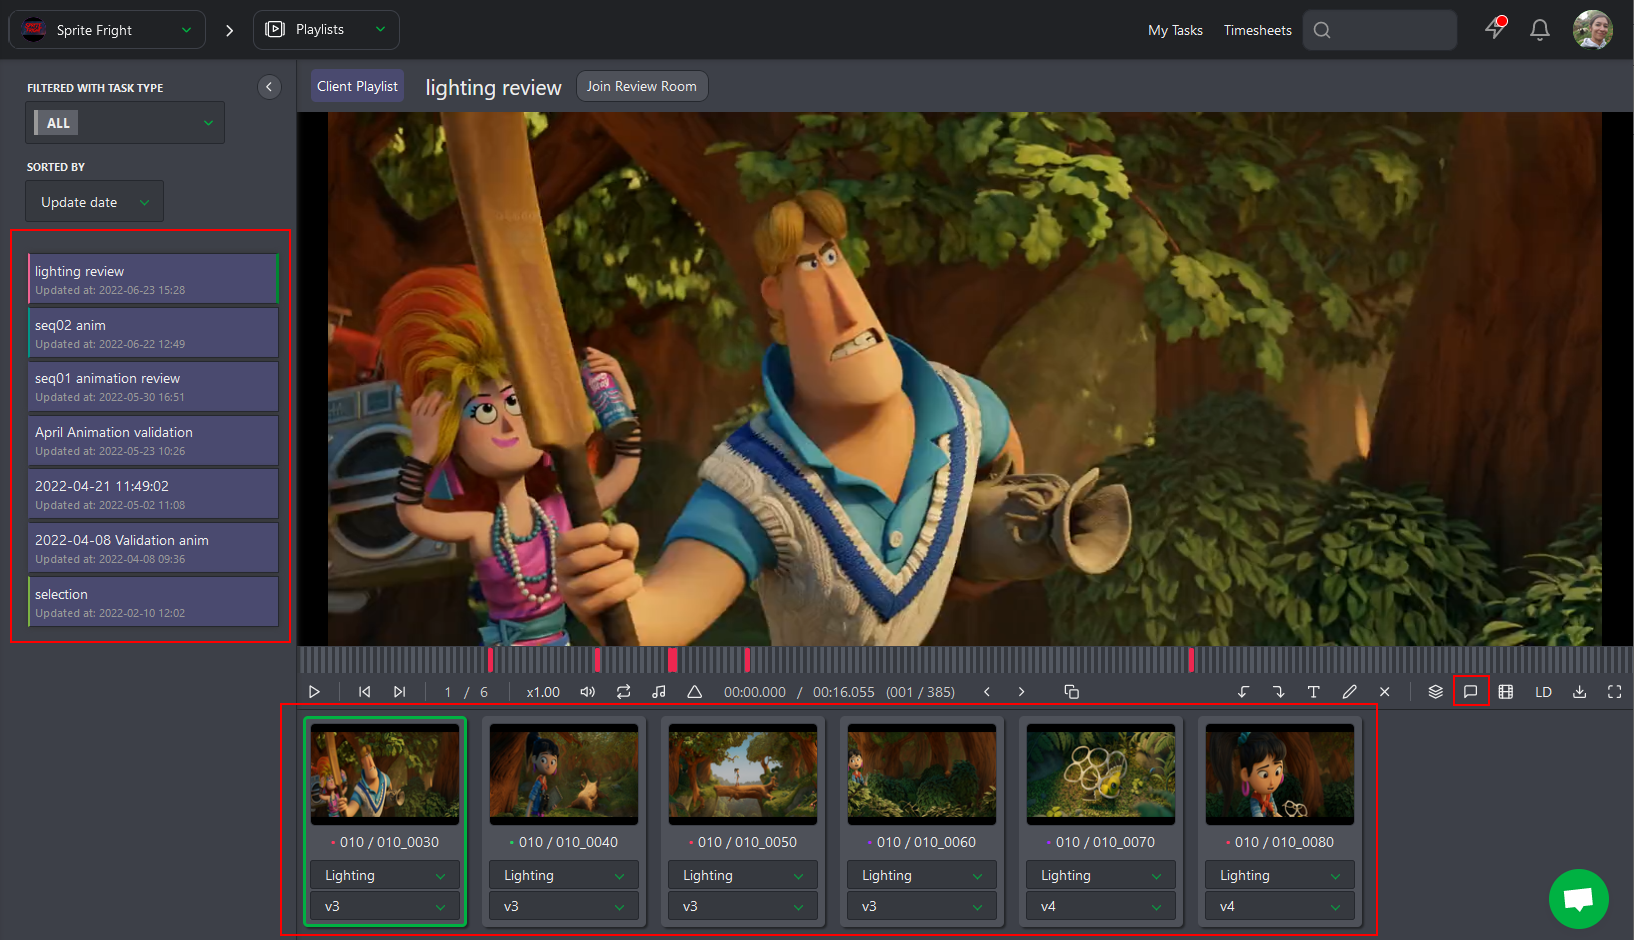
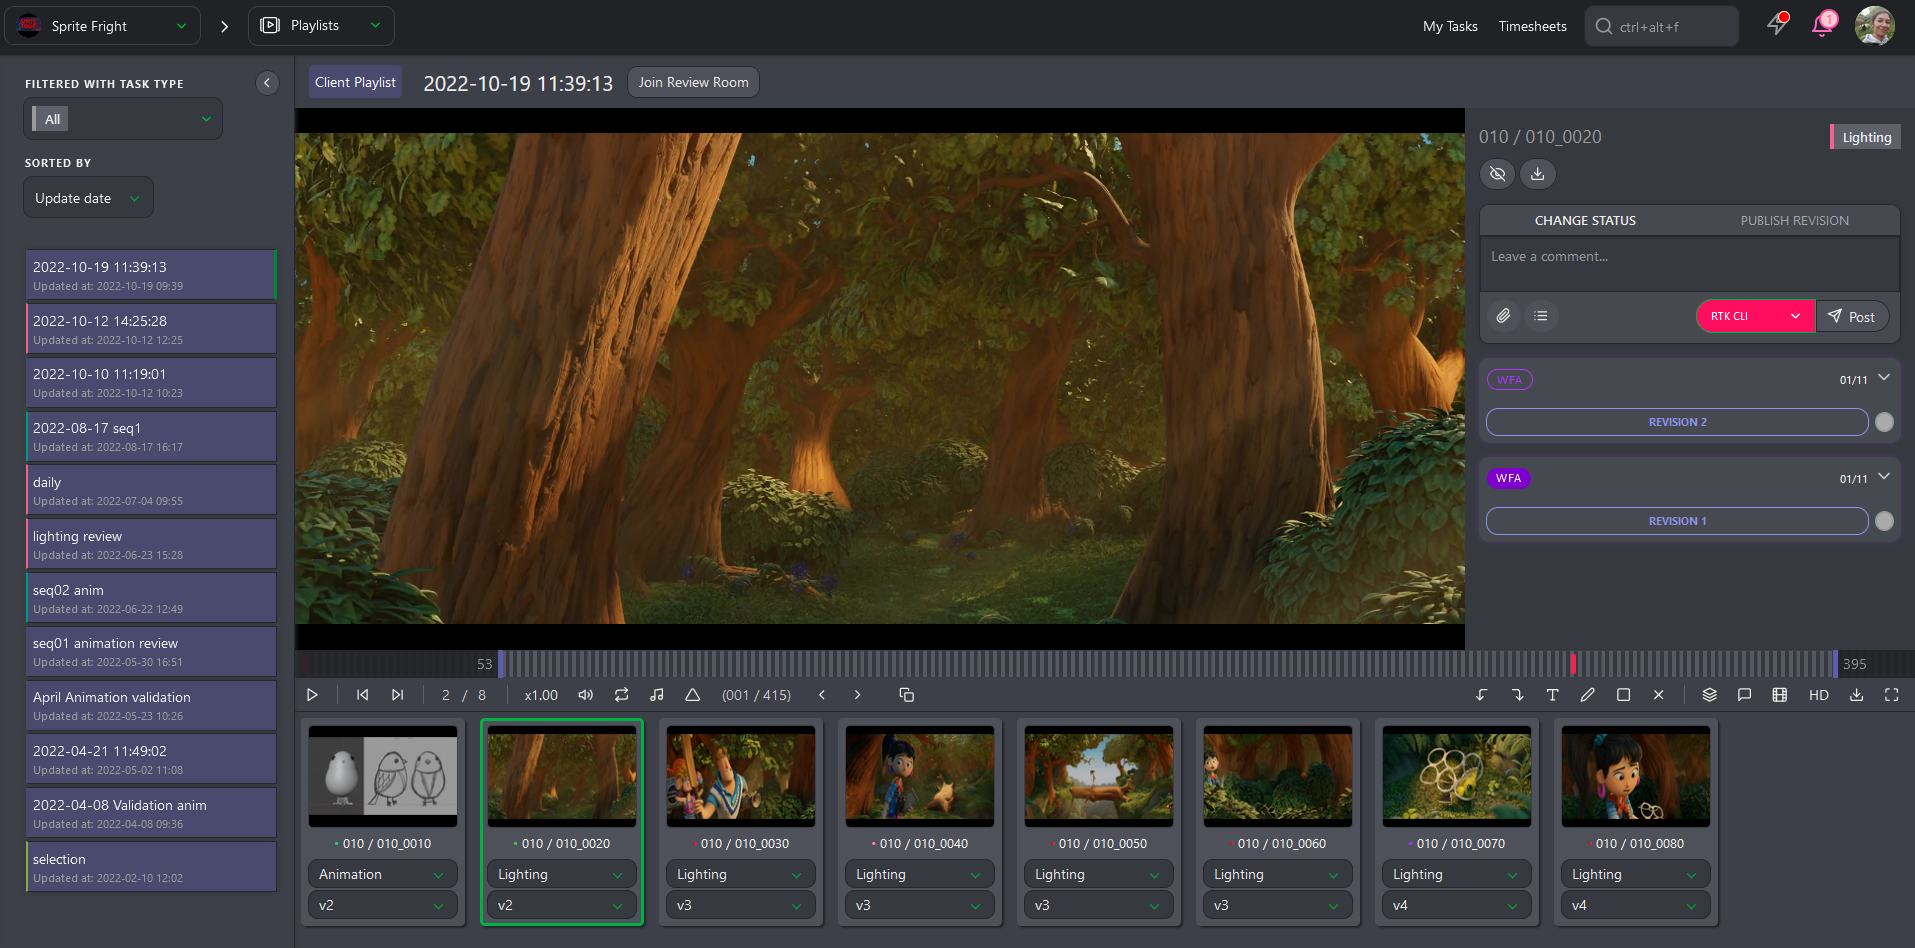
Clients access playlists differently: click on the production avatar to reach the Playlist page, which gathers all the assets and shots they have to comment on.
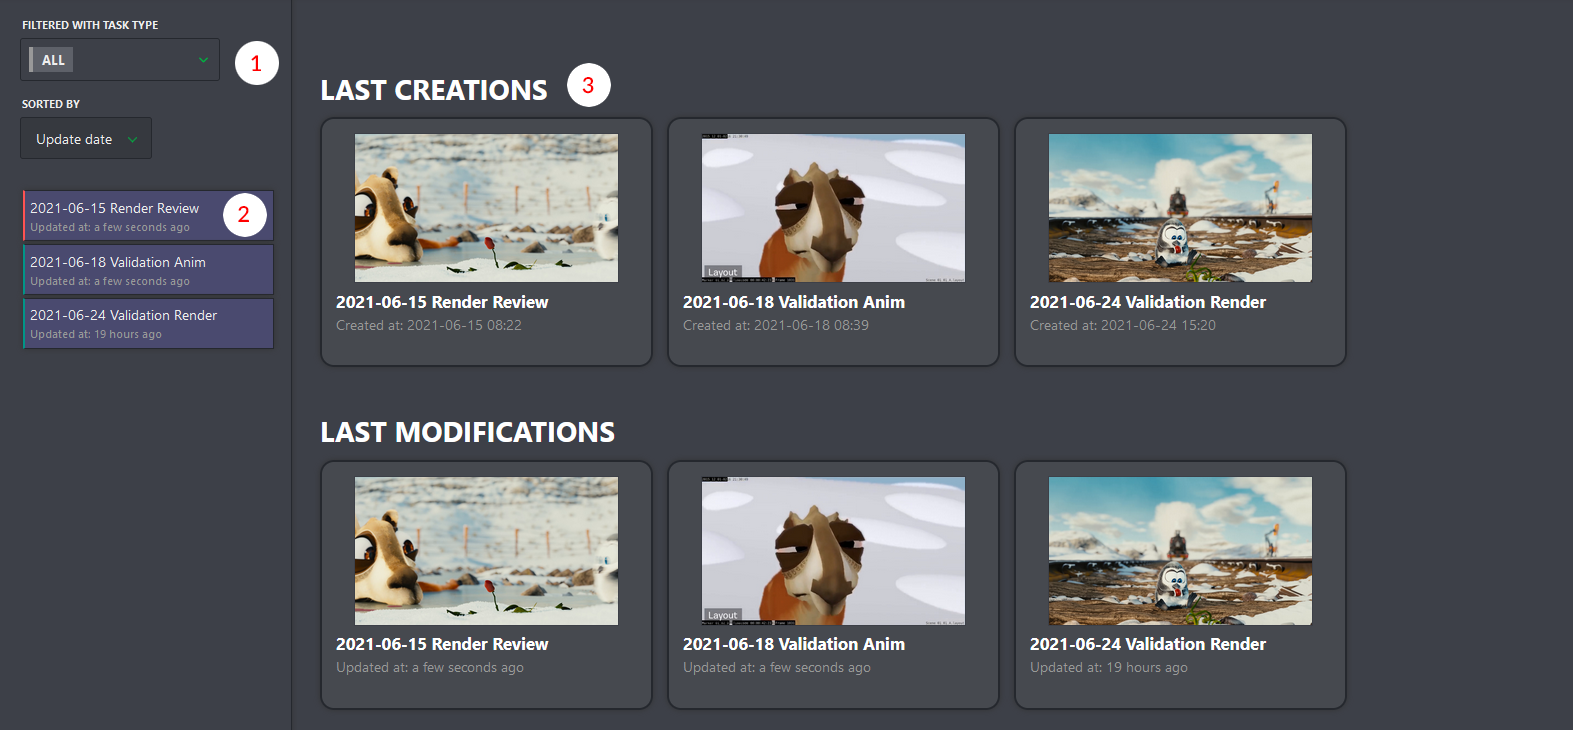
On the left, clients can sort the playlist per Task Type, date, or name (1), followed by the list of playlists created for them (2). The center part gives fast access to the recent playlists (3).
In the detail view, the left part keeps access to the different playlists, the center part shows the elements of the selected playlist (assets or shots), and the right part gives access to the comment section, where clients can write a comment to approve the preview.
Create a Playlist
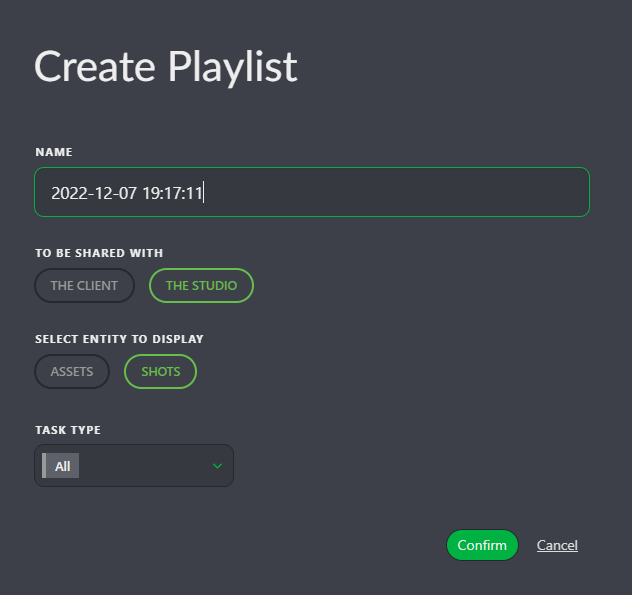
Start by creating a Playlist using the  button. The playlist name defaults to the current date & time, but you can change this. You can choose if the playlist will be shared with the studio or the client and if it's a shot or asset playlist. You can also add a Task Type tag to the playlist.
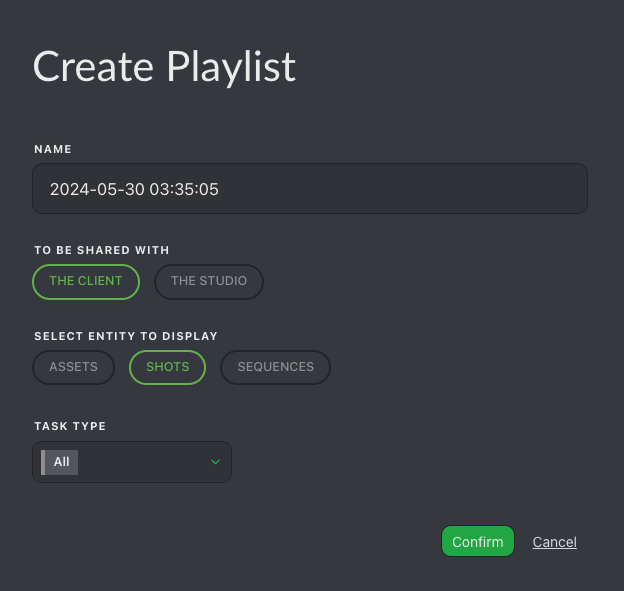
For client playlists: the process is the same, but make sure to select The Client under To Be Shared With. This ensures the proper permissions and gives the client access to only this specific playlist.
Populating a Playlist
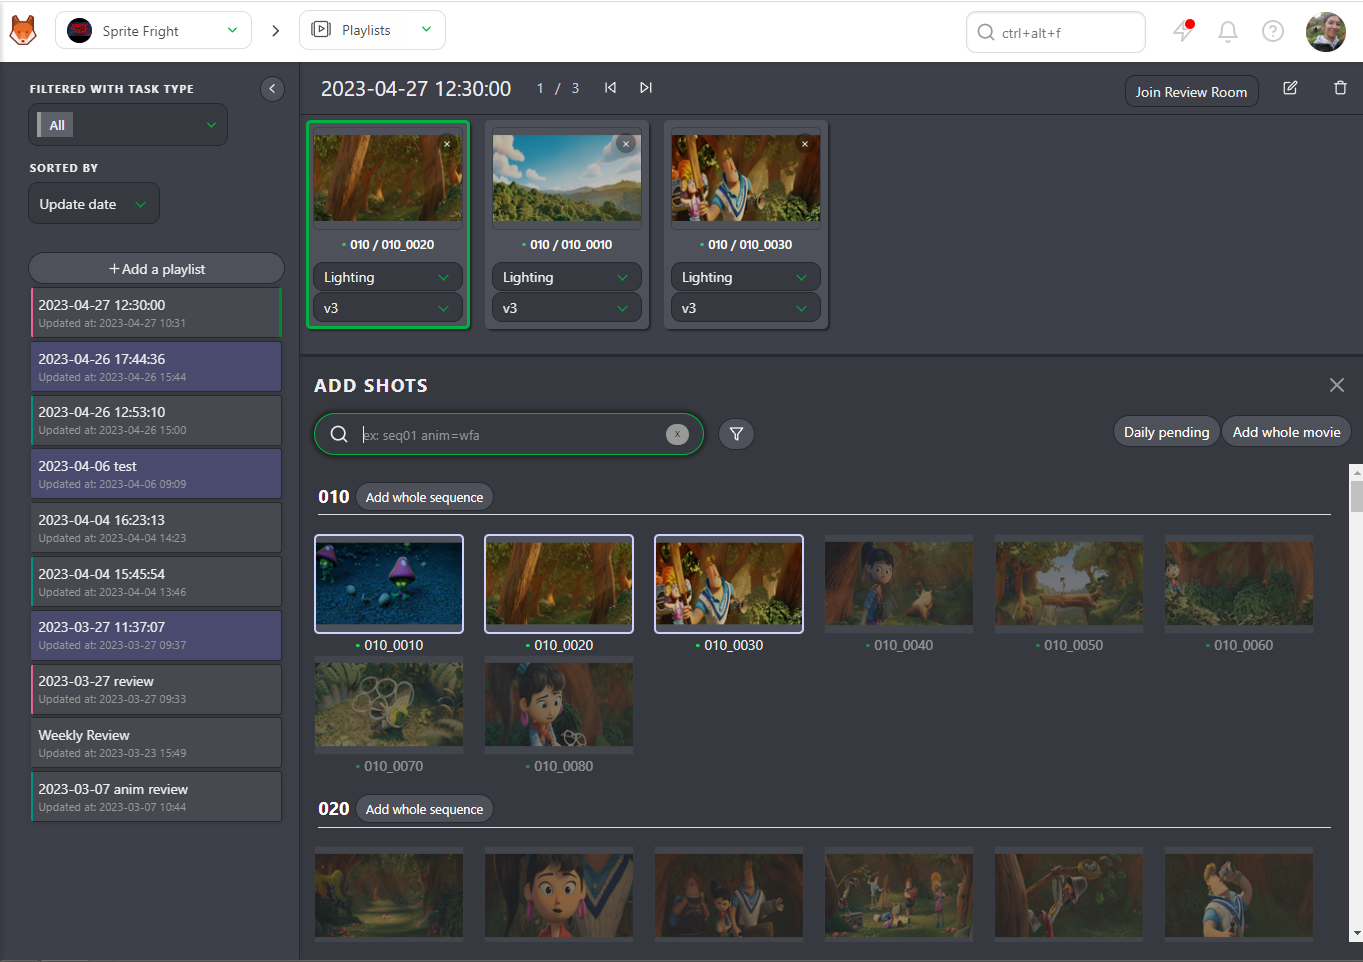
Once the playlist is created, use the search/filter bar to select which shots to add to your playlist.
You will also see options for adding:
- An entire episode or entire sequence if you want to add large chunks of the project at once.
- The whole movie, which will add all the shots of the movie.
- Daily pending, which will add all the WFA tasks of the day.
You can use the same filters as the global shot/asset page. For example, you can select all the WFA (short for "work for animation") tasks at the Animation stage by typing animation=wfa in the search bar. Validate your selection with the Add selection button. Kitsu will select the shots with the WFA status at the Animation stage and automatically load the latest uploaded version.
The shots appear in the top part of the screen. Every change is automatically saved.
Review Controls
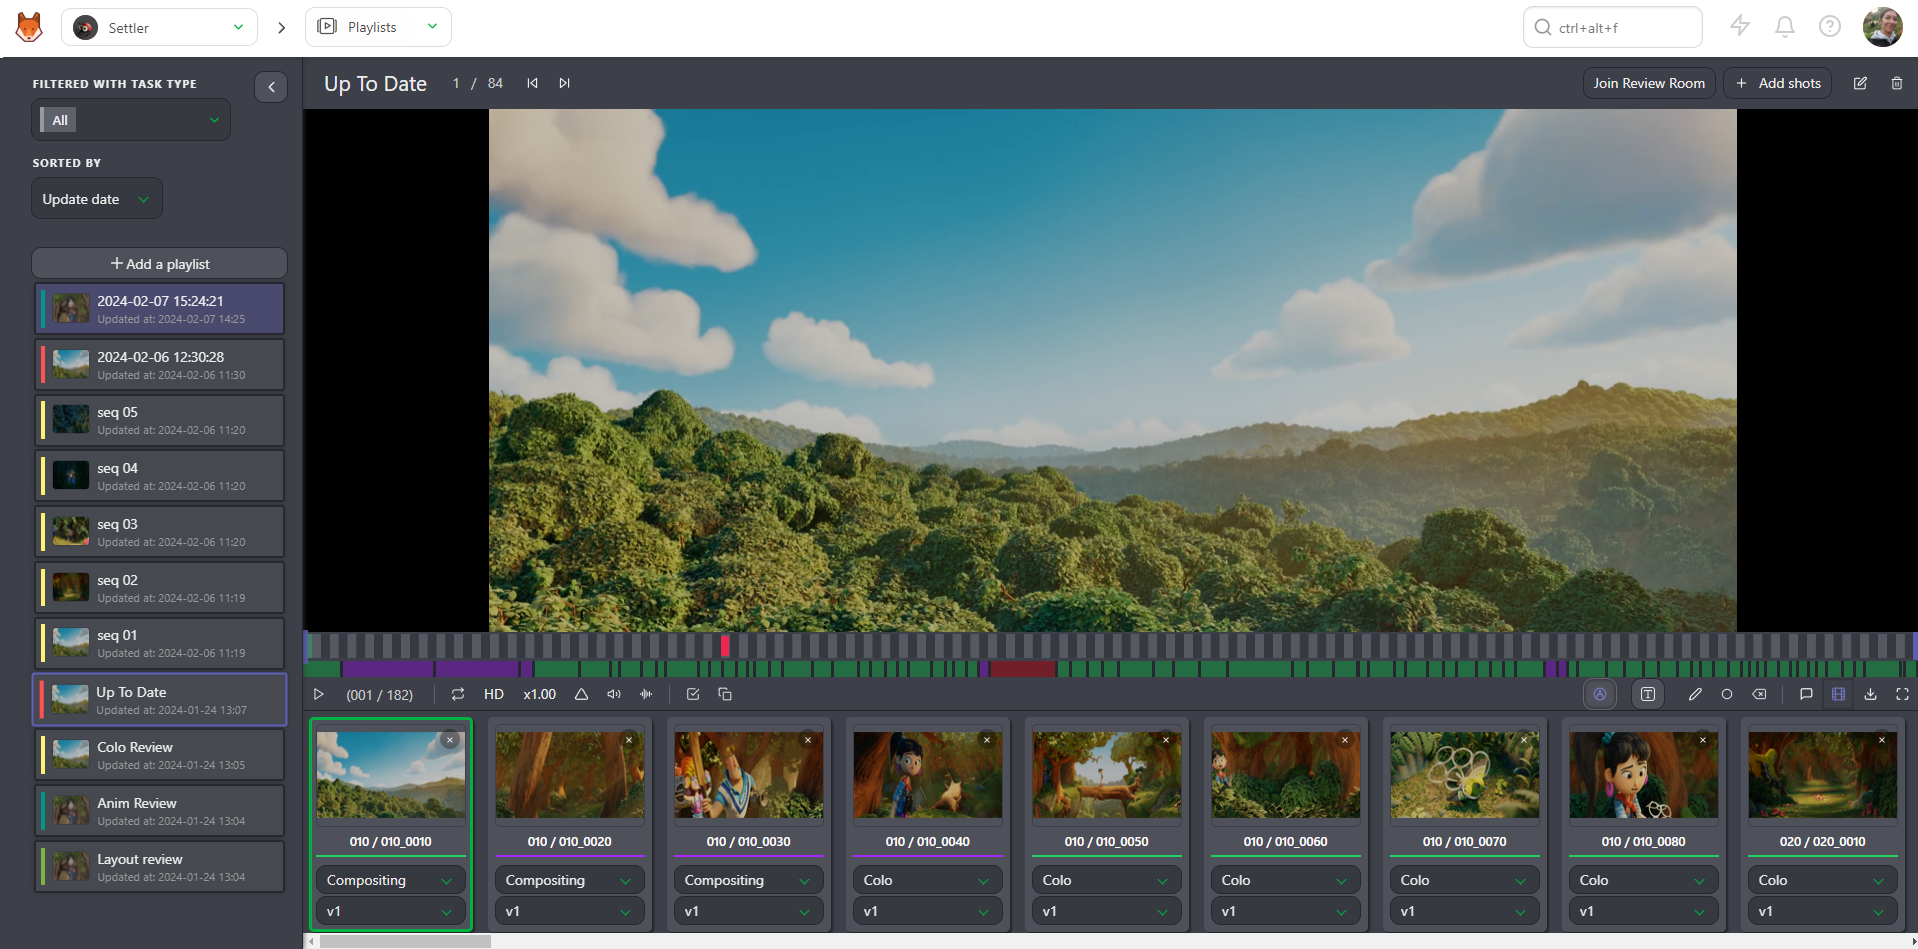
Once you have created a playlist, you have several options:
- Play or Pause
- Jump between elements in your playlist
- See the position of the selected element compared to the total number of elements
- Mute or unmute the audio
- Change the speed: double speed (x2), full speed (x1), half speed (x0.50), or quarter speed (x0.25)
- Continuously loop a single element
- Display audio waveforms
- Display annotations during playback
- Show the timecode (TC) of the element compared to the TC of the whole playlist
- Display the number of frames
- Navigate frame by frame on the preview (you can also use the left & right arrow keys on the keyboard)
- Access the compare tool
- Undo and redo options for annotations
- Text and drawing options (including delete selection)
- Change the task type of all the elements in the playlist
- Display the comments section
- Hide elements in the playlist
- Switch between LD (low definition) and HD (high definition)
- Download the playlist as a Zip file with all the separate elements, a .csv text file, or Build .mp4 to create the whole movie (only for shots)
- Enter fullscreen mode
Clients see this same set of controls, laid out as follows:

- (1) Previous shot / asset, (2) Next shot / asset, (3) position of the element
- (4) Play/pause, (5) speed (x1, x0.50, x0.25), (6) loop the selected shot
- (7) Time code of the shot vs. the global time code, (8) actual frame, (9) previous frame, (10) next frame
- (11) Split screen (compare two task types side by side)
- (12) Undo annotation, (13) Redo annotation
- (14) Write a comment on the picture and change the text color
- (15) Draw a comment on the picture and change the color/size of the line
- (16) Select a drawing and click the cross to delete it
- (17) Change the task type of all elements, (18) Open the comment/status panel, (19) Hide the element list, (20) Download the playlist, (21) Fullscreen
Clients can also navigate from element to element by clicking on it, see the color status and length of each element compared to the total, and see the position of the selected element with a green dot.
TIP
Frame-by-frame navigation with the left/right arrow keys works the same way for clients.
Client Permissions
- Clients can see all versions of all task types.
- Clients can only see comments they have made and any replies to these comments. They cannot see your internal comments.
- Clients can only see when a revision has been published, but cannot see who published it.
- Clients can only see and use statuses with the Is client allowed tag.
WARNING
A client will only have access to a production if they are part of the team, and they will only see the client playlist. There is currently no way to segregate clients within the same production.
Task, Version & Compare
For each shot/asset in the playlist, you (or the client) can choose the task and the version to view.
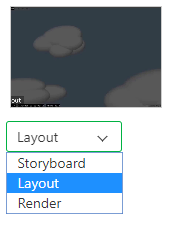
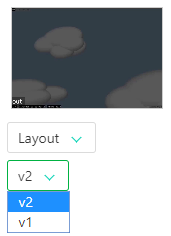
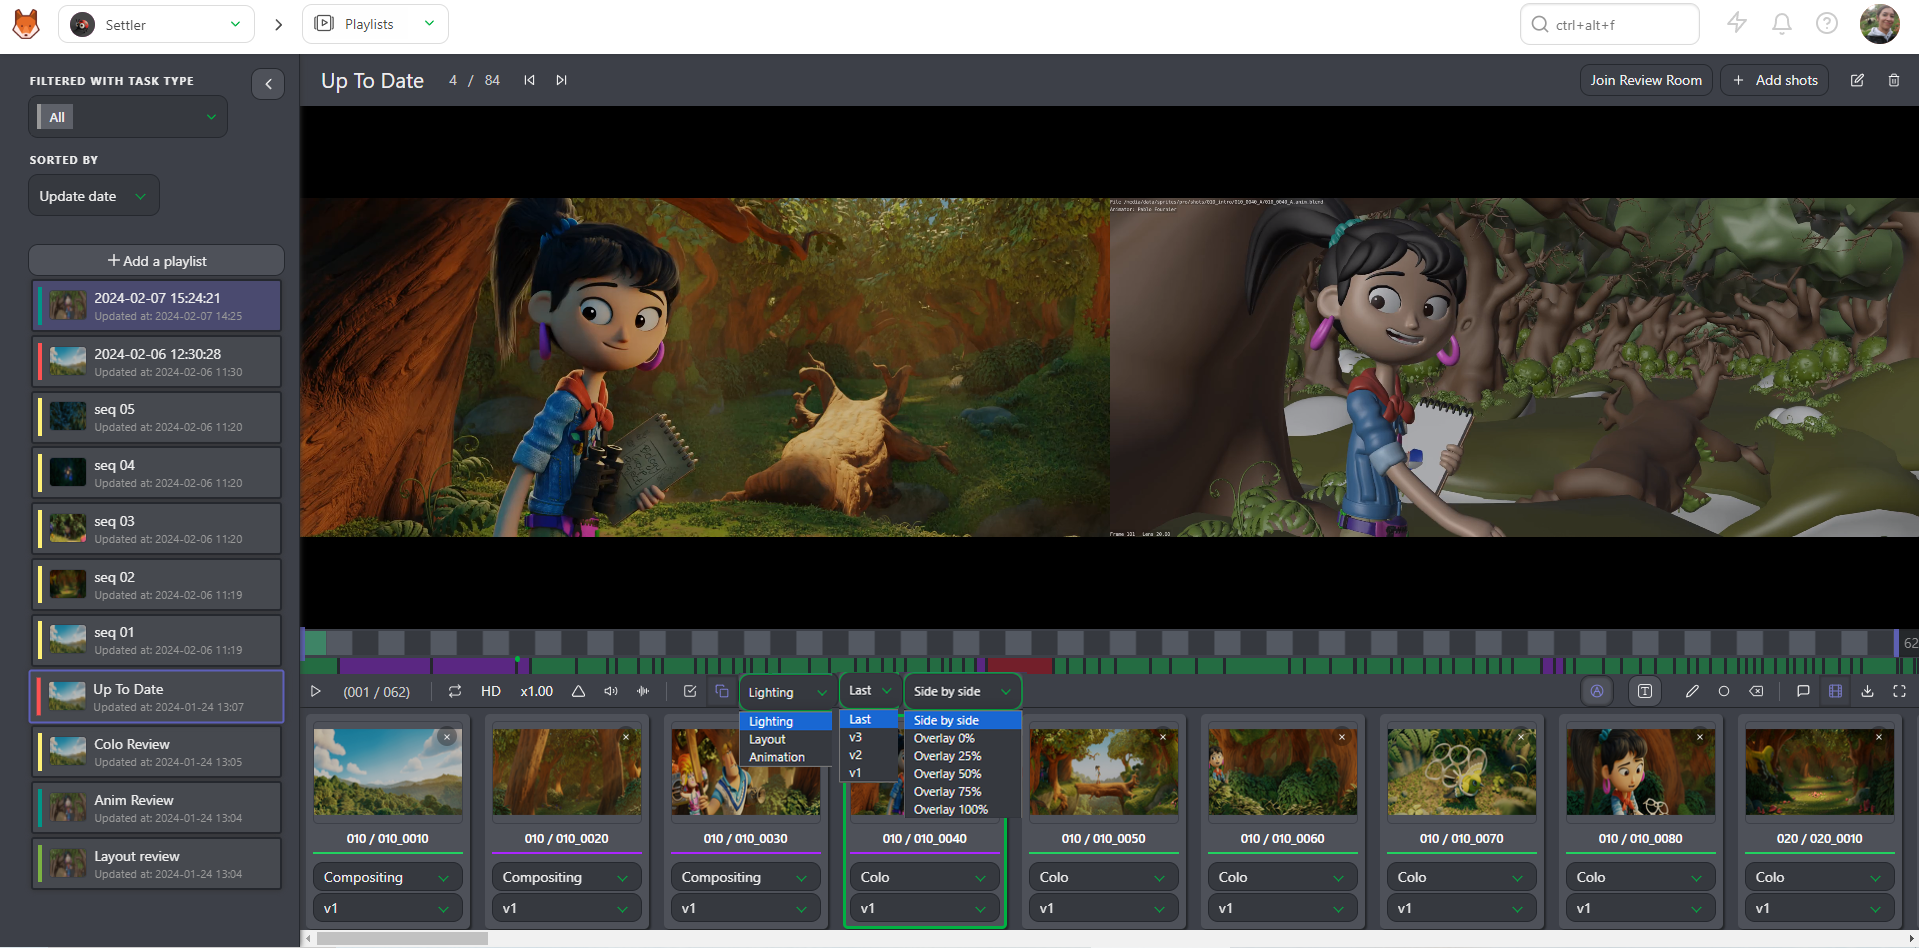
You can also play two tasks of a shot side by side. Click on the Compare button  and choose the second task type.
Commenting
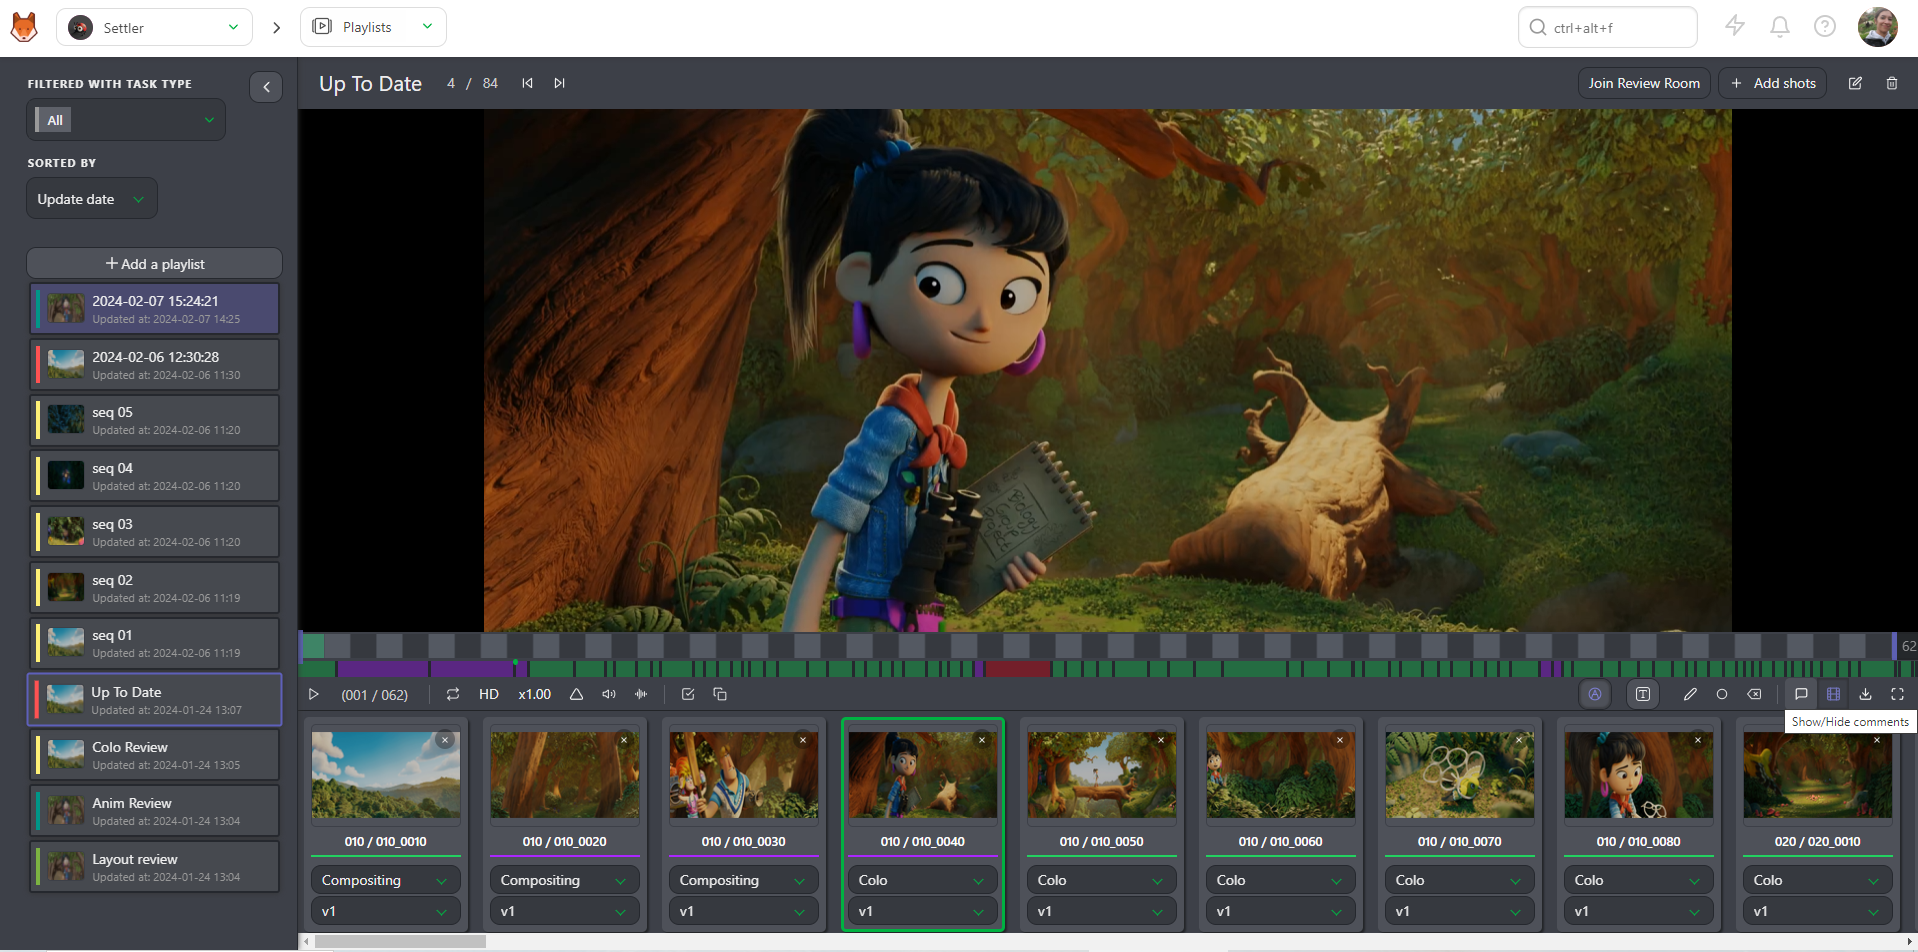
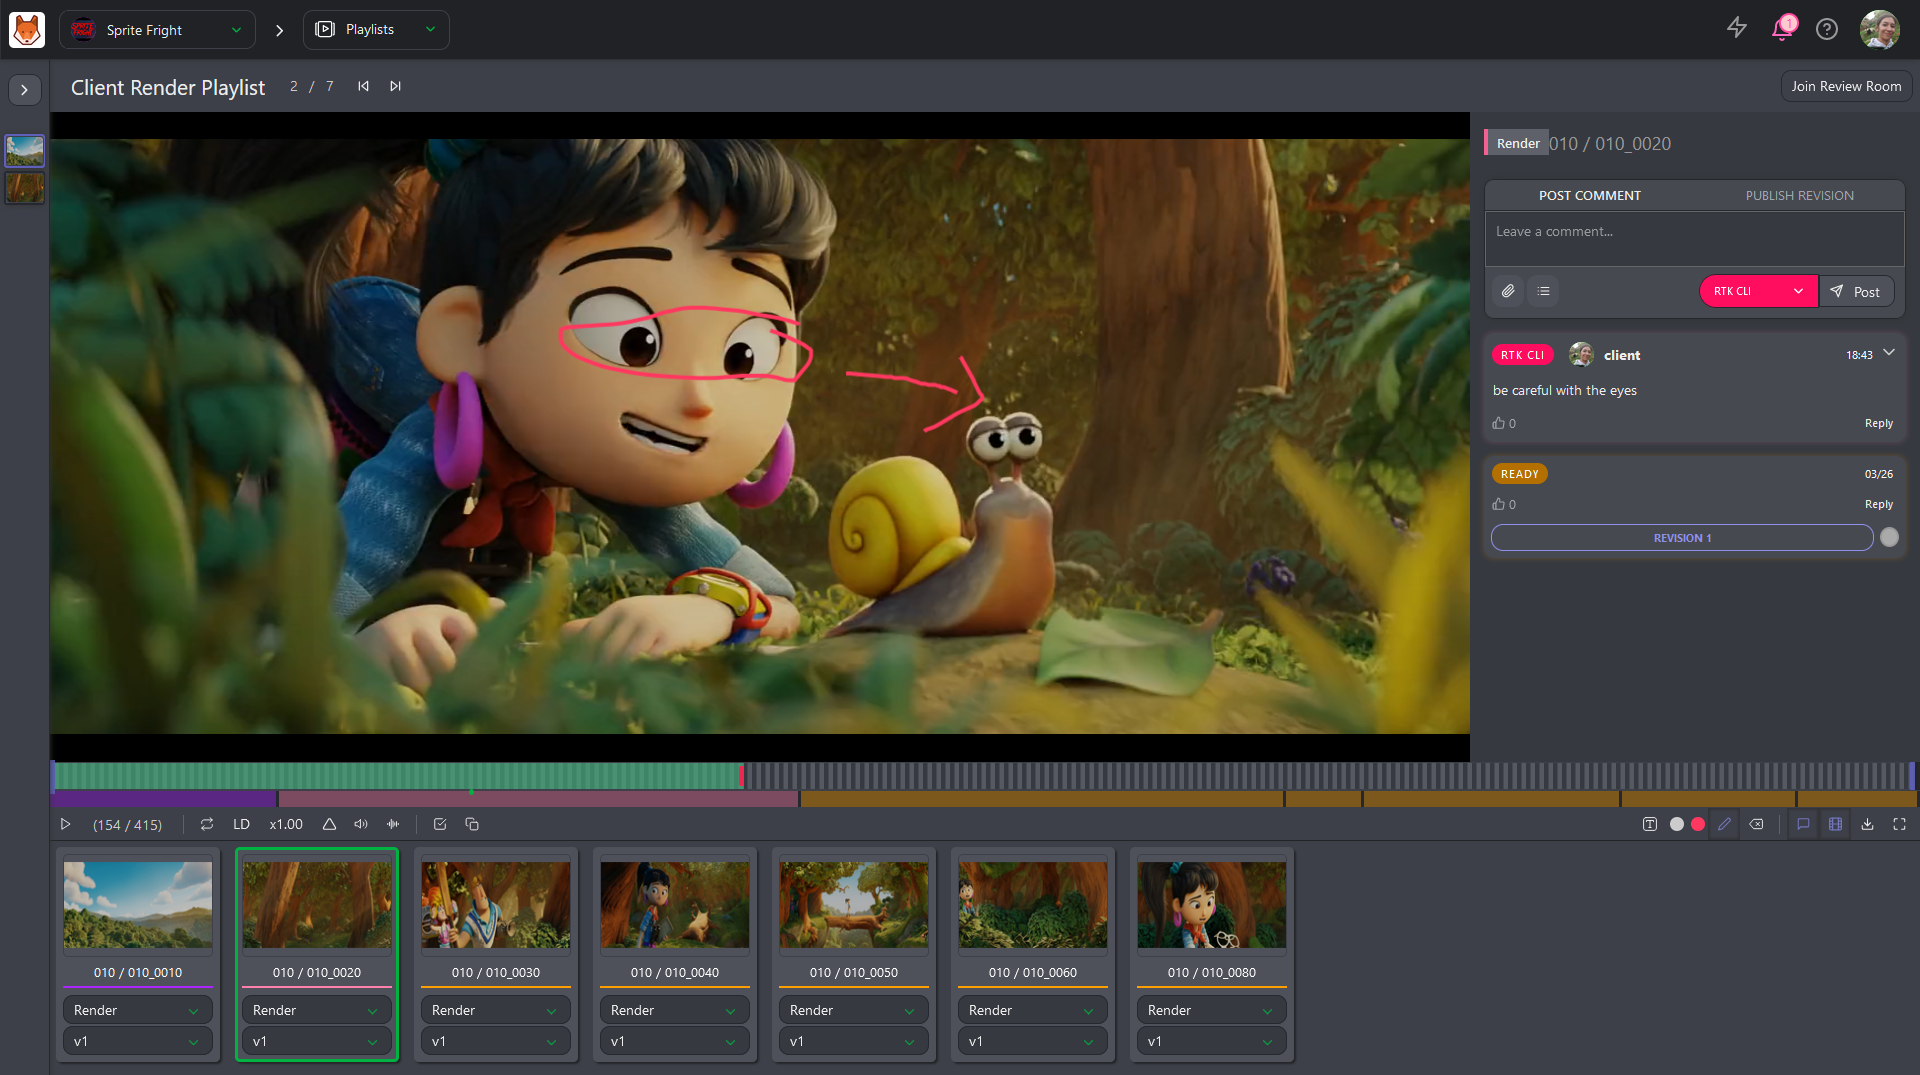
The primary purpose of the playlist is to help review the shots and assets. You can comment directly from the preview by clicking the comment button.
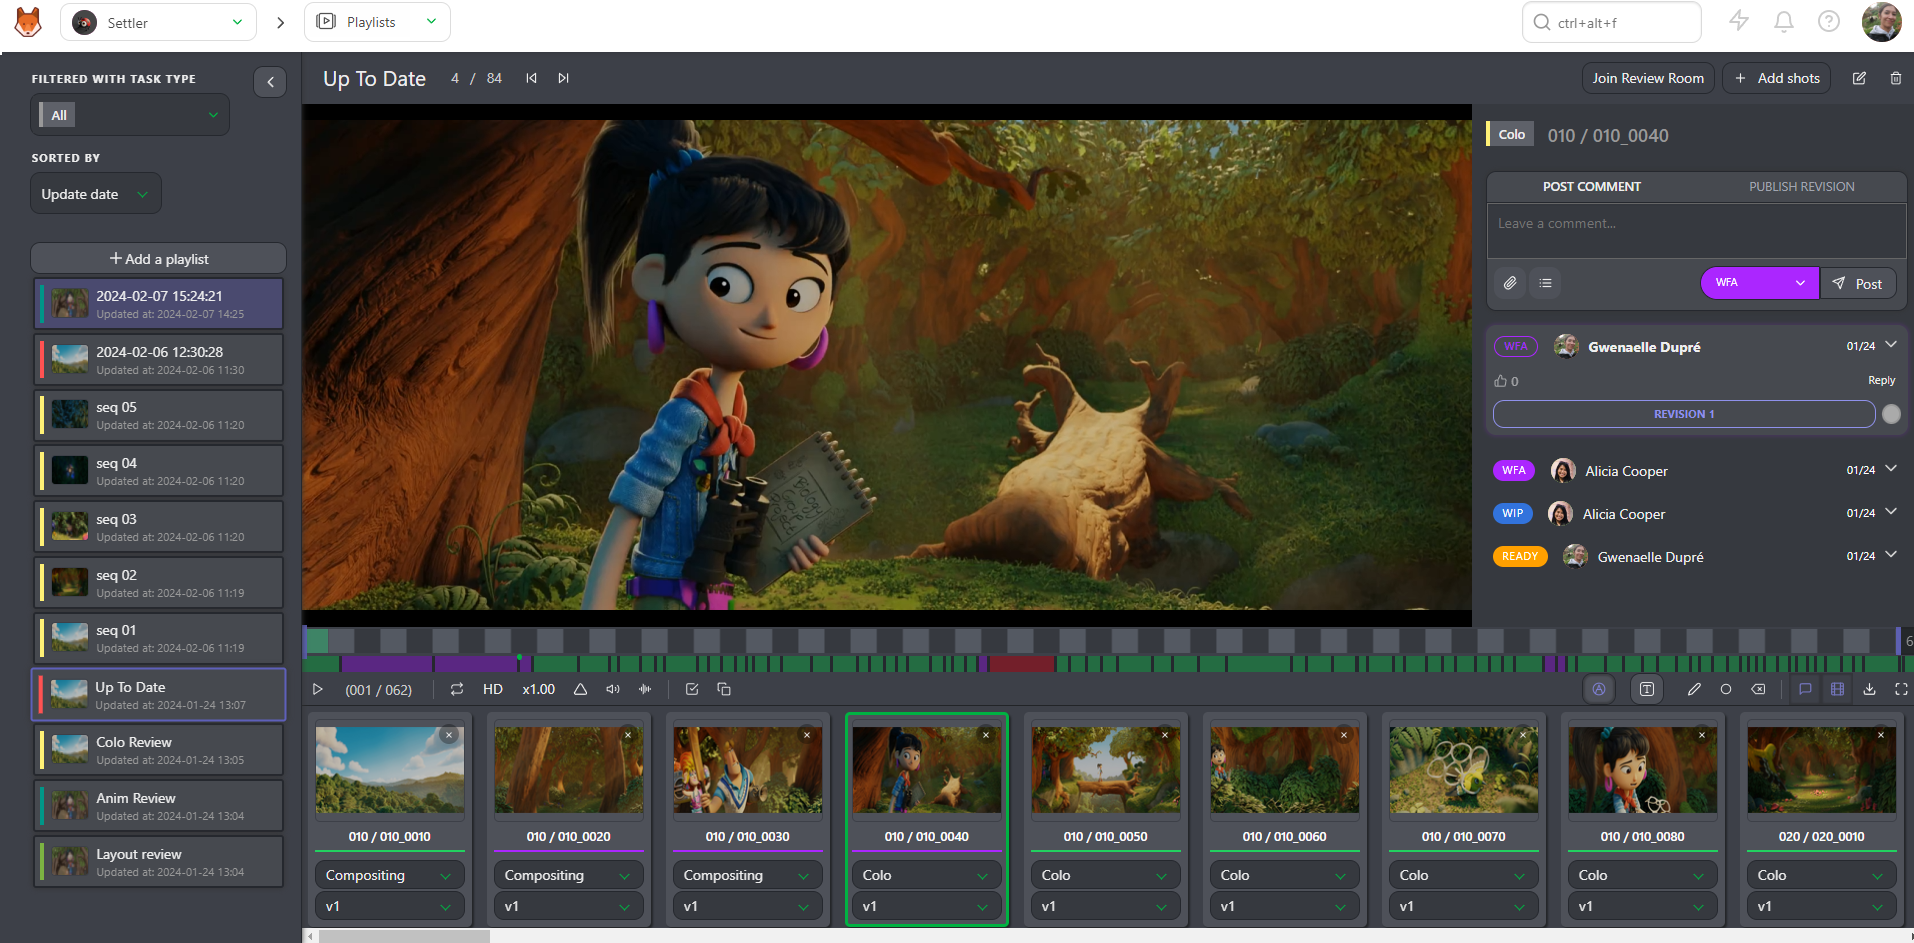
This opens the right panel, which shows a history of the comments and their status. You can see drawing comments on the video (the red dot below the timeline).
You can draw or type on the video with the draw button  (similar to Perform a review).
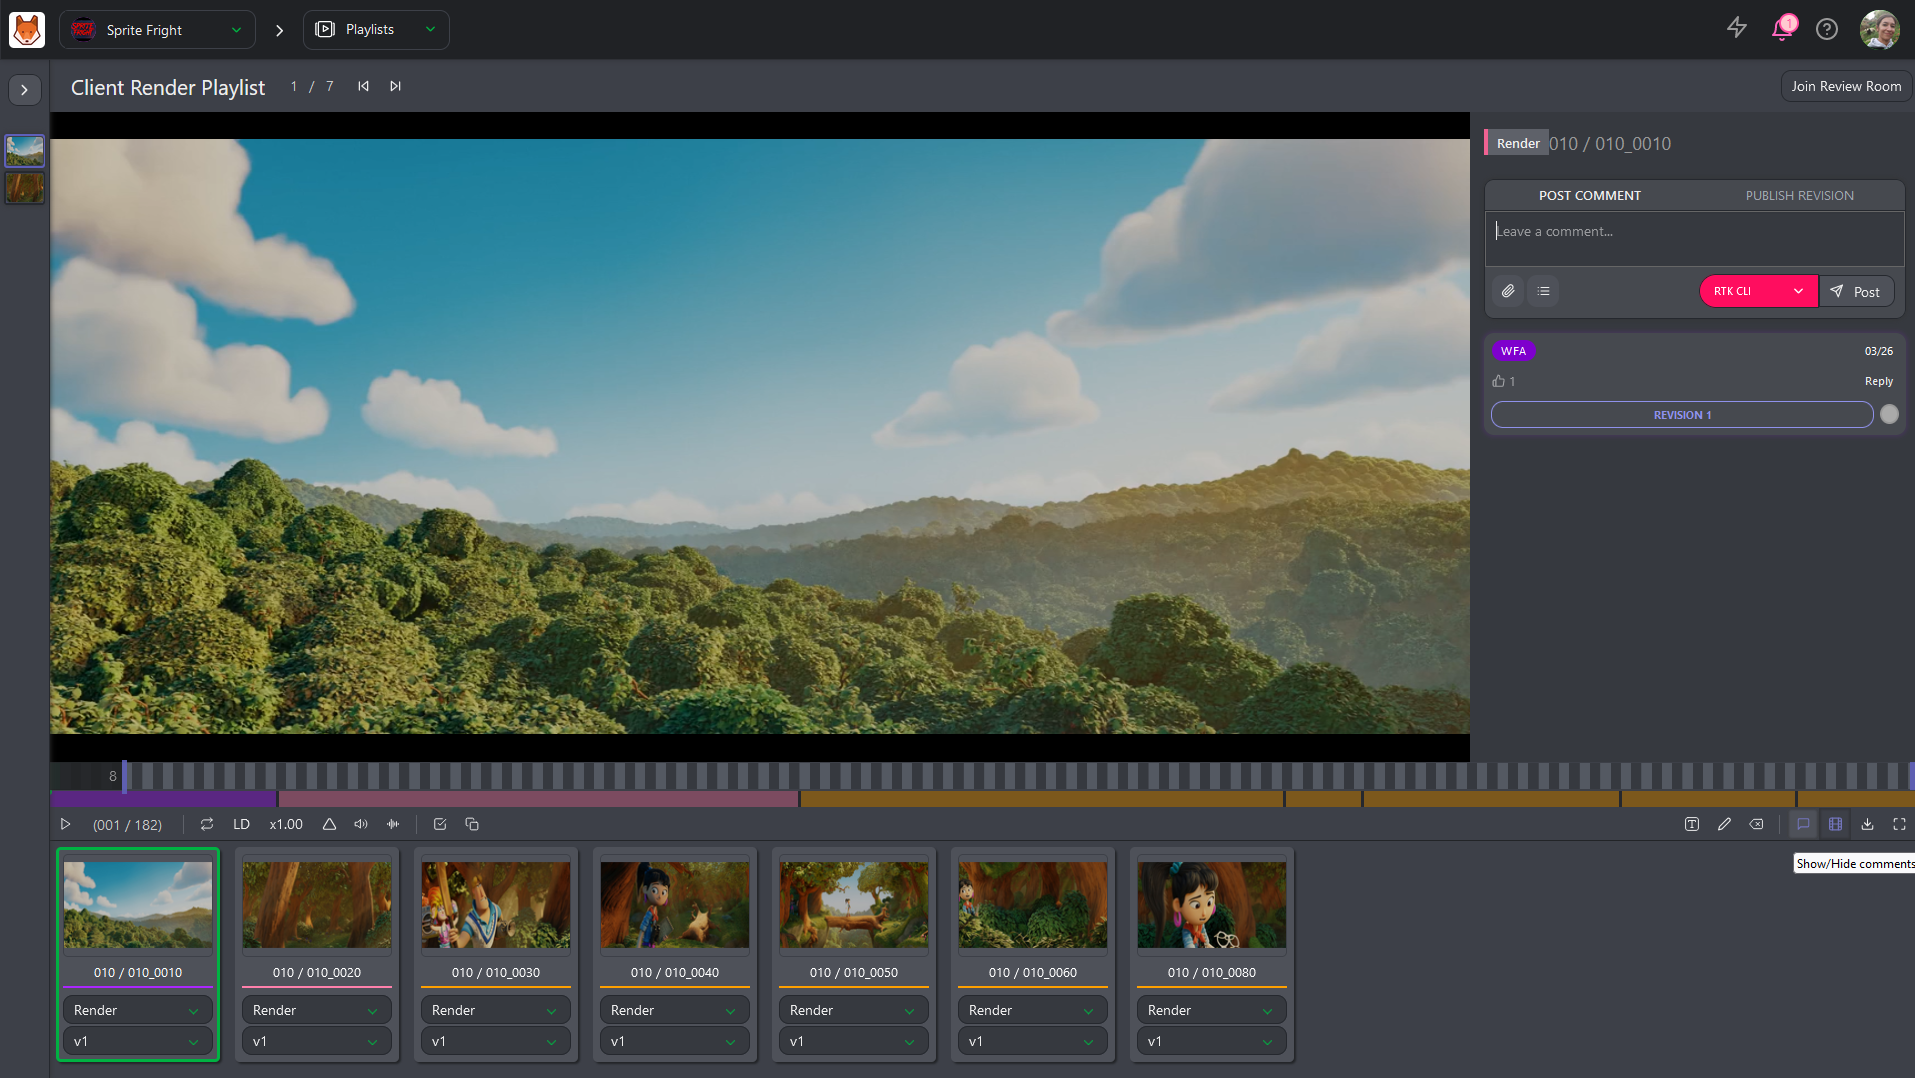
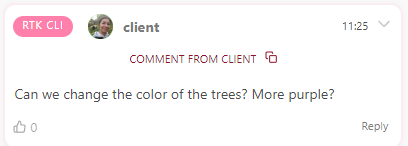
For clients, the comment button opens the same kind of panel, but showing only their own comments and status history, without access to internal comments or statuses.
WARNING
Only the supervisor and production manager can see the client's comments — artists will only see the status. The supervisor and production manager can copy the client's comments, modify them if necessary, and publish them for the team.
Share your Comments
First open the comment section. 
From there, you can change the status to  if you want the artist to perform some changes.
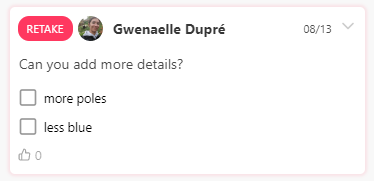
You can add a checklist to your comments. Click the Add checklist button, and the first item of the checklist appears.
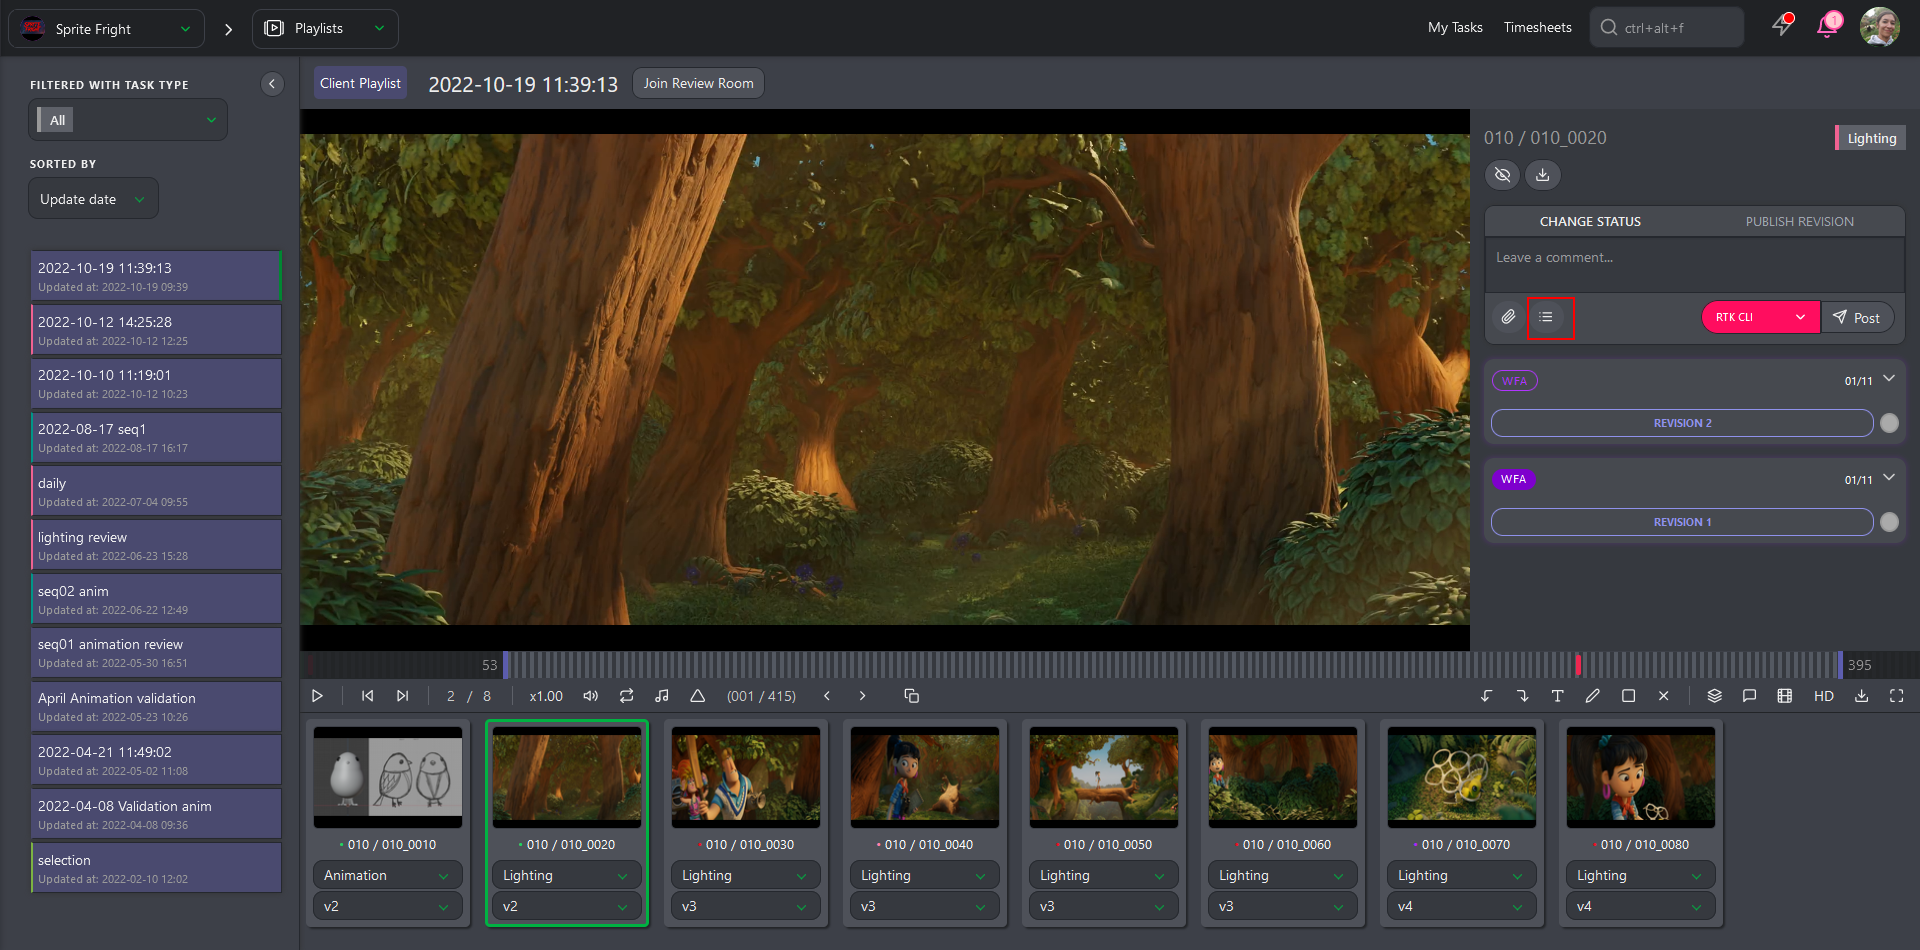
Type your comment, and hit Enter to add another line to your checklist, or click again on the Add Checklist button.
Review Room
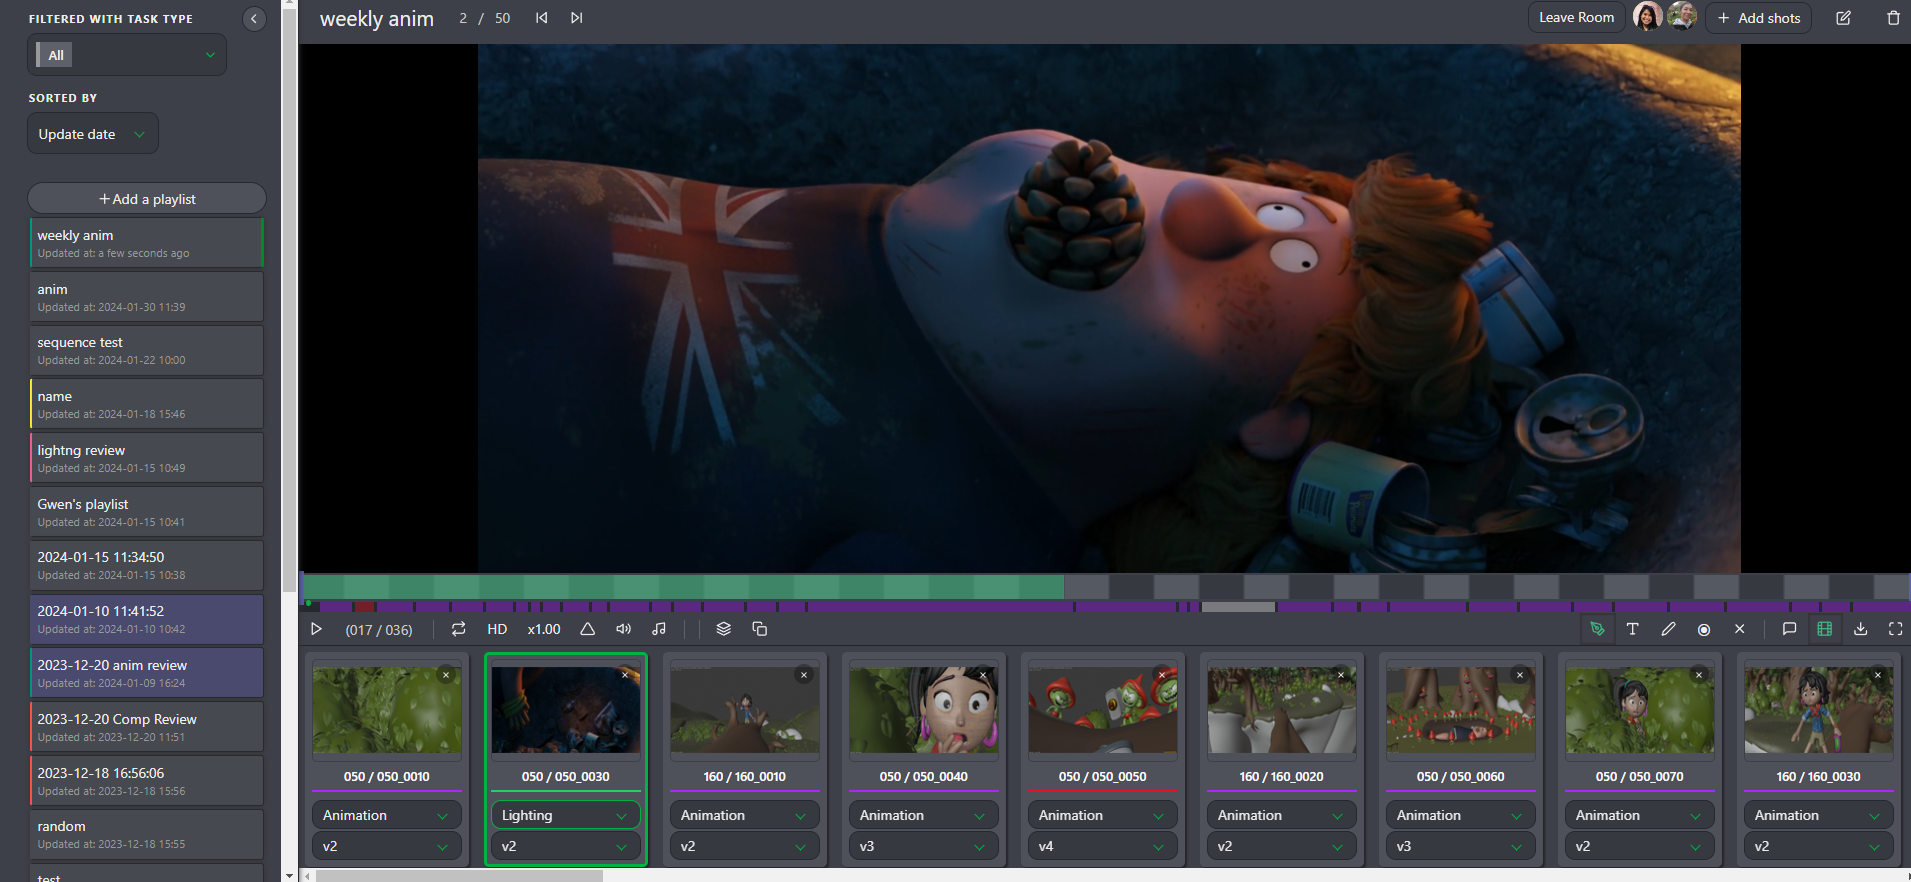
The Review Room is a collaborative space designed for efficient and synchronized dailies review sessions, for both internal teams and clients. It ensures that all participants are viewing the same content simultaneously, facilitating real-time feedback and discussion.
You can join the Review Room by clicking the button at the top of the playlist. Everyone in the room will see the play, pause, shot, and frame selections in real-time.
The Review Room also supports synchronized drawing annotations: participants can draw directly on the frames being reviewed, with all annotations visible to everyone in the session. This makes it easier to point out specific details, suggest changes, and highlight important aspects of the work.
Share Playlist
There are two ways to share playlists depending on if the reviewer has access to your Kitsu instance (internal review) or not (guest review).
1. Invite Internal Reviewers
TODO
2. Guest Review Experience
Getting feedback from temporary clients or external partners shouldn't require creating accounts. With Kitsu's public link sharing, you can send a playlist with a single link and let guests access a dedicated review player where they can:
- Leave comments
- Make drawing annotations
- Update statuses
- Manage checklists on their own feedback
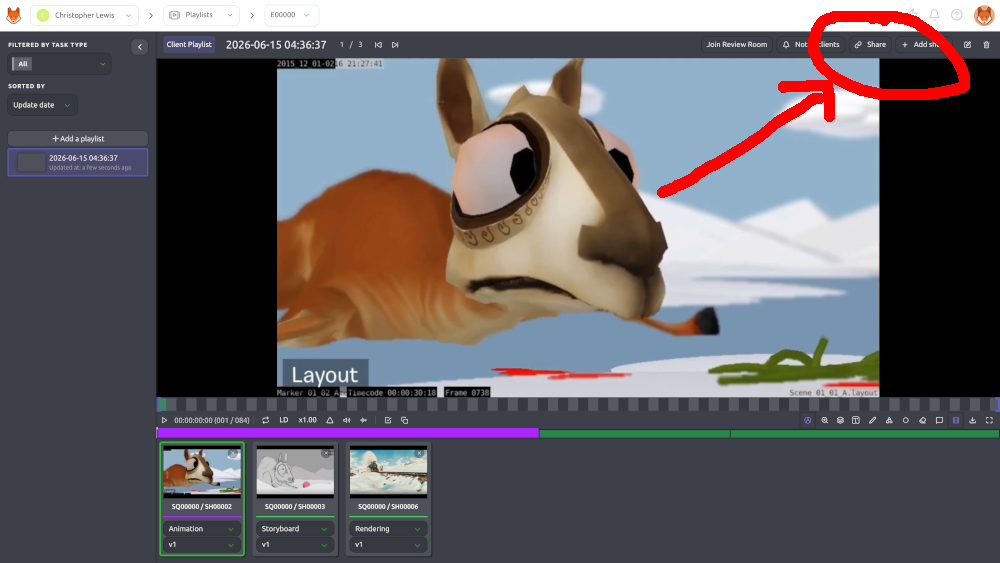
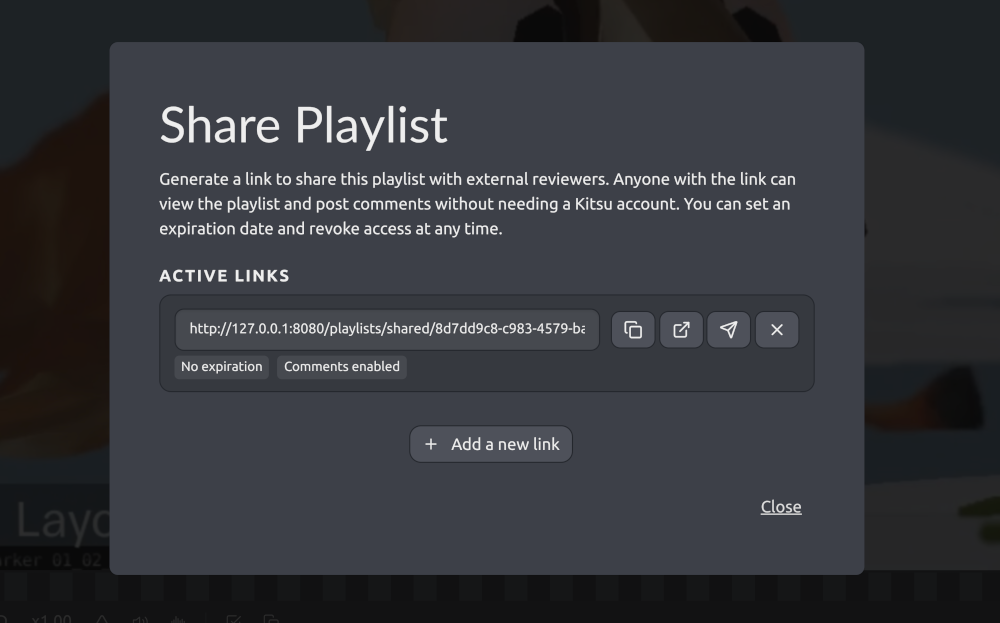
- In your playlist, click the
Sharebutton in the top right corner:
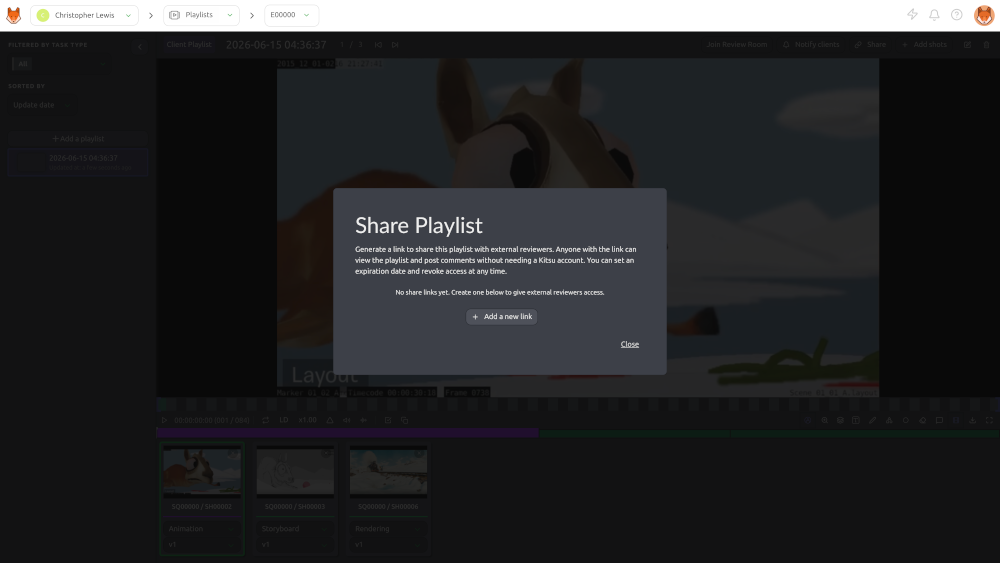
- Click
Add a new link:
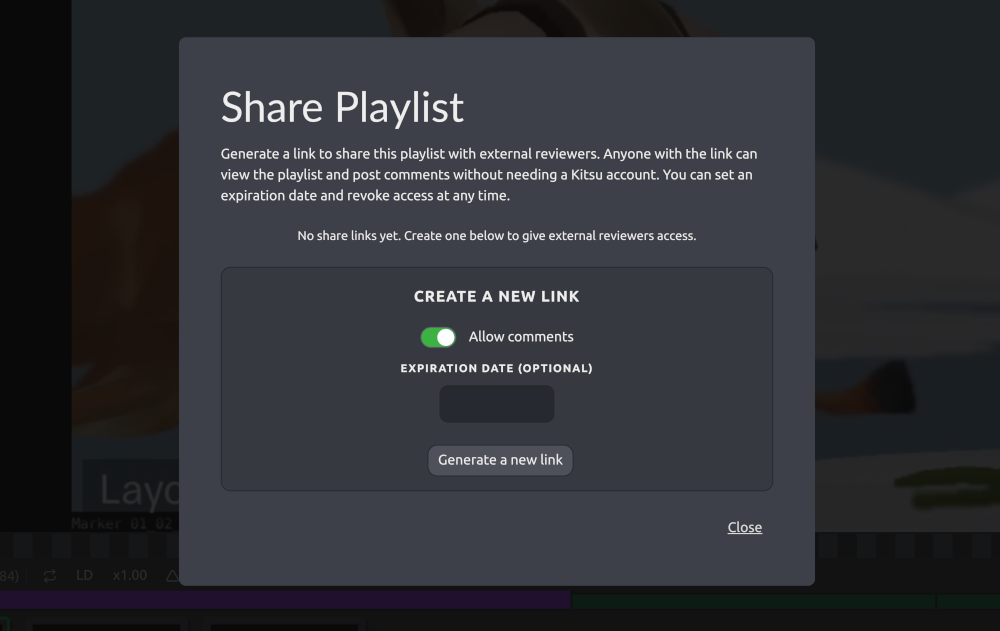
- Select if you want to allow guest comments and optionally pick an expiration date for the link:
- Share the public link with your guests. Anyone with the link can view the playlist, so be careful not to leak outside your safe space.
3. Share your Comments
A playlist is a list of curated versions / previews compiled for review and approval.
Accessing your Playlists
Production team members can find the Playlists page in the drop-down menu.
The Playlist page is separated into two parts:
- (1) A list of your playlists where you can create a new one or load an existing one.
- (2) The last created playlists and the last modified playlists.
Clients access playlists differently: click on the production avatar to reach the Playlist page, which gathers all the assets and shots they have to comment on.
On the left, clients can sort the playlist per Task Type, date, or name (1), followed by the list of playlists created for them (2). The center part gives fast access to the recent playlists (3).
In the detail view, the left part keeps access to the different playlists, the center part shows the elements of the selected playlist (assets or shots), and the right part gives access to the comment section, where clients can write a comment to approve the preview.
Create a Playlist
Start by creating a Playlist using the button. The playlist name defaults to the current date & time, but you can change this. You can choose if the playlist will be shared with the studio or the client and if it's a shot or asset playlist. You can also add a Task Type tag to the playlist.
For client playlists: the process is the same, but make sure to select The Client under To Be Shared With. This ensures the proper permissions and gives the client access to only this specific playlist.
Populating a Playlist
Once the playlist is created, use the search/filter bar to select which shots to add to your playlist.
You will also see options for adding:
- An entire episode or entire sequence if you want to add large chunks of the project at once.
- The whole movie, which will add all the shots of the movie.
- Daily pending, which will add all the WFA tasks of the day.
You can use the same filters as the global shot/asset page. For example, you can select all the WFA (short for "work for animation") tasks at the Animation stage by typing animation=wfa in the search bar. Validate your selection with the Add selection button. Kitsu will select the shots with the WFA status at the Animation stage and automatically load the latest uploaded version.
The shots appear in the top part of the screen. Every change is automatically saved.
Review Controls
Once you have created a playlist, you have several options:
- Play or Pause
- Jump between elements in your playlist
- See the position of the selected element compared to the total number of elements
- Mute or unmute the audio
- Change the speed: double speed (x2), full speed (x1), half speed (x0.50), or quarter speed (x0.25)
- Continuously loop a single element
- Display audio waveforms
- Display annotations during playback
- Show the timecode (TC) of the element compared to the TC of the whole playlist
- Display the number of frames
- Navigate frame by frame on the preview (you can also use the left & right arrow keys on the keyboard)
- Access the compare tool
- Undo and redo options for annotations
- Text and drawing options (including delete selection)
- Change the task type of all the elements in the playlist
- Display the comments section
- Hide elements in the playlist
- Switch between LD (low definition) and HD (high definition)
- Download the playlist as a Zip file with all the separate elements, a .csv text file, or Build .mp4 to create the whole movie (only for shots)
- Enter fullscreen mode
Clients see this same set of controls, laid out as follows:
- (1) Previous shot / asset, (2) Next shot / asset, (3) position of the element
- (4) Play/pause, (5) speed (x1, x0.50, x0.25), (6) loop the selected shot
- (7) Time code of the shot vs. the global time code, (8) actual frame, (9) previous frame, (10) next frame
- (11) Split screen (compare two task types side by side)
- (12) Undo annotation, (13) Redo annotation
- (14) Write a comment on the picture and change the text color
- (15) Draw a comment on the picture and change the color/size of the line
- (16) Select a drawing and click the cross to delete it
- (17) Change the task type of all elements, (18) Open the comment/status panel, (19) Hide the element list, (20) Download the playlist, (21) Fullscreen
Clients can also navigate from element to element by clicking on it, see the color status and length of each element compared to the total, and see the position of the selected element with a green dot.
TIP
Frame-by-frame navigation with the left/right arrow keys works the same way for clients.
Client Permissions
- Clients can see all versions of all task types.
- Clients can only see comments they have made and any replies to these comments. They cannot see your internal comments.
- Clients can only see when a revision has been published, but cannot see who published it.
- Clients can only see and use statuses with the Is client allowed tag.
WARNING
A client will only have access to a production if they are part of the team, and they will only see the client playlist. There is currently no way to segregate clients within the same production.
Task, Version & Compare
For each shot/asset in the playlist, you (or the client) can choose the task and the version to view.
You can also play two tasks of a shot side by side. Click on the Compare button and choose the second task type.
Commenting
The primary purpose of the playlist is to help review the shots and assets. You can comment directly from the preview by clicking the comment button.
This opens the right panel, which shows a history of the comments and their status. You can see drawing comments on the video (the red dot below the timeline).
You can draw or type on the video with the draw button (similar to Perform a review).
For clients, the comment button opens the same kind of panel, but showing only their own comments and status history, without access to internal comments or statuses.
WARNING
Only the supervisor and production manager can see the client's comments — artists will only see the status. The supervisor and production manager can copy the client's comments, modify them if necessary, and publish them for the team.
Share your Comments
First open the comment section.
From there, you can change the status to if you want the artist to perform some changes.
You can add a checklist to your comments. Click the Add checklist button, and the first item of the checklist appears.
Type your comment, and hit Enter to add another line to your checklist, or click again on the Add Checklist button.
Review Room
The Review Room is a collaborative space designed for efficient and synchronized dailies review sessions, for both internal teams and clients. It ensures that all participants are viewing the same content simultaneously, facilitating real-time feedback and discussion.
You can join the Review Room by clicking the button at the top of the playlist. Everyone in the room will see the play, pause, shot, and frame selections in real-time.
The Review Room also supports synchronized drawing annotations: participants can draw directly on the frames being reviewed, with all annotations visible to everyone in the session. This makes it easier to point out specific details, suggest changes, and highlight important aspects of the work.
Share Playlist
There are two ways to share playlists depending on if the reviewer has access to your Kitsu instance (internal review) or not (guest review).
1. Invite Internal Reviewers
TODO
2. Guest Review Experience
Getting feedback from temporary clients or external partners shouldn't require creating accounts. With Kitsu's public link sharing, you can send a playlist with a single link and let guests access a dedicated review player where they can:
- Leave comments
- Make drawing annotations
- Update statuses
- Manage checklists on their own feedback
- In your playlist, click the
Sharebutton in the top right corner:
- Click
Add a new link:
- Select if you want to allow guest comments and optionally pick an expiration date for the link:
- Share the public link with your guests. Anyone with the link can view the playlist, so be careful not to leak outside your safe space.
4. Global View of the Assets
Create an Asset
Create your first asset
So, now that we have created our production and have a general grasp of the Kitsu interface, it's time to create our first asset.
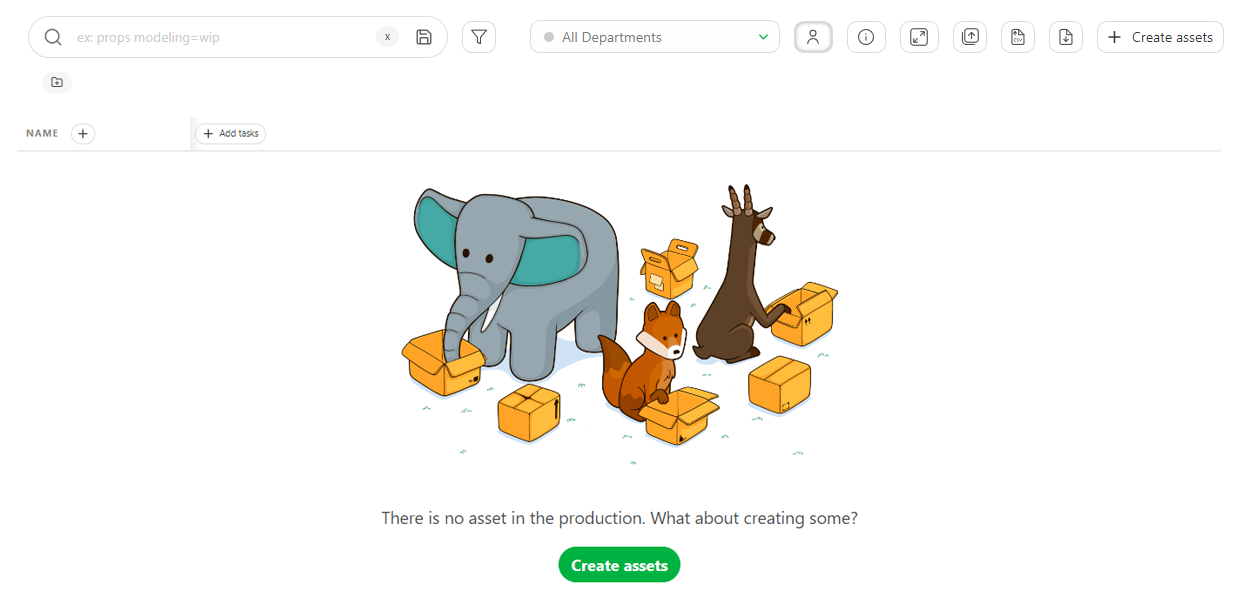
On the asset page, click on Add assets.
WARNING
When you create an asset, your task workflow will be applied, and all the tasks will be created simultaneously as the asset.
A pop-up window opens:
It asks you to choose the Asset Type (1). If you didn't add a new asset type, Kitsu will provide examples such as Characters, Environment, FX, Props, etc. Let's start with a character.
TIP
You can also customize the asset type list and the tasks pipeline. See the guide ( Customization of the workflow) for more details
We give it a Name (2) and enter a description that helps the Artist know what to do and quickly identify the asset.
Click on Confirm and stay if you have multiple assets to create.
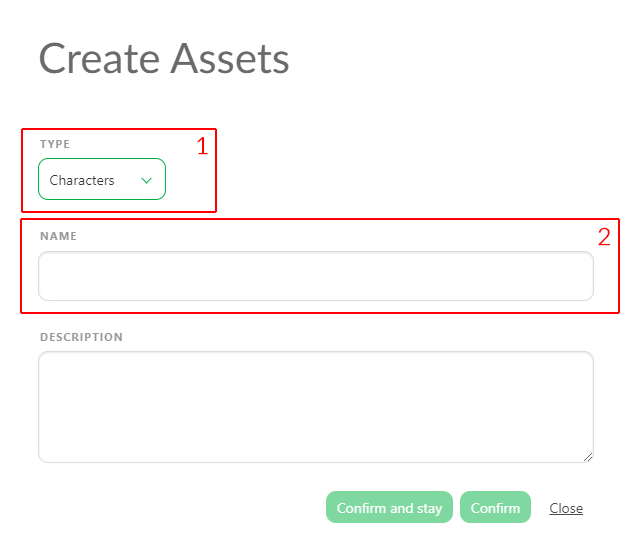
You can change the asset type and keep adding assets.
TIP
The newly created asset appears in the background whenever you click on Confirm and stay.
After adding your last asset, click on Confirm. It will create the asset and close the window.
TIP
If you click on **Confirm and stay, ** realize you don't have more assets to add, and click on **Close, ** the window will be canceled.
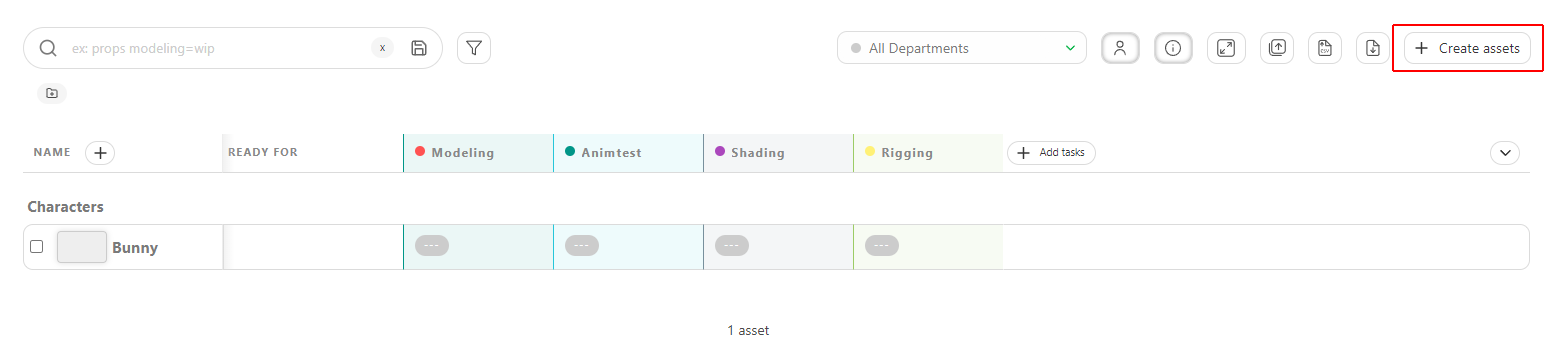
You will also see the tasks that are selected for your assets workflow are created at the same time.
If you need to add more Assets, click the + Create assets button.
Create Assets from a CSV Spreadsheet File
You may already have your asset list ready in a spreadsheet file. With Kitsu, you have two ways to import them; the first is to import a .csv file and copy-paste your data directly into Kitsu.
First, save your spreadsheet as a .csv file.
Then, go back to the asset page on Kitsu and click on the Import icon. 
A pop-up window Import data from a CSV opens. Click on Browse to pick your .csv file.
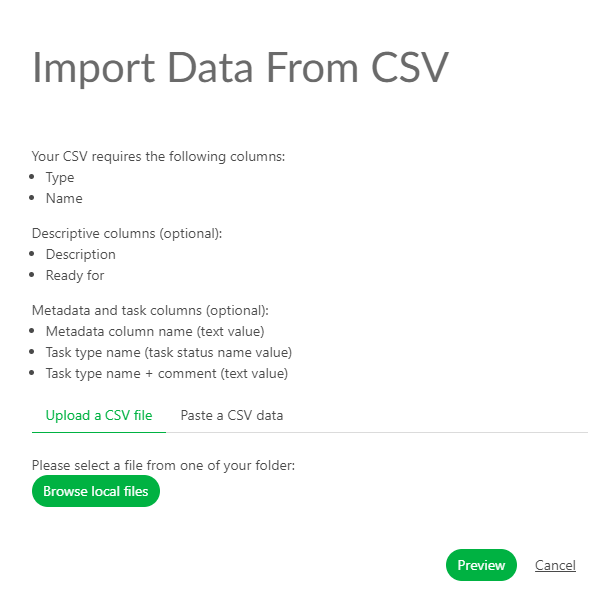
To see the result, click on the Preview button. You can check and adjust the name of the columns by previewing your data. NB: the Episode column is only mandatory for a TV Show production. 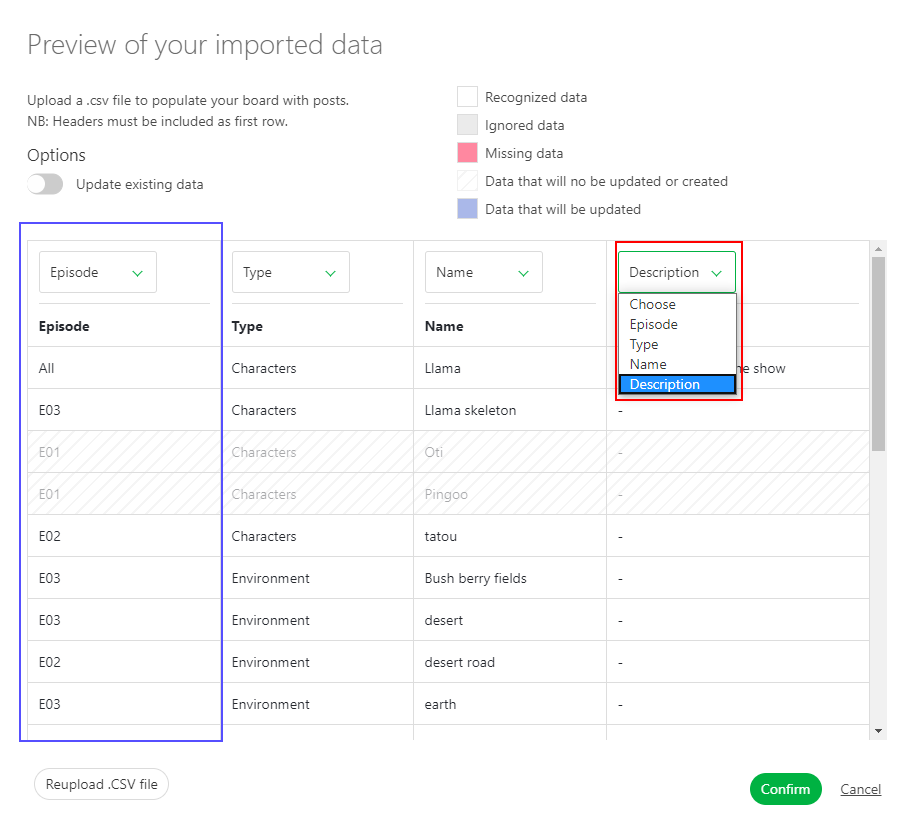
Once everything is good, click the Confirm button to import your data into Kitsu.
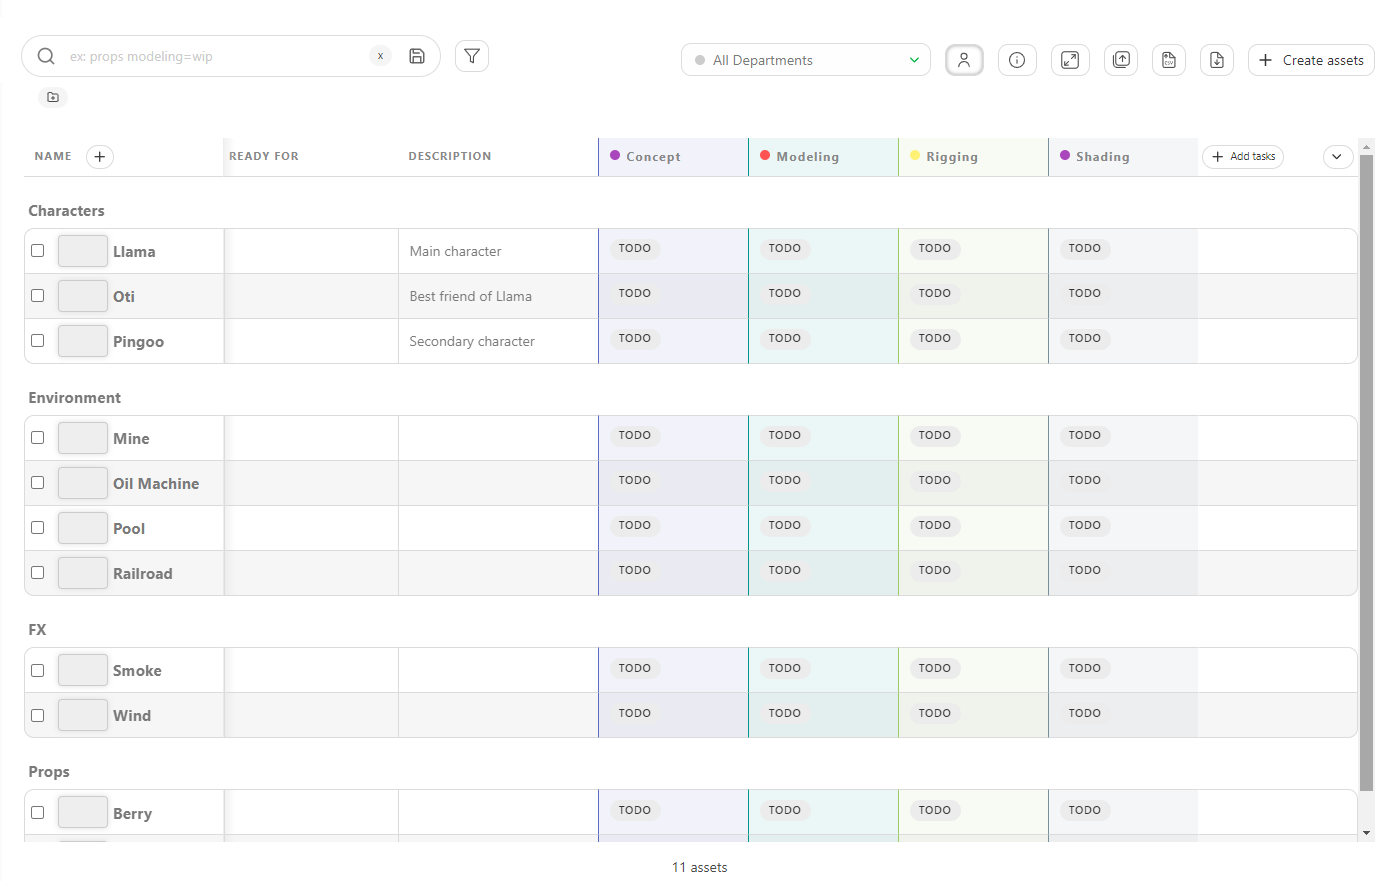
You have imported all your assets into Kitsu and created the task according to your Settings.
Create Assets by Copying / Pasting a Spreadsheet File
Open your spreadsheet, select your data, and copy them.
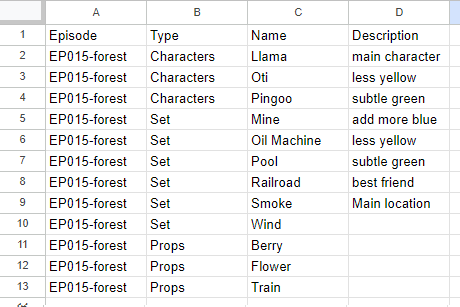
Then, go back to the asset page on Kitsu and click on the Import icon .
A pop-up window Import data from a CSV opens; click on the Paste a CSV data tab.
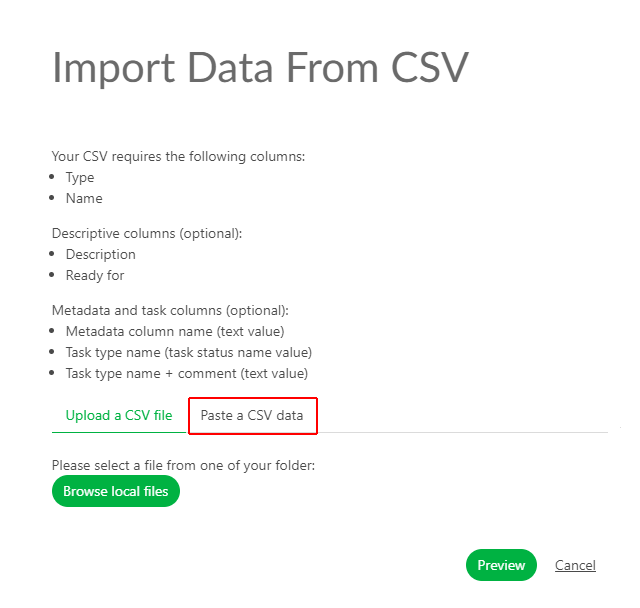 You can paste your previously selected data and see the result with the Preview button.
 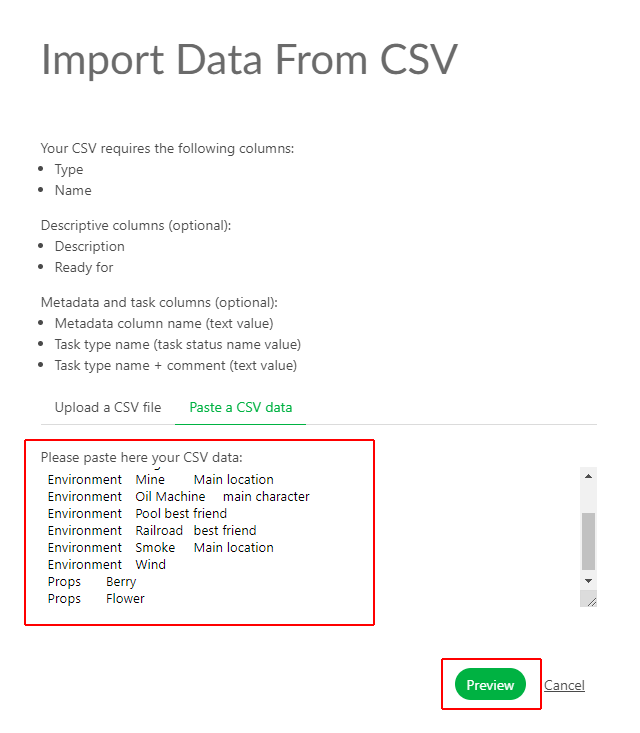 You can check and adjust the name of the columns by previewing your data. NB: the Episode column is only mandatory for a TV Show production.
Once everything is good, click the Confirm button to import your data into Kitsu.
You have imported all your assets into Kitsu and created the task according to your Settings.
See the Details of an Asset
To see an asset's detail, click on its name.
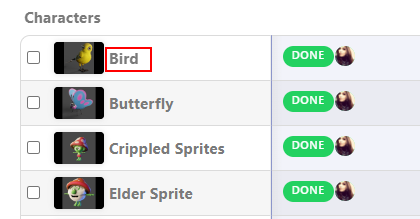
A new page opens with the list of the tasks, the assignation, and the status newsfeed on the right.
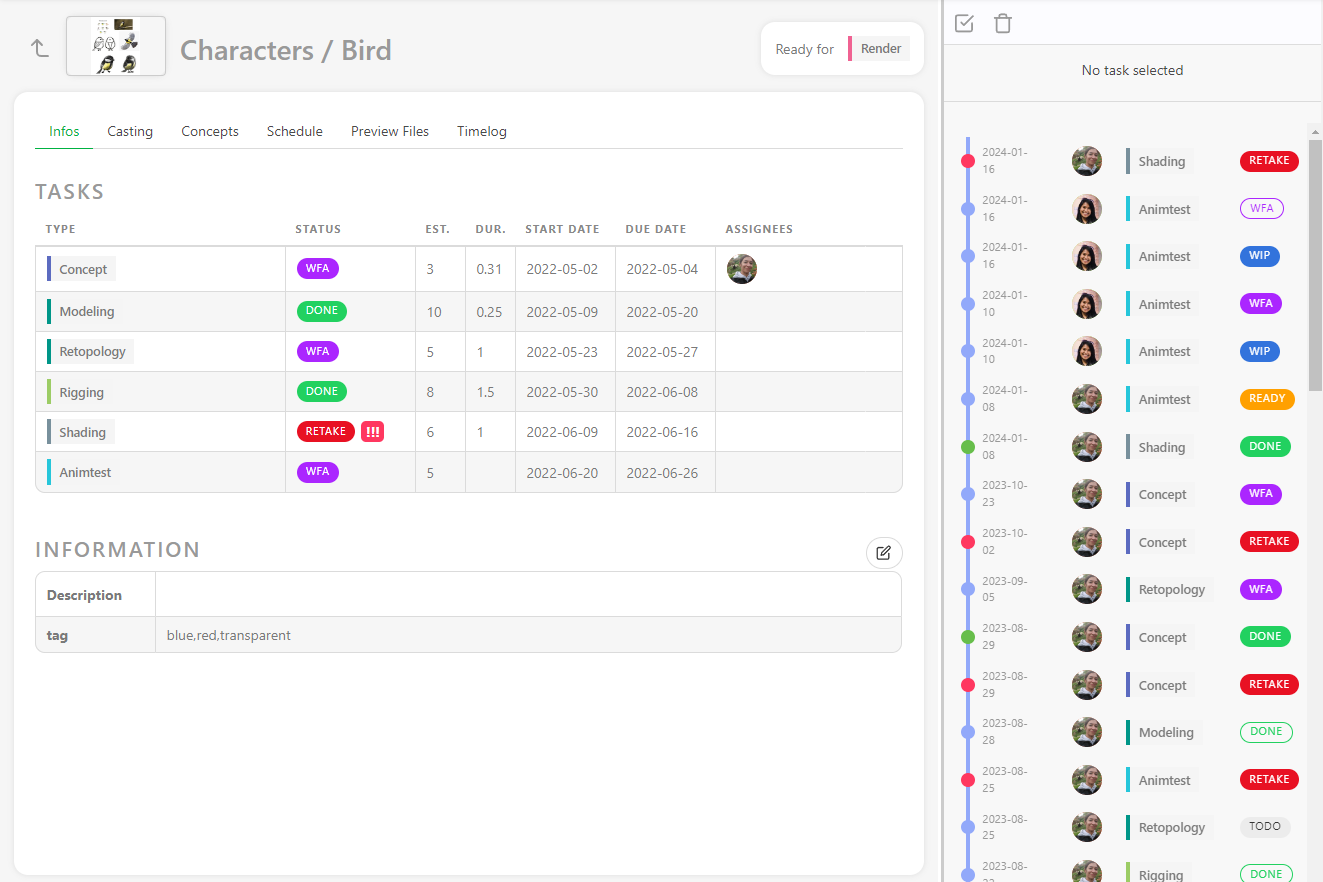
You can click on the status of each task to open the comment panel and see the history of the comments and the different versions.
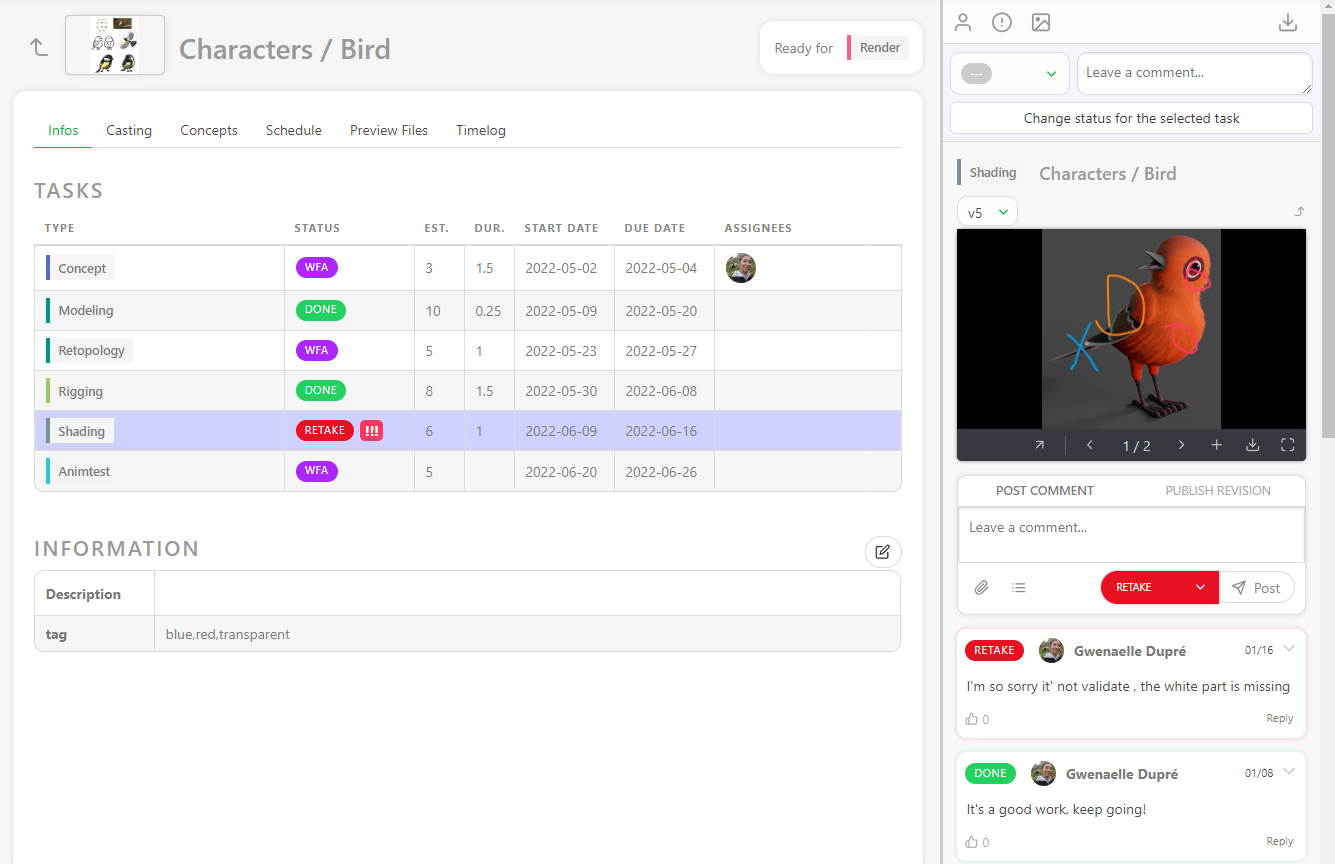
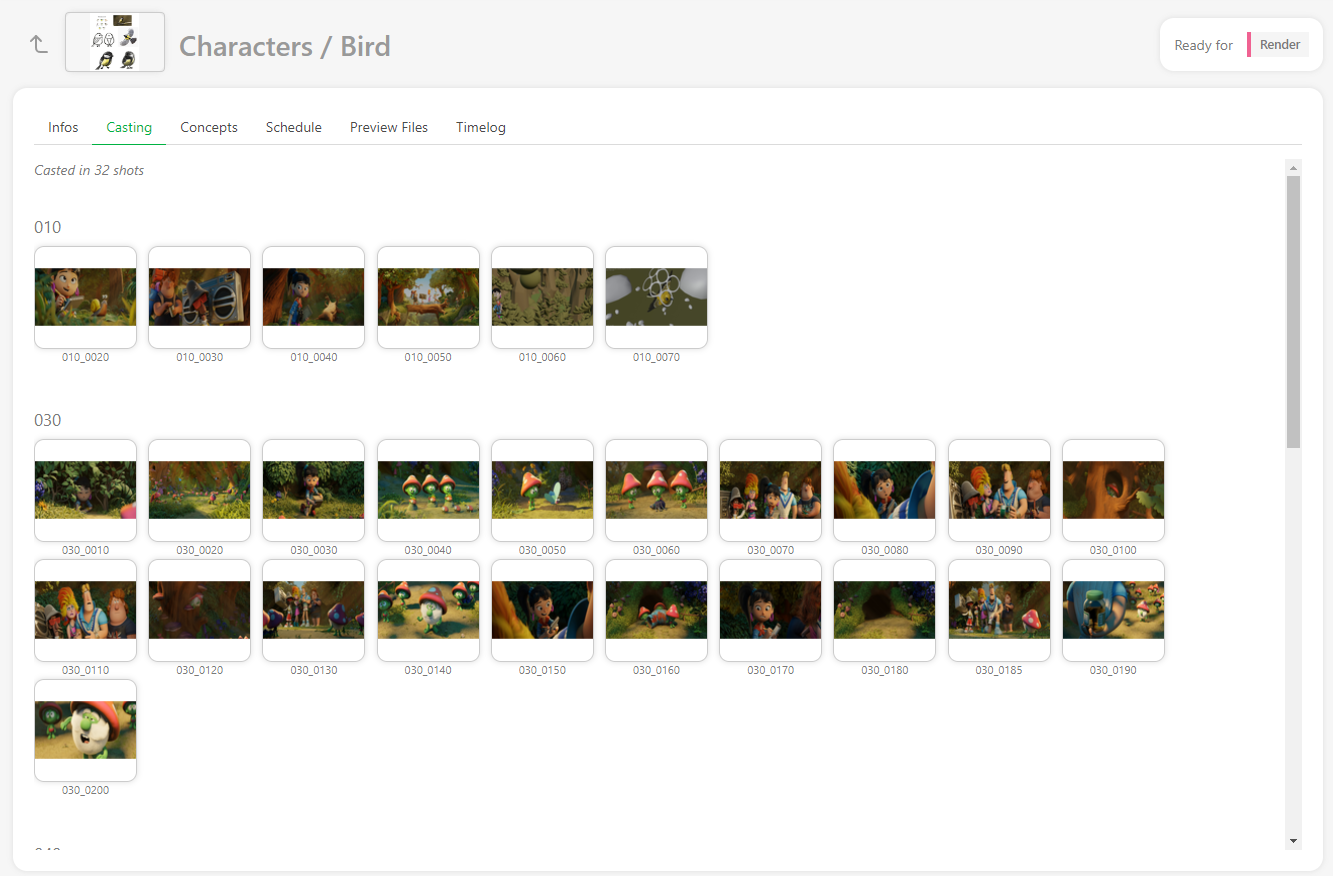
You can also access the Casting,
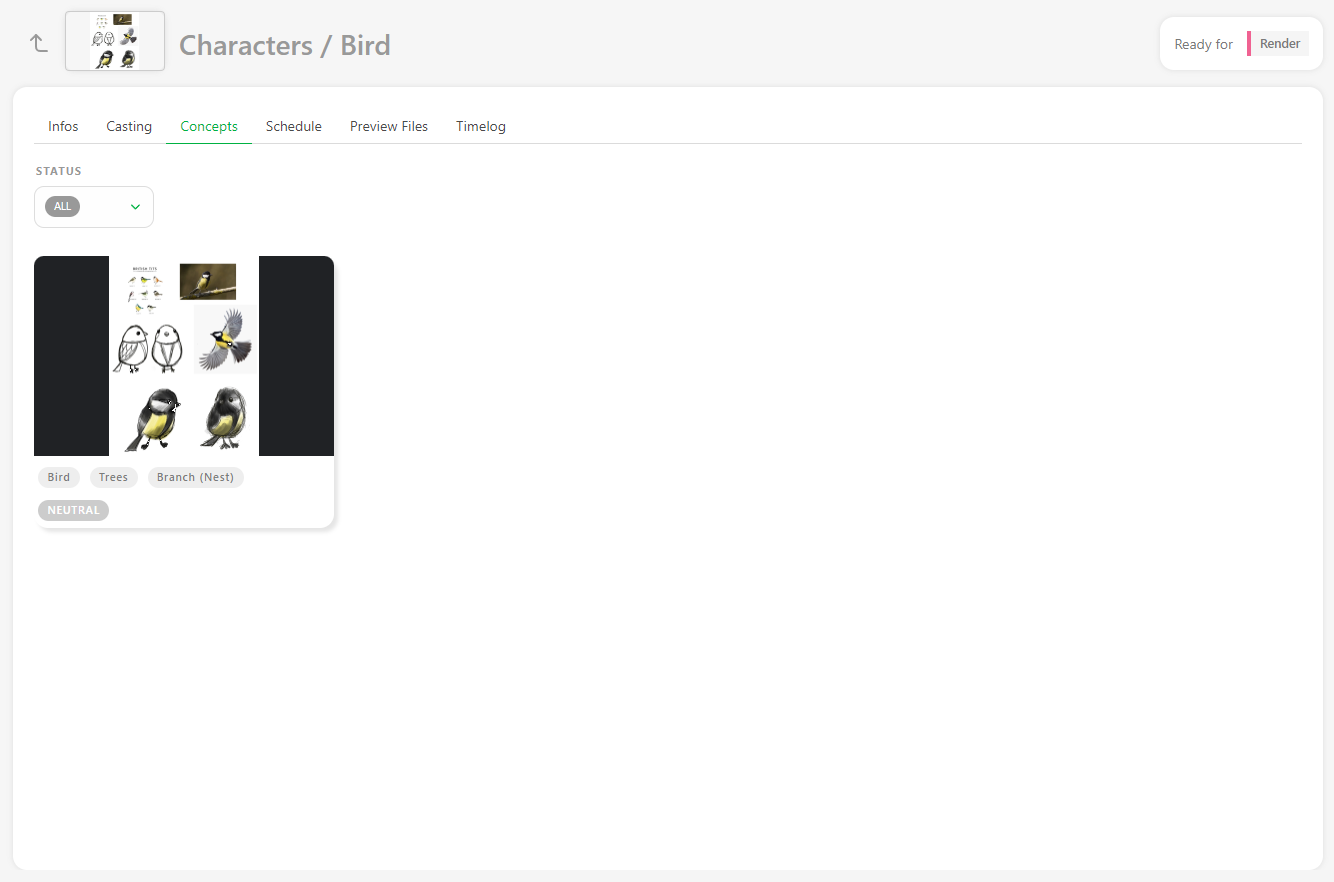
concept linked to this asset,
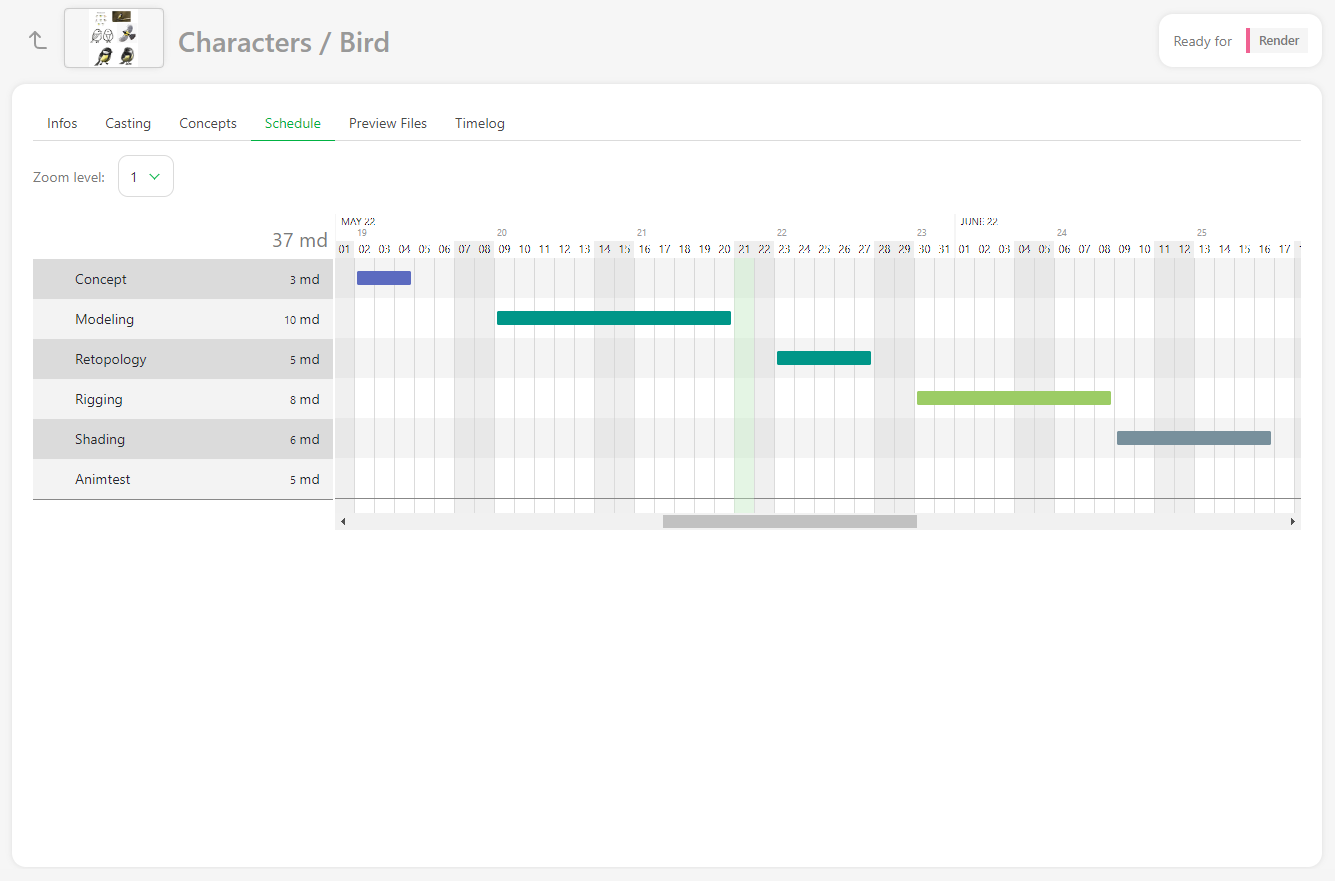
The Schedule is available if you have previously filled out the task type page data. If you have already filled out the data, you can modify them directly here.
the Preview Files uploaded at various task types,
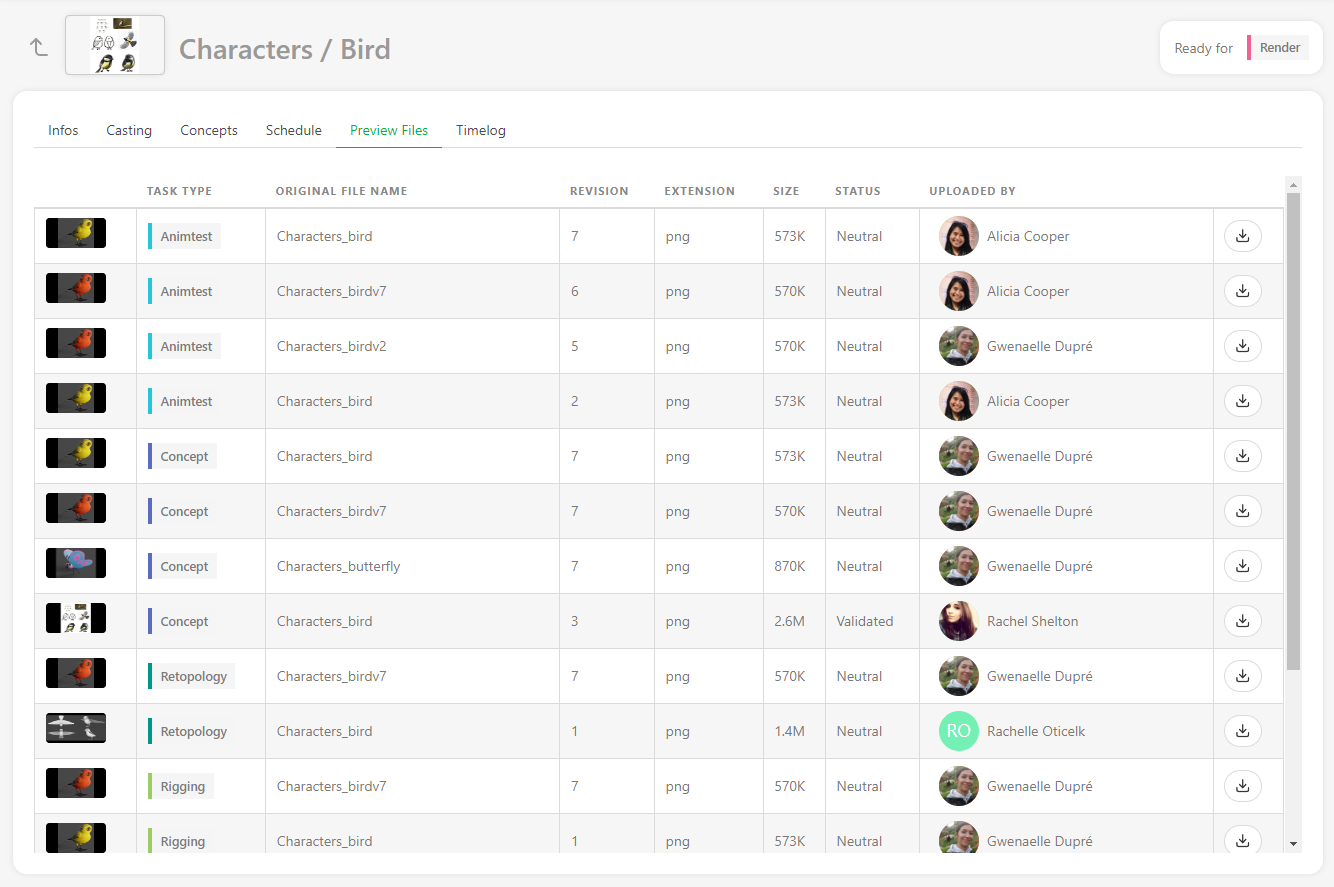
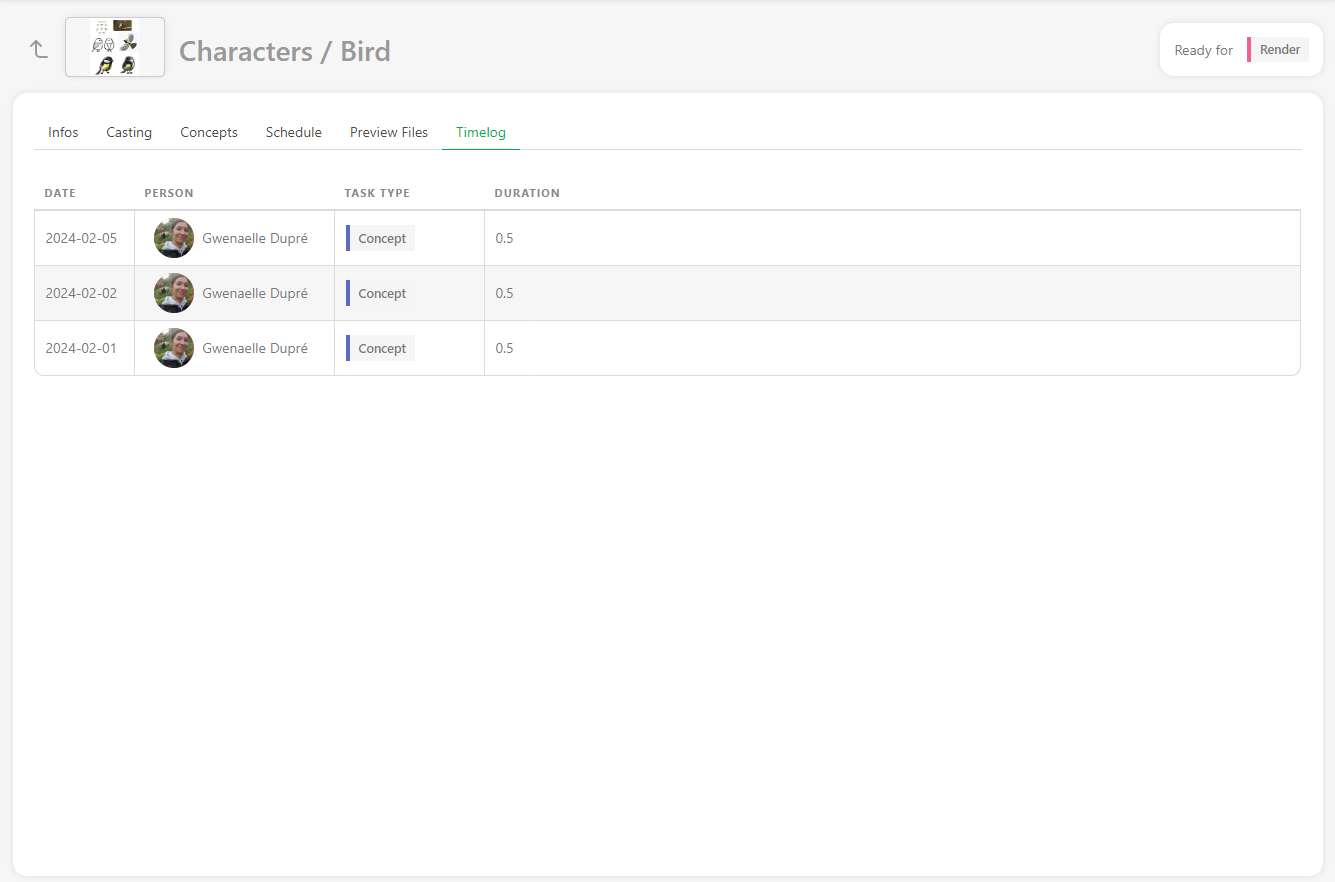
And the Timelog if people have filled out their timesheet on the tasks of this asset.
Add more tasks after creating the assets
If you realize after creating the assets that the task is missing, you can still add them.
First, ensure the missing task type is added to the settings page under the task type tab.
Then go back to the asset page and click on + Add tasks
Update your assets
You can update your assets at any point, change their name and asset type, modify their description, and add any custom information you added to the global page.
You can edit assets by going to the asset page, hovering over the asset you want to modify, and then clicking on the edit button  (1) on the right side of the line.
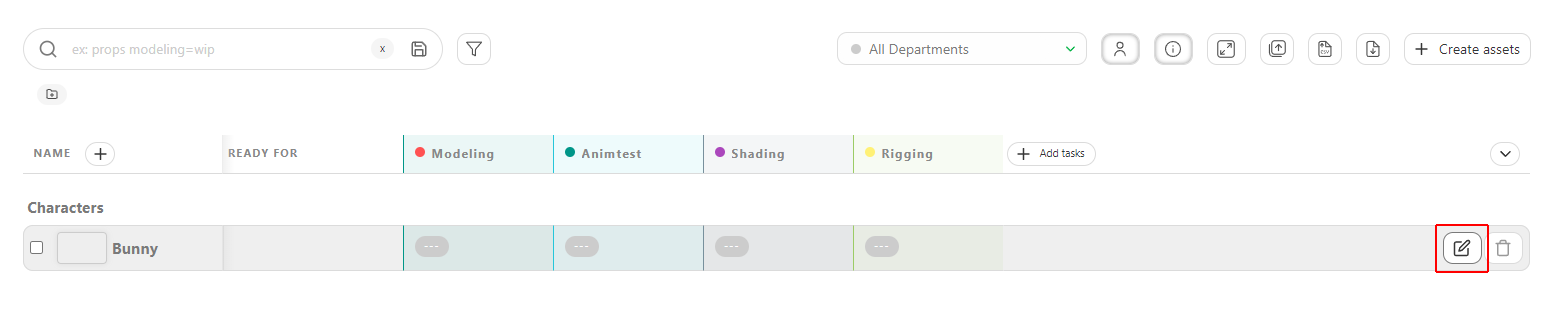
To extend the description on the main asset page, click on the first words (2), and a pop-up with the full description will open.
Update Assets with the CSV Import
You can use the CSV import to update your data quickly.
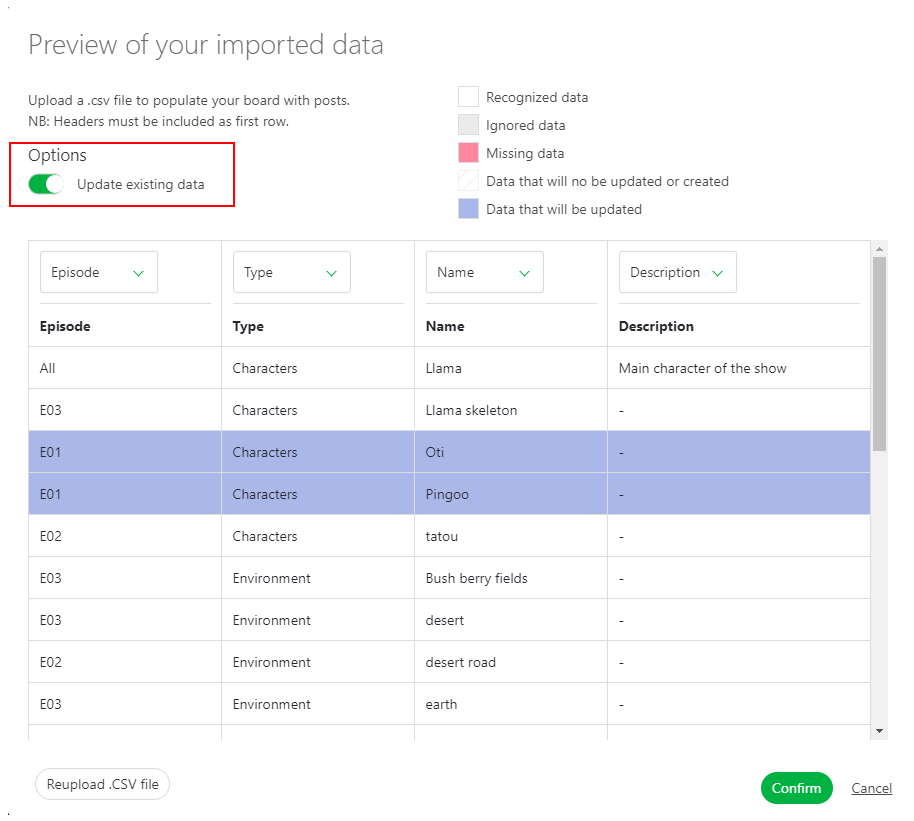
You can update the type of an asset, the Assignation, the Status of tasks, and add a Comment.
You need to switch on the option Update existing data. Then, the lines that will be updated will be highlighted in blue.
Update Assets by Copying / Pasting a Spreadsheet File
Open your spreadsheet, select your data, and copy them.
Then, go back to the asset page on Kitsu and click on the Import icon .
A pop-up window Import data from a CSV opens; click on the Paste a CSV data tab.
You can paste your previously selected data and see the result with the Preview button. You can check and adjust the name of the columns by previewing your data.
NB: the Episode column is only mandatory for a TV Show production. You need to switch on the option Update existing data. Then, the lines that will be updated will be highlighted in blue.
You have imported all your assets into Kitsu and created the task according to your Settings.
Global View of the Assets
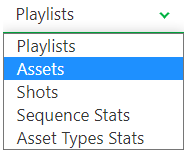
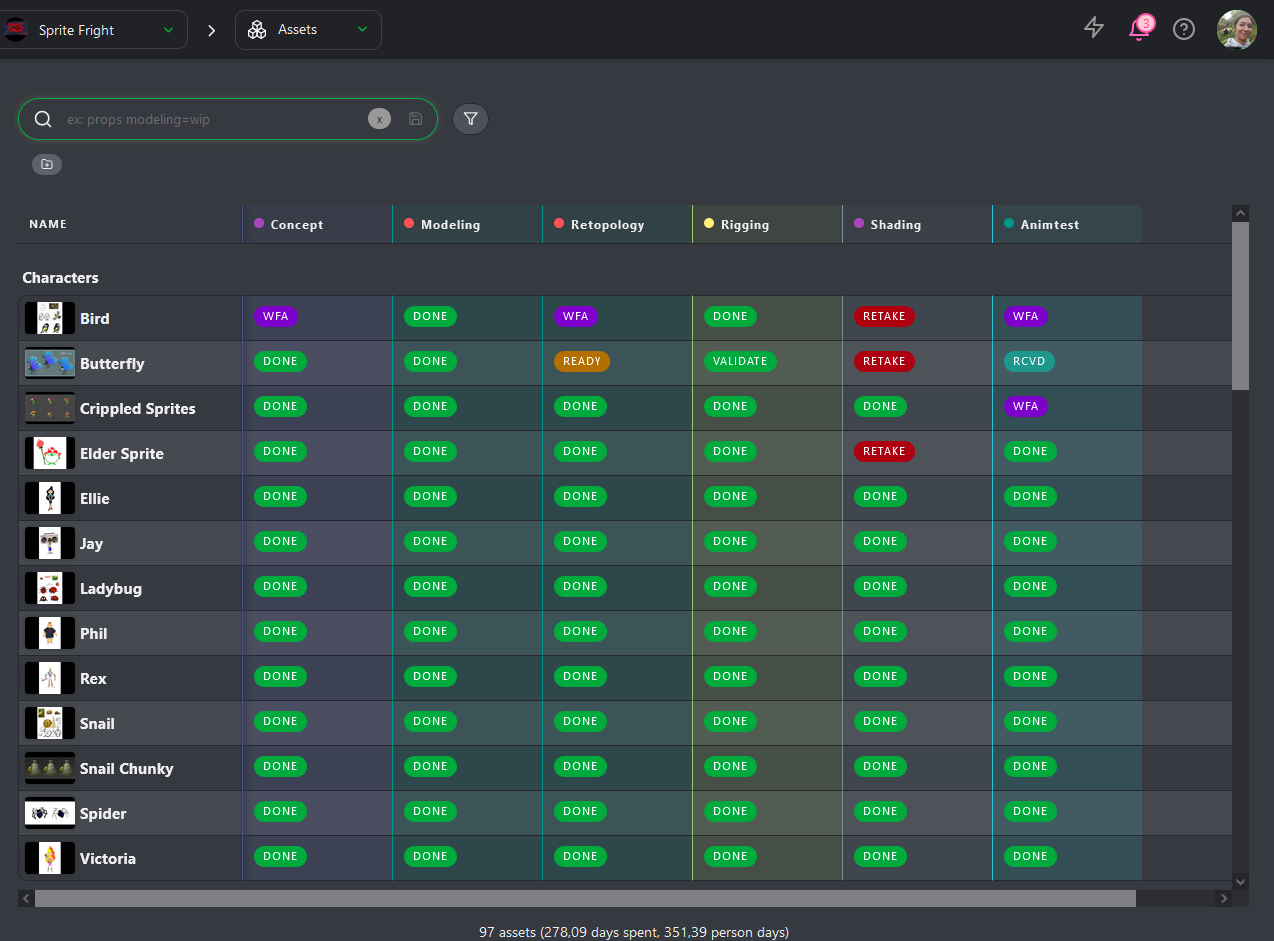
As a client, you can go to the global page of the assets with the drop-down menu on top of the screen.
On the global page, you will be able to see all the statuses of the different steps of the assets.
Asset Library
What is the Asset Library?
The Asset Library serves as a centralized repository for all assets used within Kitsu. Teams can import assets from any project into a shared library, making them accessible for future productions. With this functionality, assets like character models, props, environments, and more can be managed in one place and repurposed seamlessly in new projects.
How to Use the Asset Library
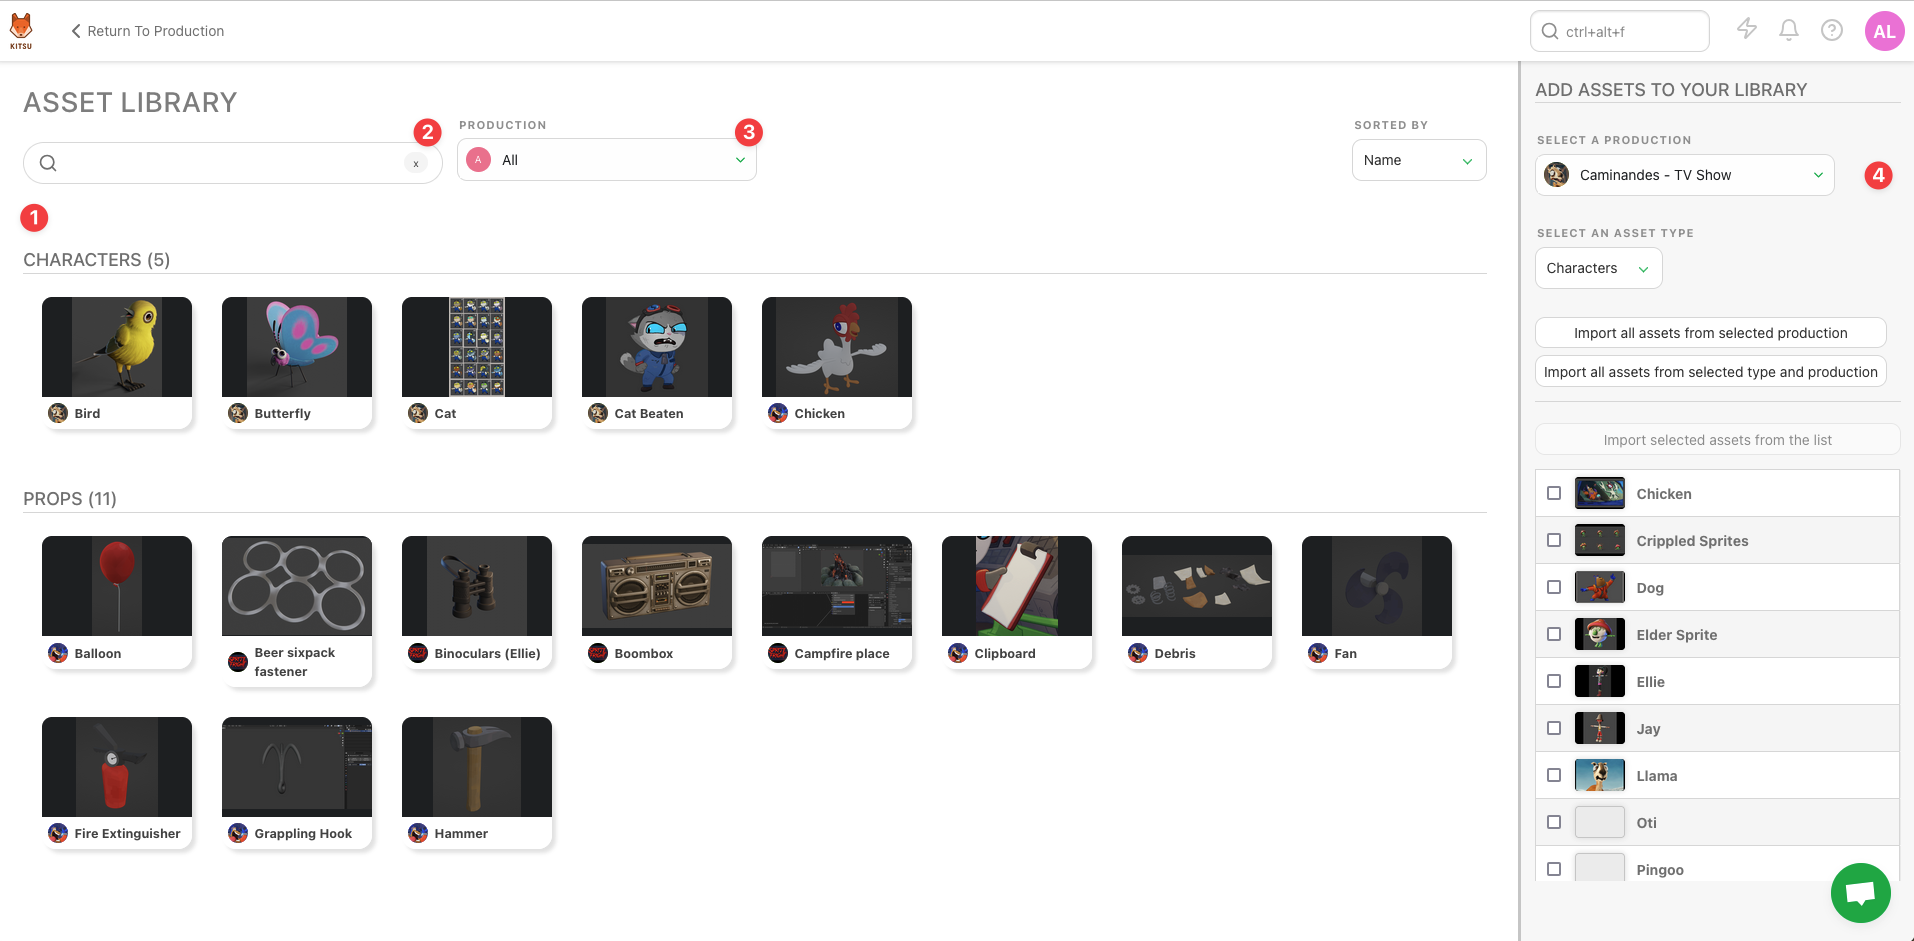
- You can access the Asset Library from the Studio section of the main Kitsu menu.
- The main Asset Library window displays all assets currently available in the library (1). Use the search (2) and filter (3) options to quickly find specific assets within the library.
- On the right-hand pane (4), you’ll find the import option for bringing in assets from other productions into the Asset Library.
Adding Assets to the Library
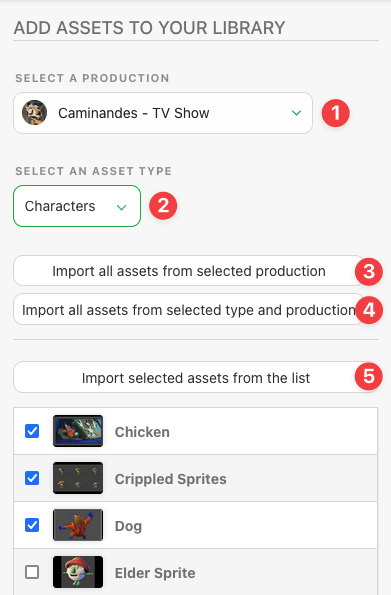
The right-hand pane is where you can add existing assets from other productions into the library. This action does not create a copy but simply references the original asset, allowing it to be used in other productions.
To import an asset:
- Select the production you wish to import the asset from (1).
- Choose the asset type you’d like to import (2).
There are three main ways to import assets:
- Import all assets from a specific production (3).
- Import assets by type from the selected production (4).
- Select individual assets for import (5).
Once imported, the asset will be available for use in breakdowns for other productions, allowing for efficient asset reuse across projects.
TIP
There are specific rules around who can import assets into the asset library, depending on the user’s permission group:
- Studio Manager: Can import any assets from any production.
- Production Manager: Can import assets only if they are part of the team.
- Supervisor and Artist: Cannot import assets into the library.
Remove Assets
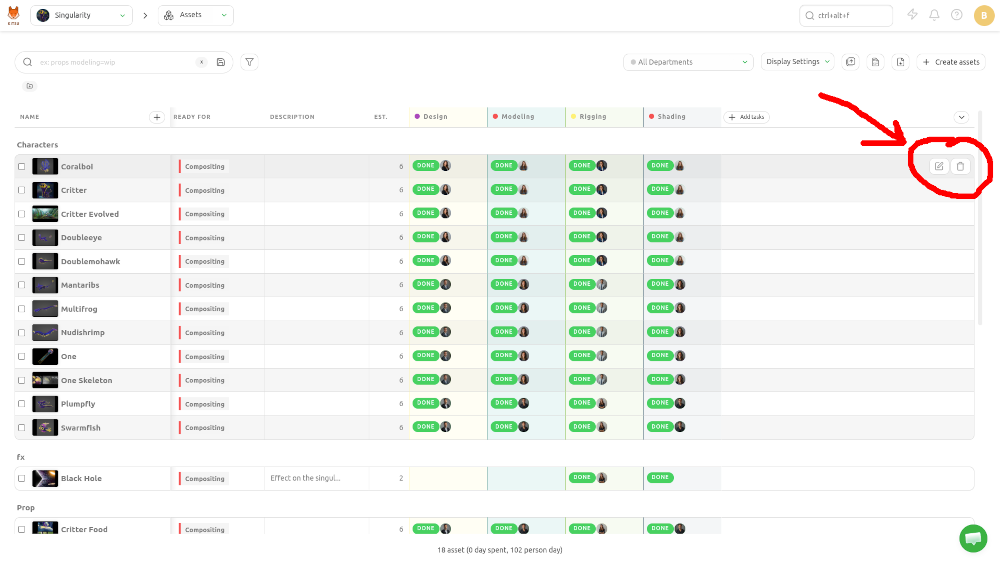
Hover over the asset you wish to remove in your production's asset list and click the Delete icon:
5. Global View of the Shots
Managing Shots
Create a Shot
Create your first shot
It's time to create shots for your production.
WARNING
Shots are linked to Sequences in Kitsu. This means you must create a sequence and then populate this sequence with shots.
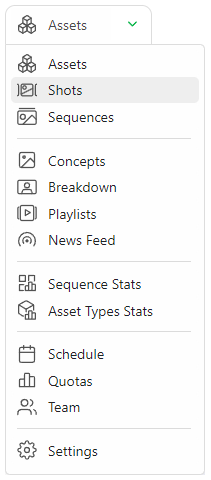
You need to go to the Shots page: you can use the dropdown menu and click on the SHOTS.
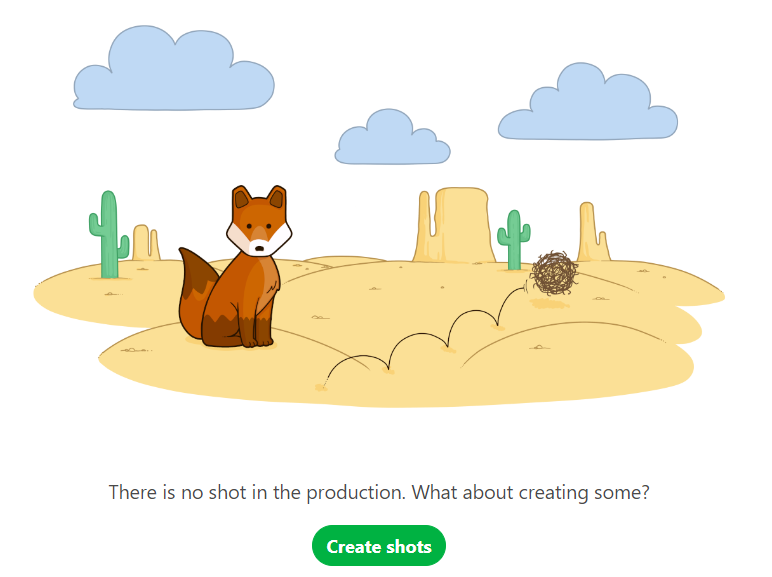
Click on the Add shots button to start with the shot creation.
WARNING
When you create a shot, the task workflow you have designed will be applied, and all the tasks will be created at the same time as the shot.
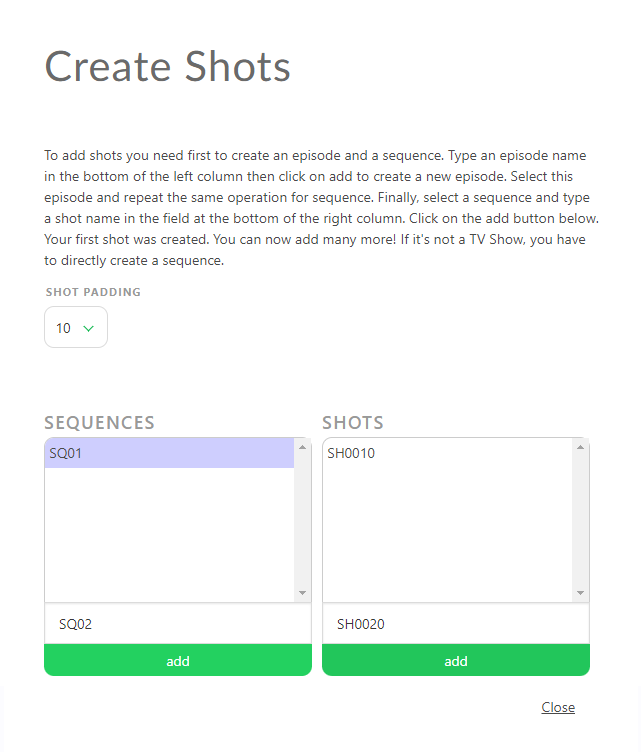
A new pop-up opens for the creation of the shots. You can now create the sequences and the shots.
Enter the first sequence, for instance, sq01, then add.
Now, you can see your sequence has been created. To add shots to this sequence, select it and create your shots.
For example, type sh0010 on the shots column, then again add. You can also define padding for your shots.
TIP
If you want to name your shots ten on ten as SH0010, SH0020, SH0030, etc, set the Shot Padding as 10
You can now see that new shots are listed and linked by their sequence. You have created the first shot of the first sequence.
Now, let's add more shots than just one! As you can see, the box already contains your name code but incremented, so you have to continue to click on add to create more shots.
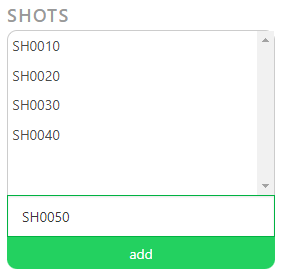
To add more sequences, go to the left part, type the name of your new sequence, and then click on add. Your second sequence is selected, and you can now add shots.
TIP
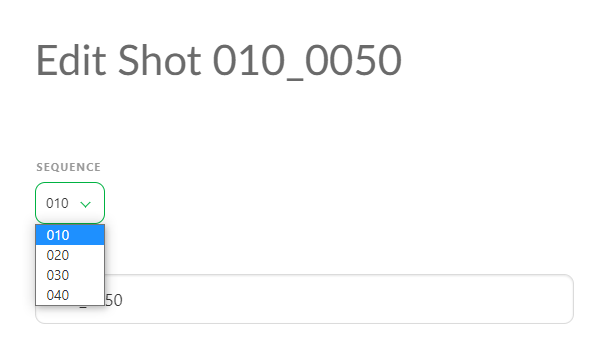
If a shot is misplaced on a sequence, you have to edit the shot , and change the sequence. 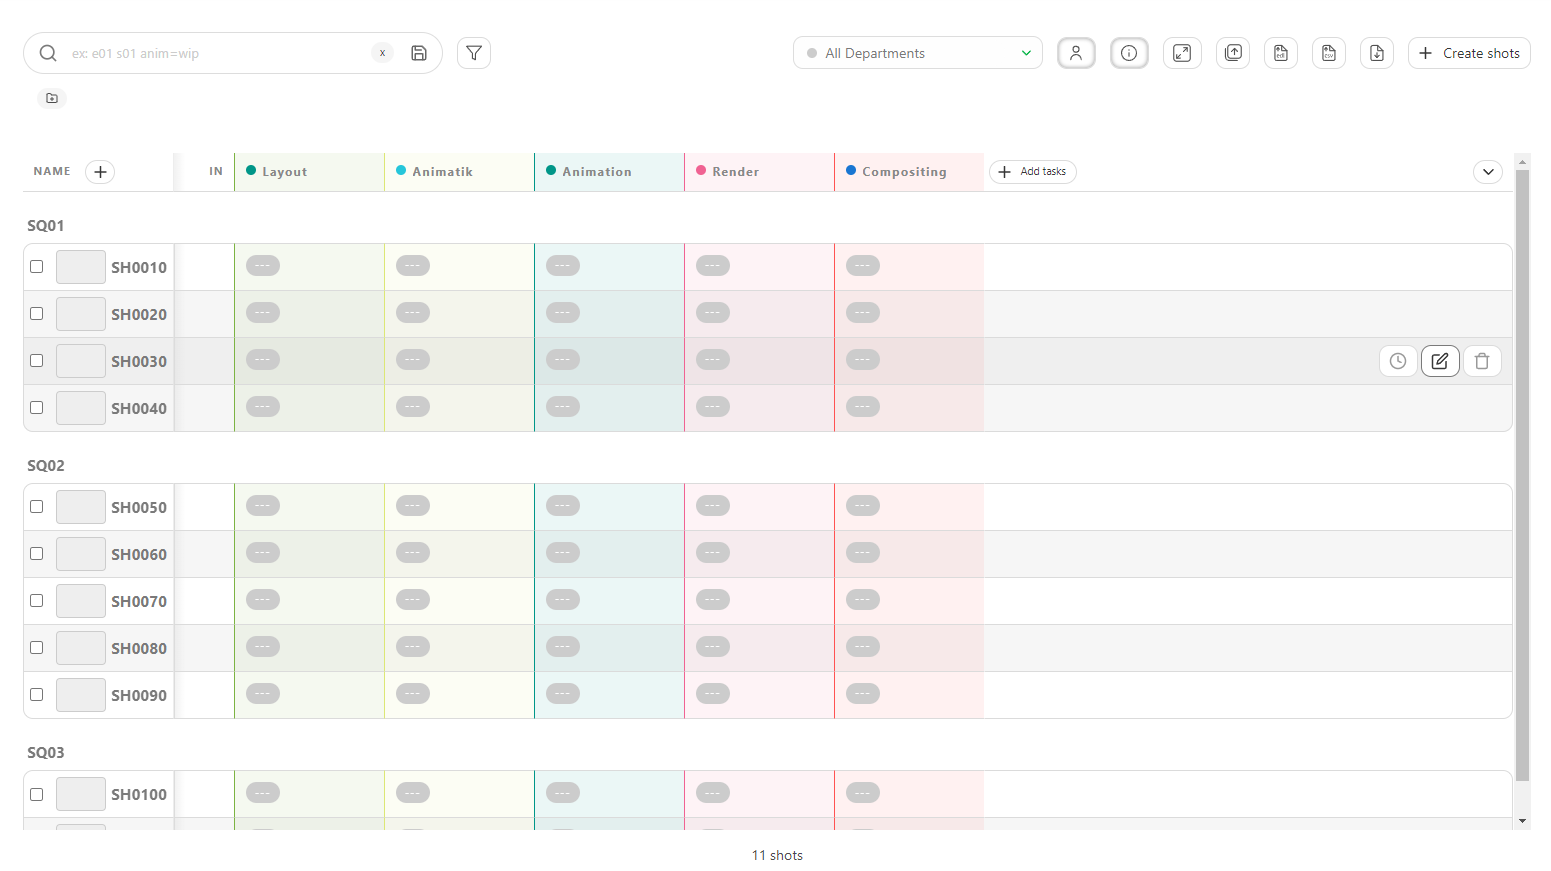
Create Shots from an EDL File
You may already have your shots list ready in an EDL file. With Kitsu, you can directly import your EDL file to create the sequence, shot, number of frames, Frame in and out, and more.
On the Global Shot Page, you will see an Import EDL button.

You can select the naming convention of the video file used during the editing on the pop-up.
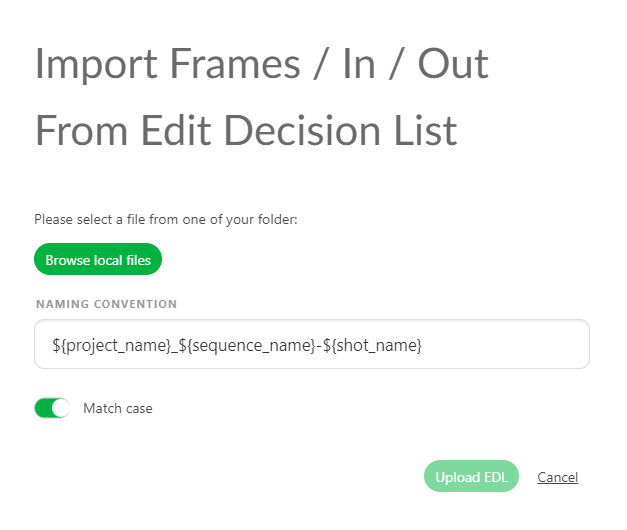
It means the video clip on the editing is named as project_sequence_shot.extension.
Here is an example of an EDL for the LGC production.
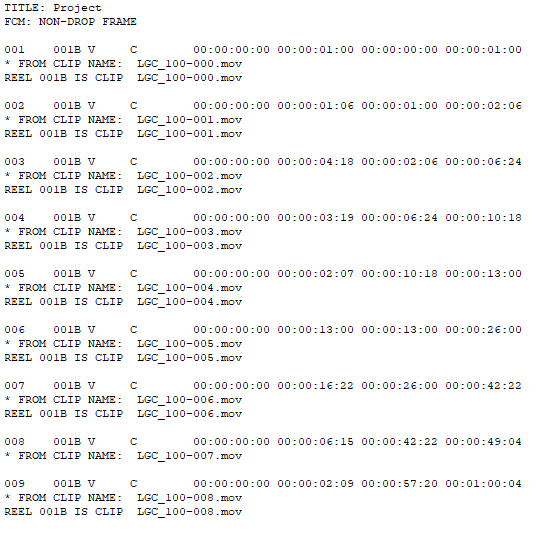
The video files are named LGC_100-000.mov, which means LGC is the production name, 100 is the sequence name, and 000 is the shot name.
You can import the EDL file once you have the naming convention.
Then click on Upload EDL
Then Kitsu will create the shots.
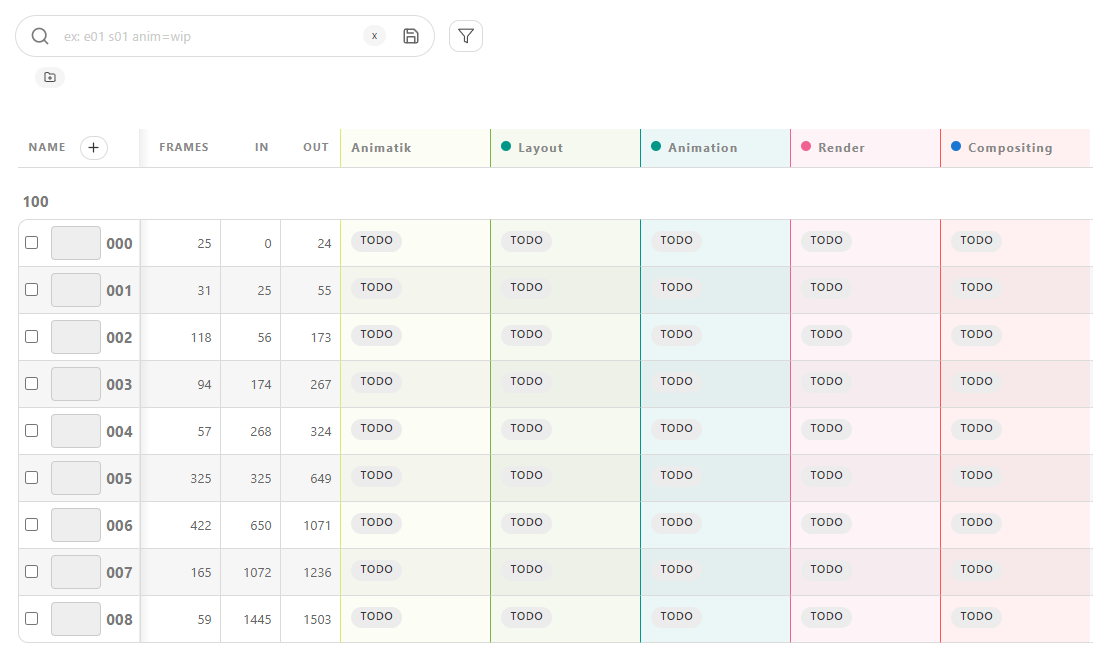 :::
:::
Create Shots from a CSV Spreadsheet File
You may already have your shots list ready in a spreadsheet file. With Kitsu, you have two ways to import them; the first is to import a .csv file directly, and the second is to copy-paste your data directly into Kitsu.
First, save your spreadsheet as a .csv file.
Then, return to the shot page on Kitsu and click the Import icon.
A pop-up window Import data from a CSV opens. Click on Browse to pick your .csv file.
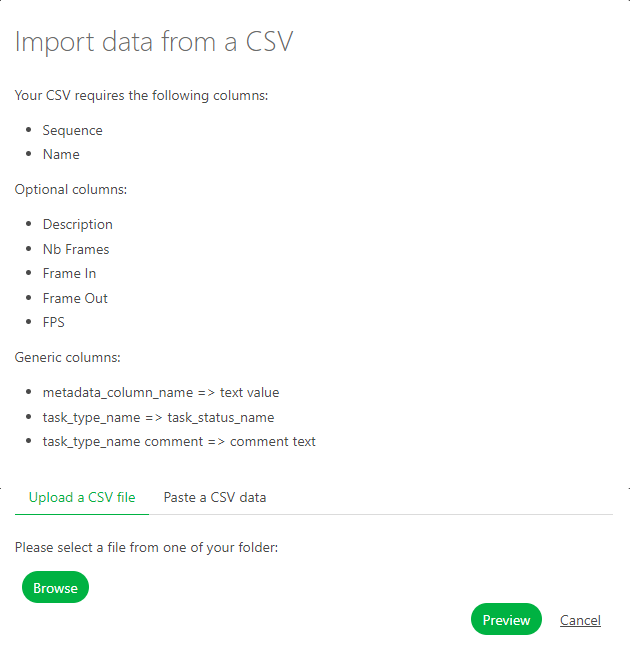
To see the result, click on the Preview button. You can check and adjust the name of the columns by previewing your data. NB: the Episode column is only mandatory for a TV Show production. 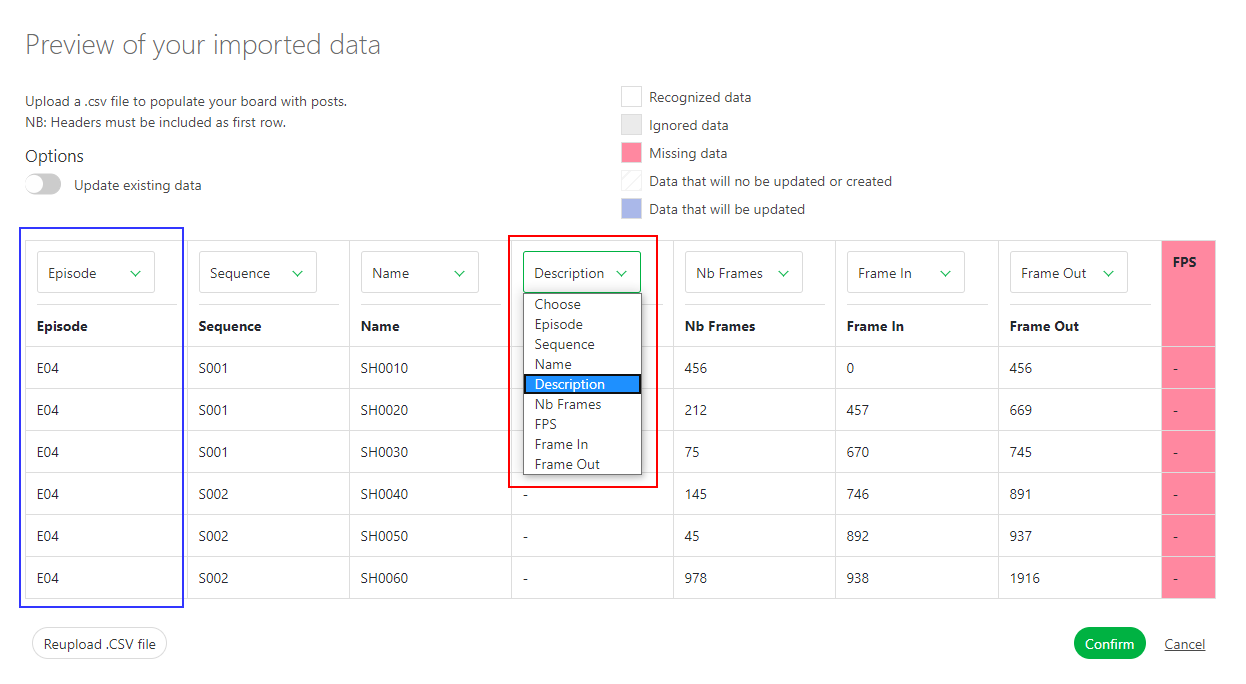
Once everything is good, click the Confirm button to import your data into Kitsu.
All your shots are imported into Kitsu, and the task is created according to your Settings.
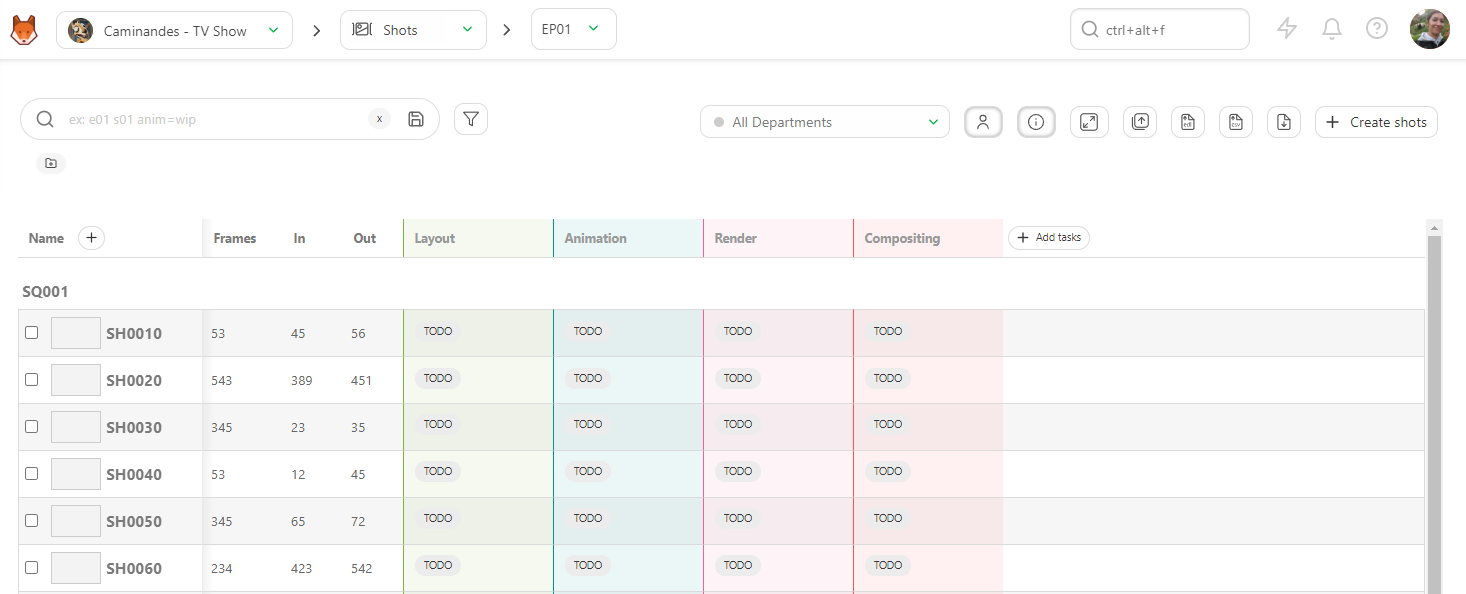
Create Shots by Copying / Pasting a Spreadsheet File
Open your spreadsheet, select your data, and copy them.
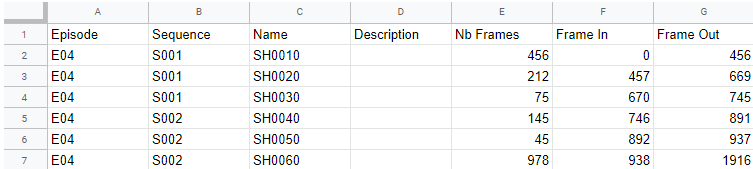
Then, go back to the shot page on Kitsu and click on the Import icon .
A pop-up window Import data from a CSV opens; click on the Paste a CSV data tab.
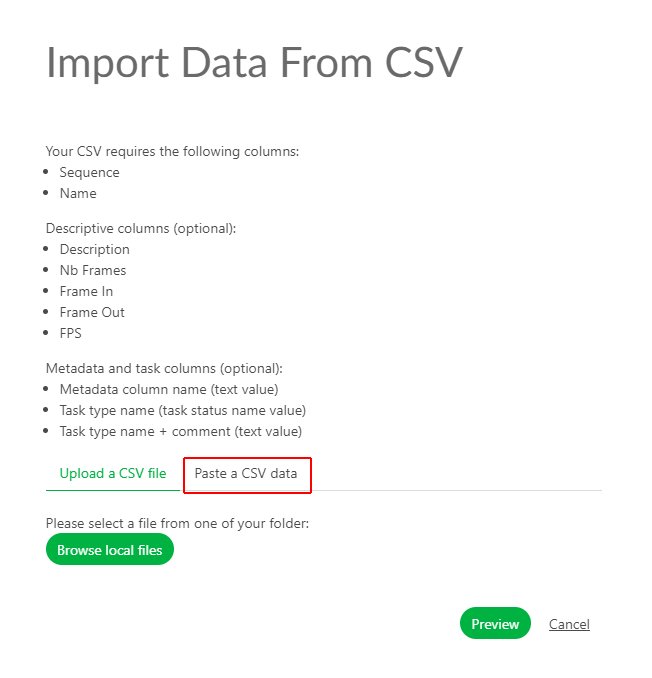 You can paste your previously selected data and see the result with the Preview button.
 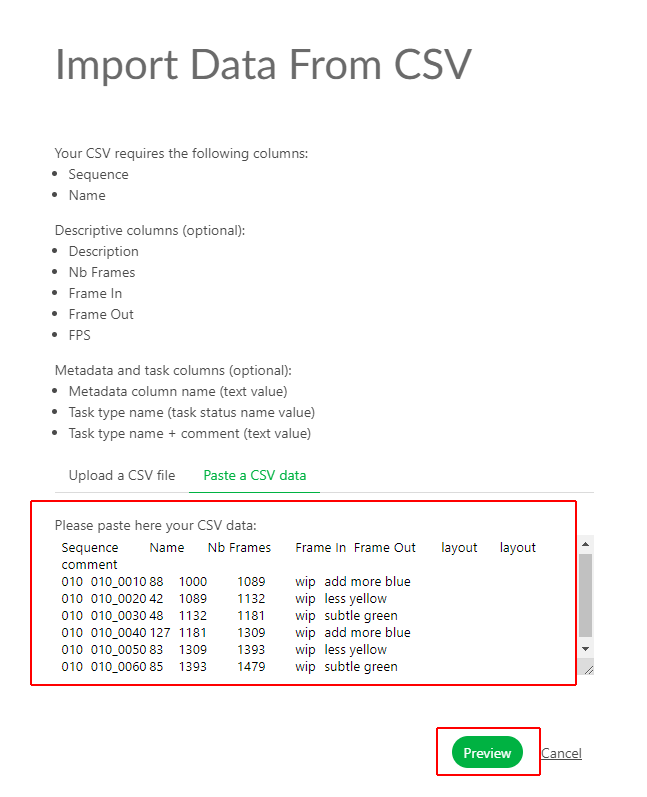 You can check and adjust the name of the columns by previewing your data. NB: the Episode column is only mandatory for a TV Show production.
Once everything is good, click the Confirm button to import your data into Kitsu.
All your shots are imported into Kitsu, and the task is created according to your Settings.
See the Details of a Shot
If you want to see the details of a shot, click on its name.
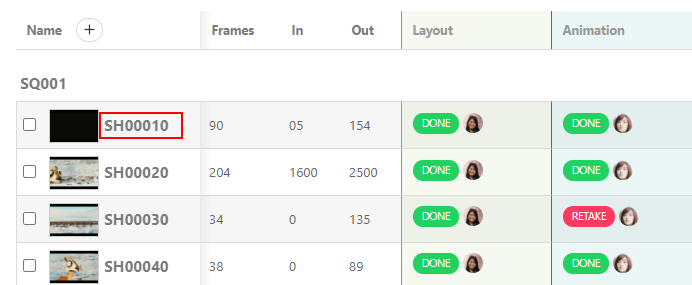
A new page opens with the list of the tasks, the assignation, and the status newsfeed on the right. You can navigate through each by clicking on the name of the tabs.
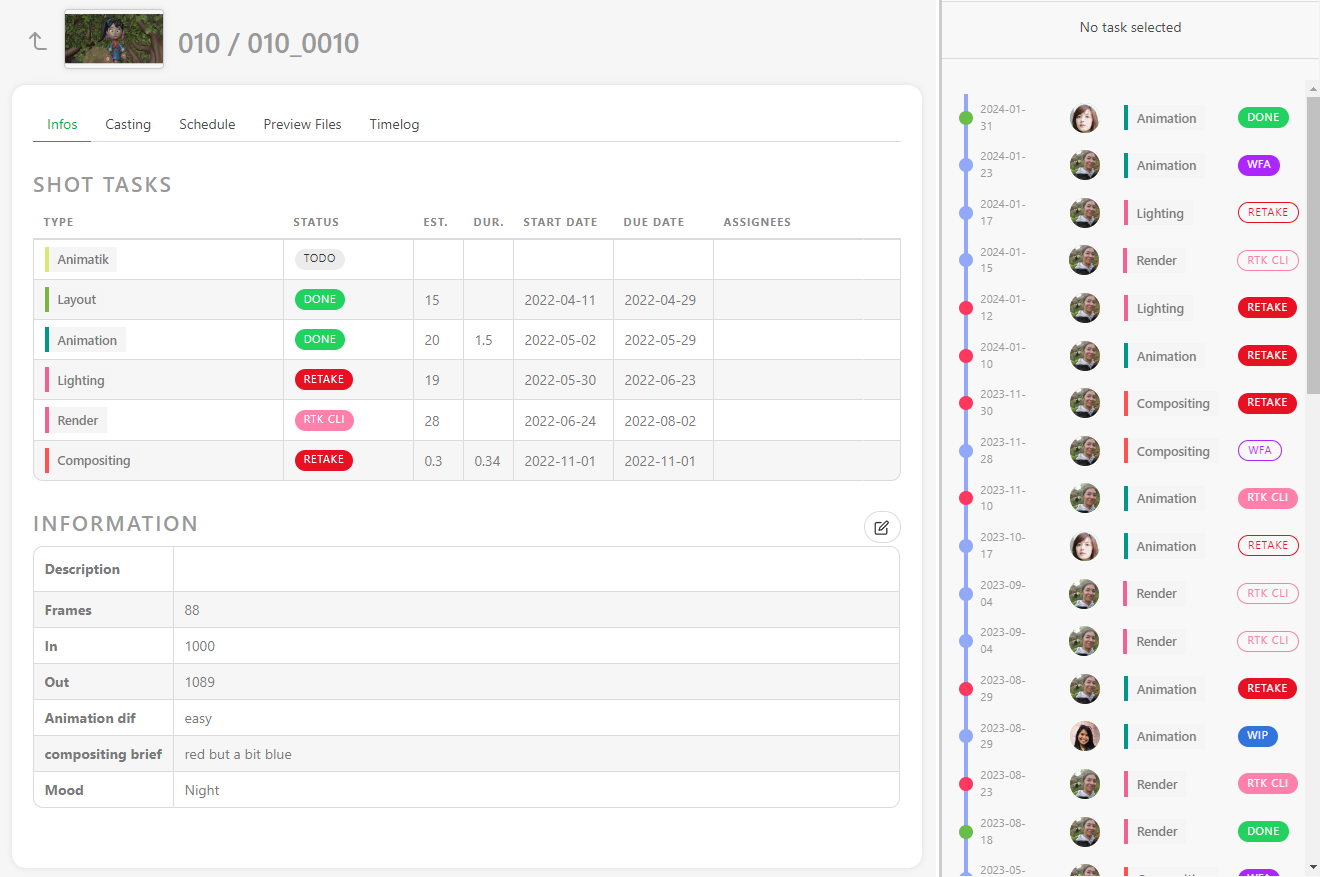
You can click on the status of each task to open the comment panel and see the history of the comments and the different versions.
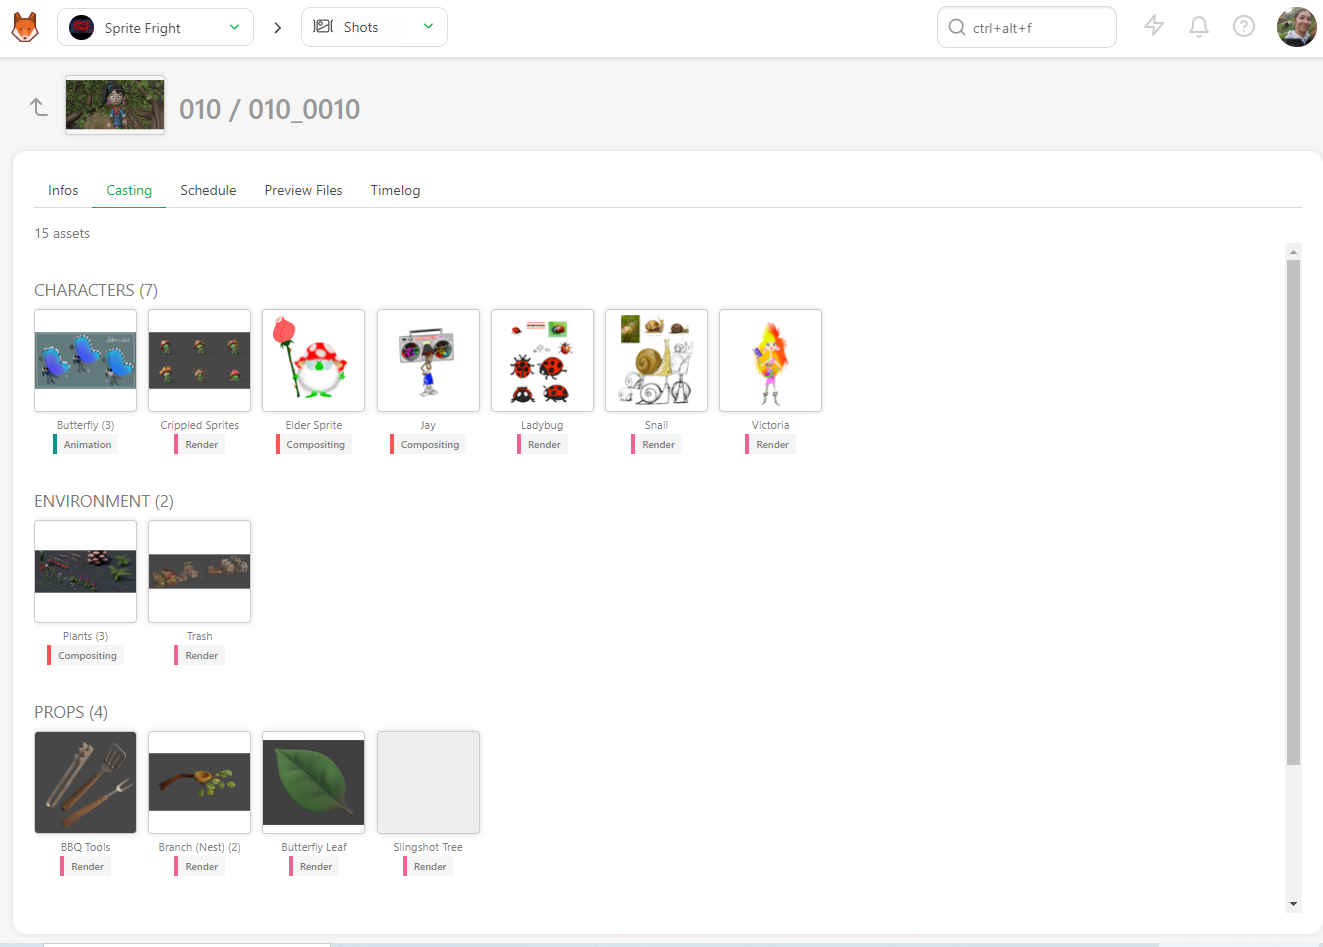
You can also access the Casting,
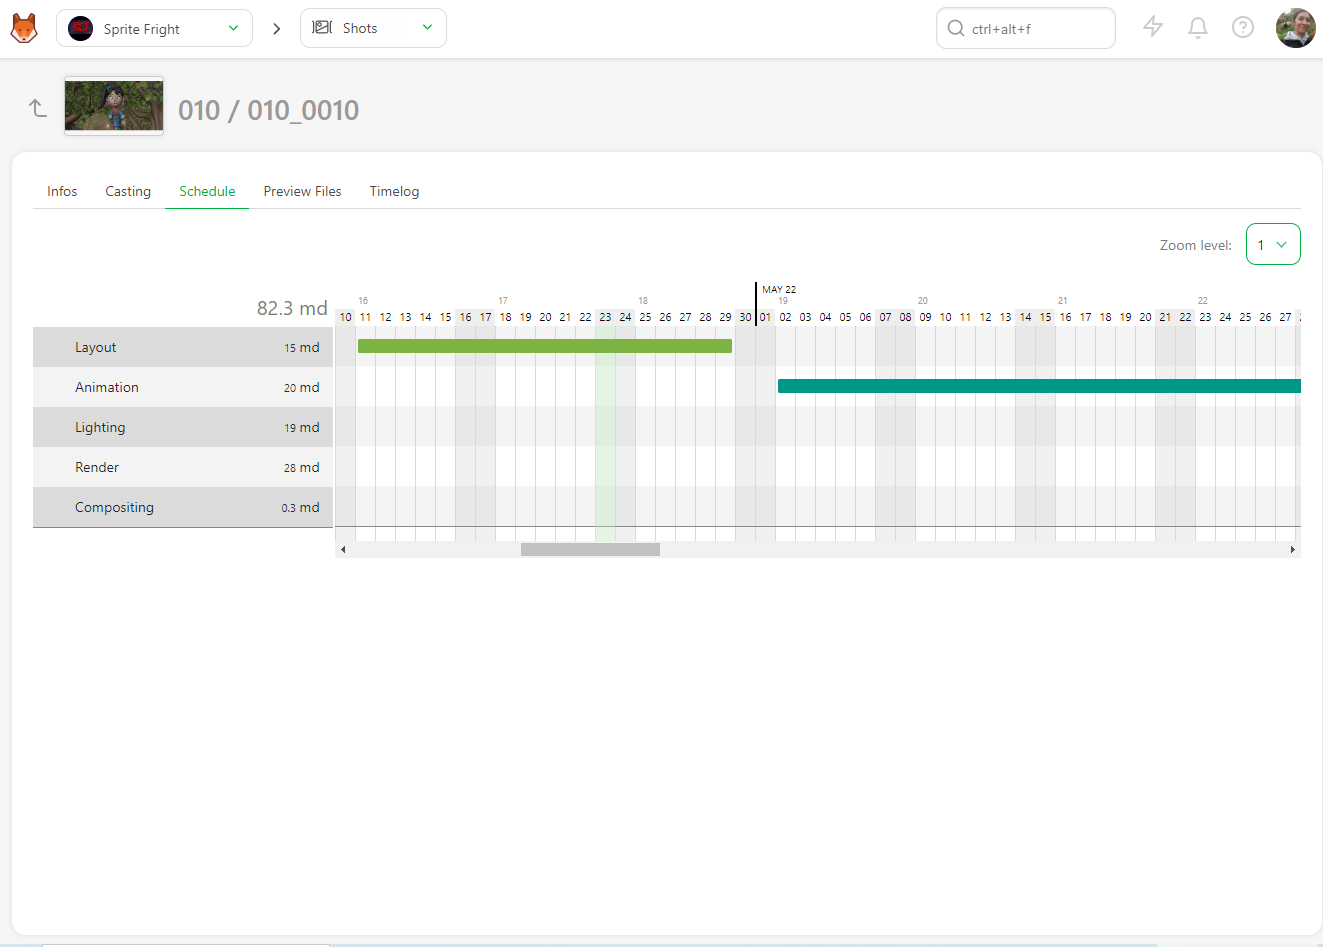
The Schedule is available if you have previously filled out the task type page data. If you have already filled out the data, you can modify them directly here.
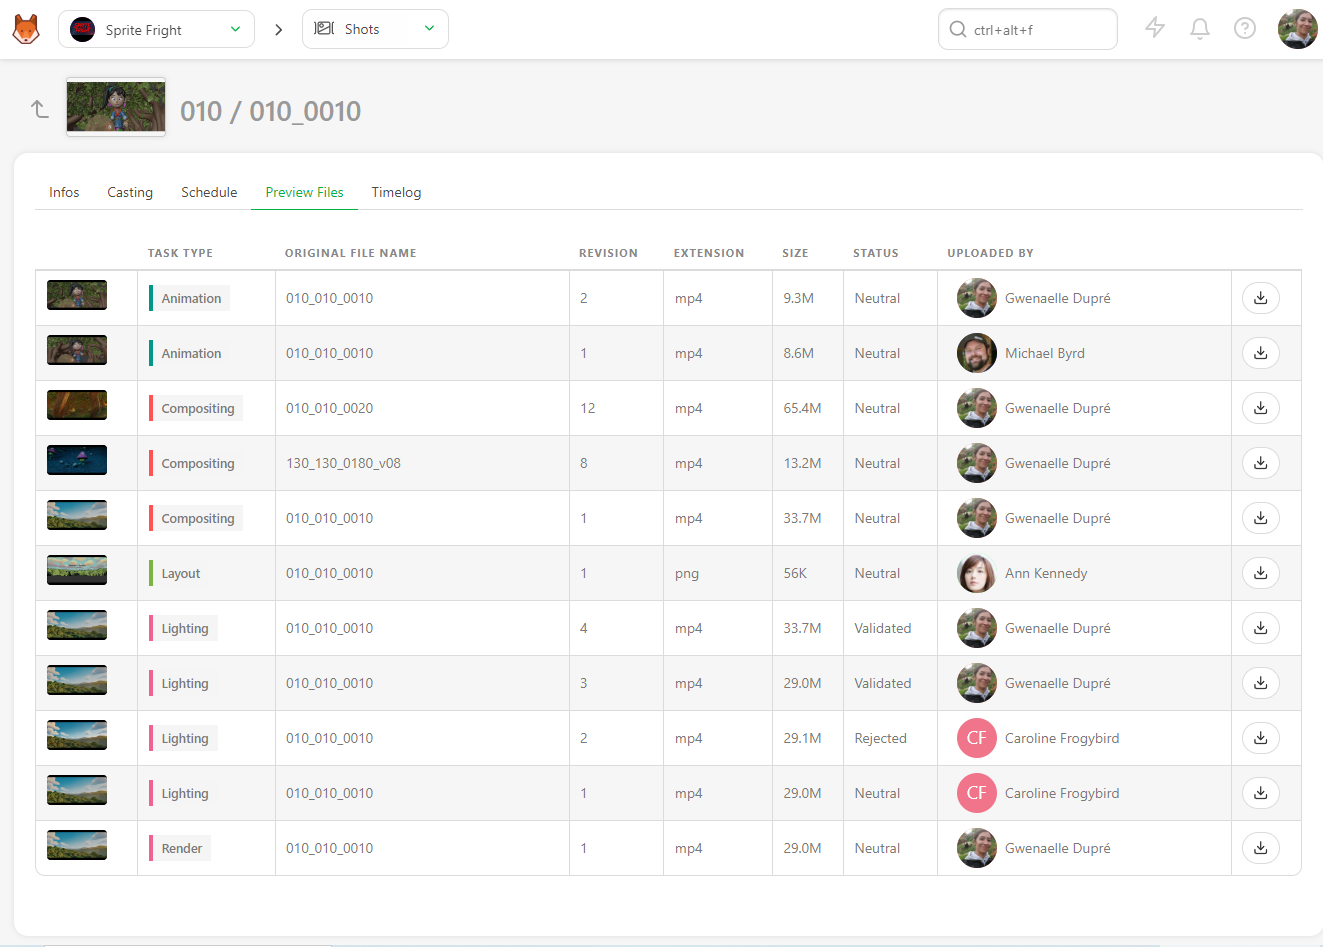
the Preview Files uploaded at various task types,
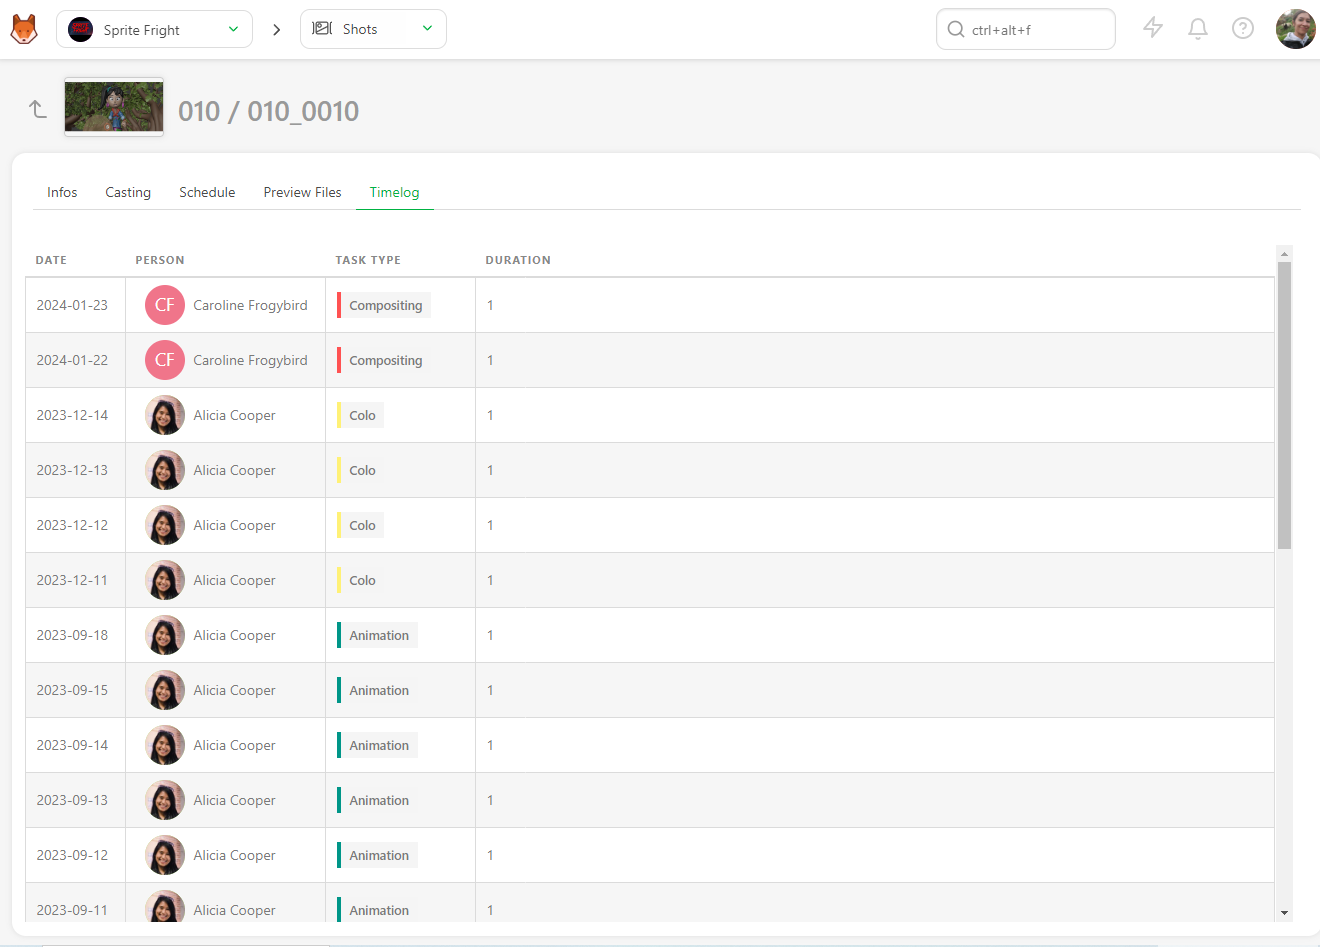
And the Timelog if people have filled out their timesheet on the tasks of this asset.
Add more tasks after creating the shots
If you realize after creating the shots that the task is missing, you can still add them.
First, ensure the missing task type is added to the settings page under the task type tab.
Then go back to the shot page and click on + Add tasks.
Update your shots
You can update your shots at any point, change their names and sequences, modify their descriptions, and add any custom information you added to the global page.
You can edit shots by going to the shot page, hovering over the shot you want to modify, and then clicking on the edit button (1) on the right side of the line.
To extend the description on the main shot page, click on the first words (2), and a pop-up with the full description will open.
Update Shots Information with CSV Import
You can use the CSV Import to update your data as the NB Frames, Frame IN, Frame Out, or any custom Metadata column.
You can update the Assignationthe Status of tasks and add a Comment.
Open your spreadsheet, select your data, and copy them.
Then, go back to the shot page on Kitsu and click on the Import icon .
A pop-up window Import data from a CSV opens; click on the Paste a CSV data tab.
You can paste your previously selected data and see the result with the Preview button. You need to switch on the Option: Update existing data. The updated shots will be in blue.
NB: the Episode column is only mandatory for a TV Show production. 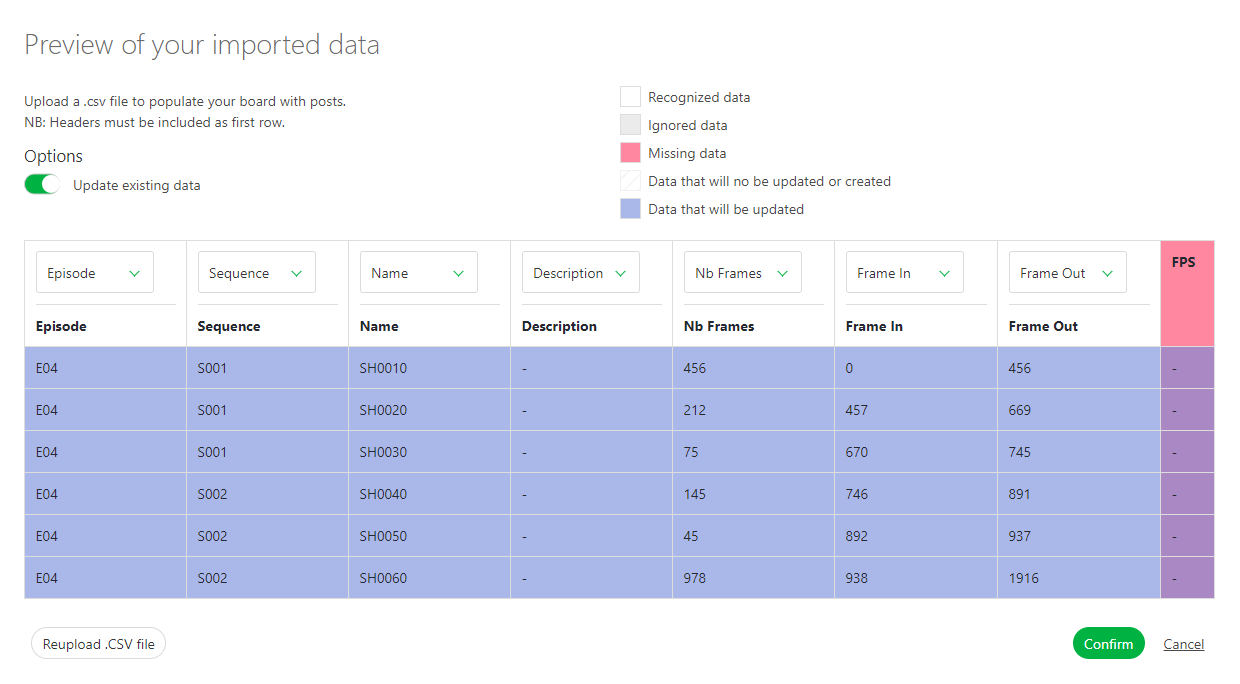
Once everything is good, click the Confirm button to import your data into Kitsu.
All your shots are imported into Kitsu, and the task is created according to your Settings.
Add the number of Frames and Frame ranges to the shots
At this stage of the production, the animatic should be done. This means you have the length (number of frames, Frame range In, and Frame range Out) for each shot. You can add this information to the spreadsheet. This way, you are sure that all the frames are calculated and none are missing or over-computed.
WARNING
If you have created your shots and sequence by hand, the Frame column will be hidden. You must edit at least one shot and fill in the number of frames to display the Frame column. The column will be displayed if you have created your shots and imported the number of frames with a CSV/spreadsheet.
You need to edit the shots to fill in the frame range information. Click on the edit button on the right side of the shot line.
You can enter the shots In and **Out ** in the new window. Then, save by clicking the Confirm button.
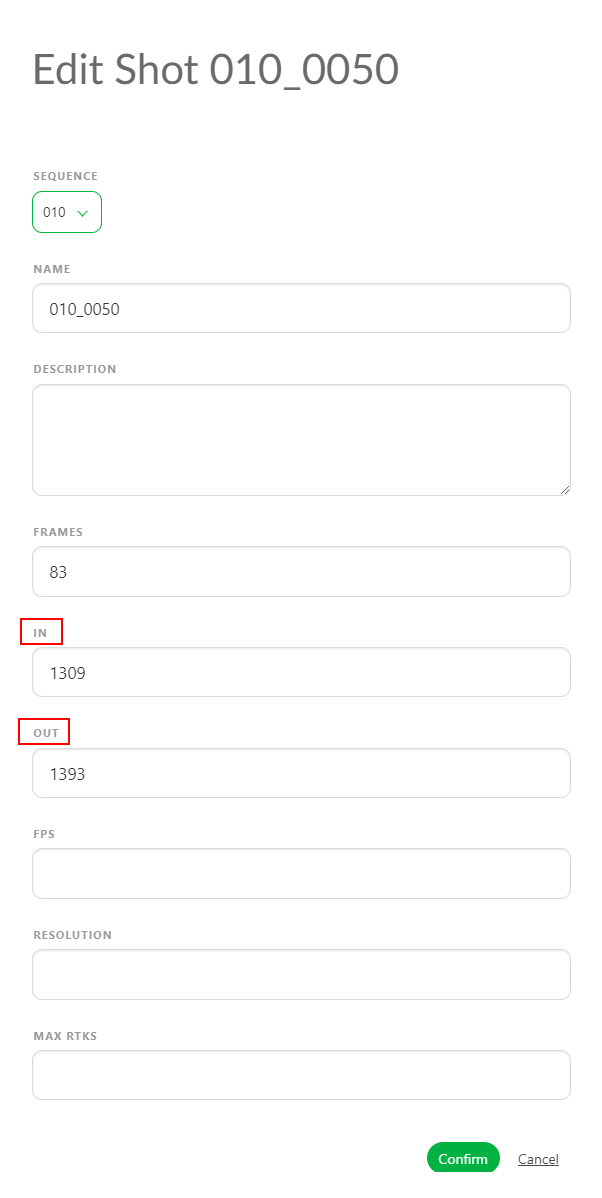
Now, the frame range appears on the general spreadsheet of the shot page.
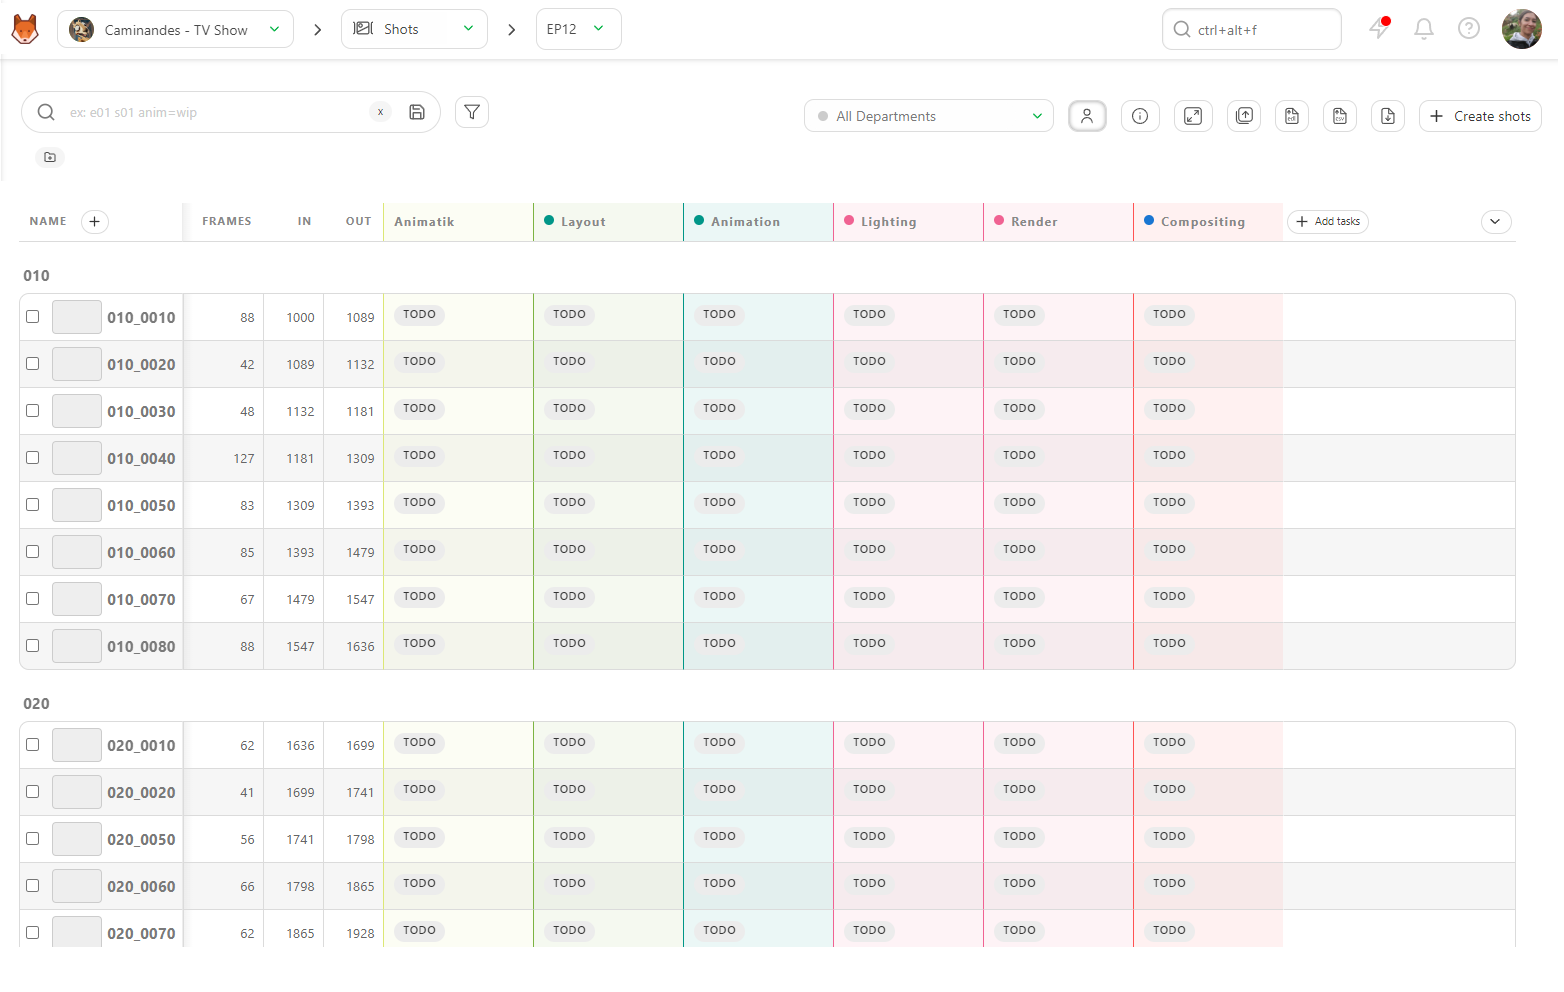
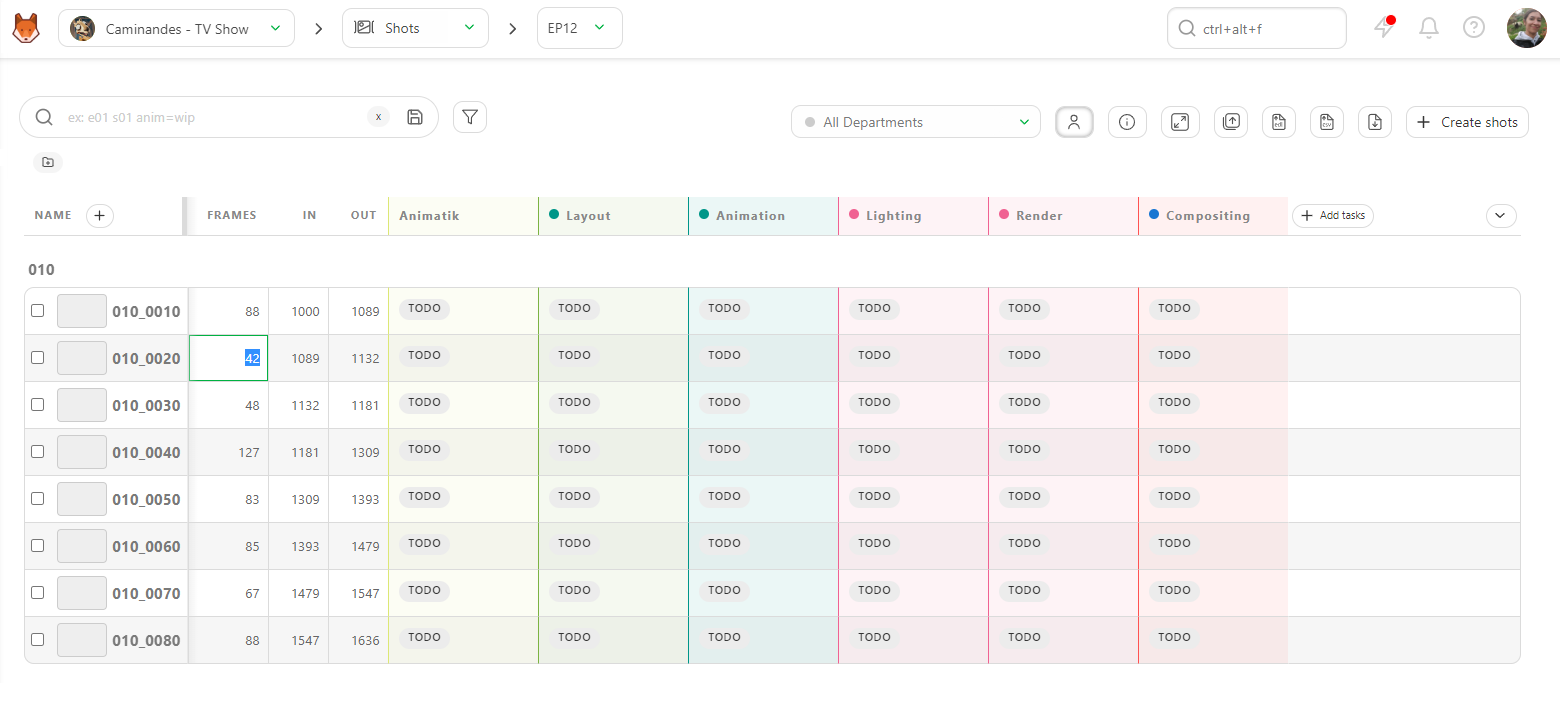
Now that you have unlocked the Frames, In, and Out columns, you can fill them directly from the global shot page.
Click on the case you want to fill in and add the data.
TIP
If you enter the Frame In and Frame Out, Kitsu automatically calculates the Number of Frame.
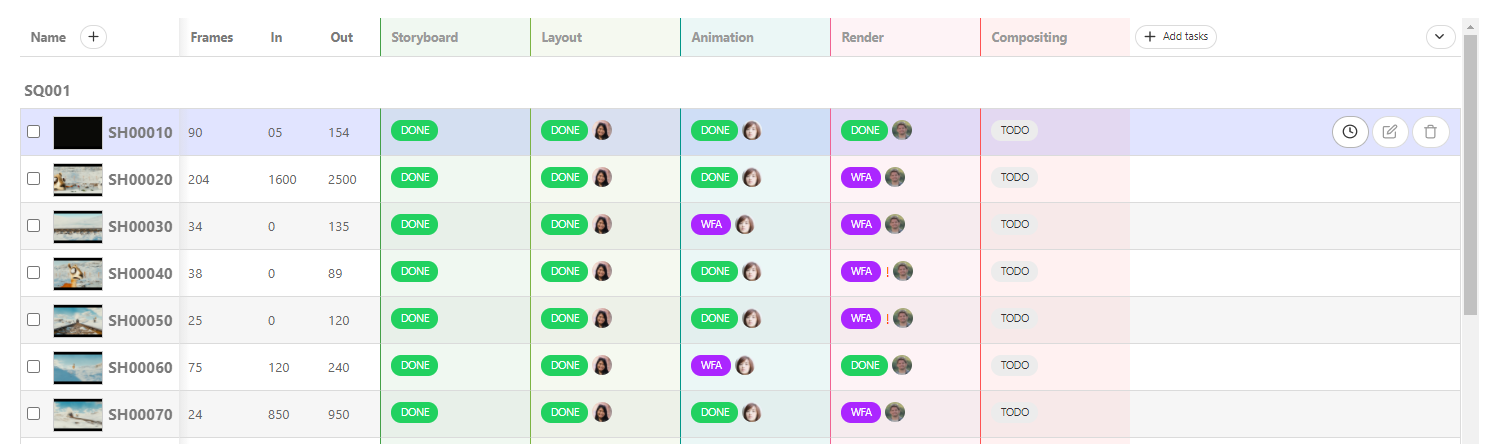
You can also use the CSV Import to update your frame range quickly. Update Shots information with CSV Import
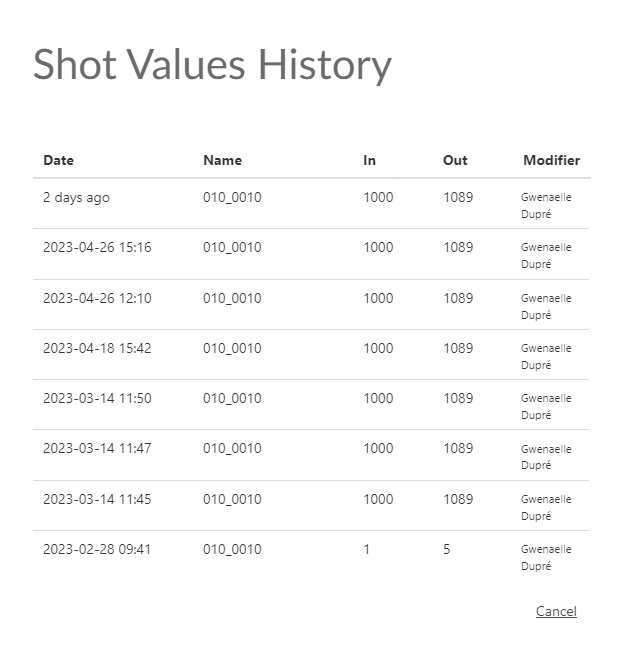
You can also access the history of shot values.
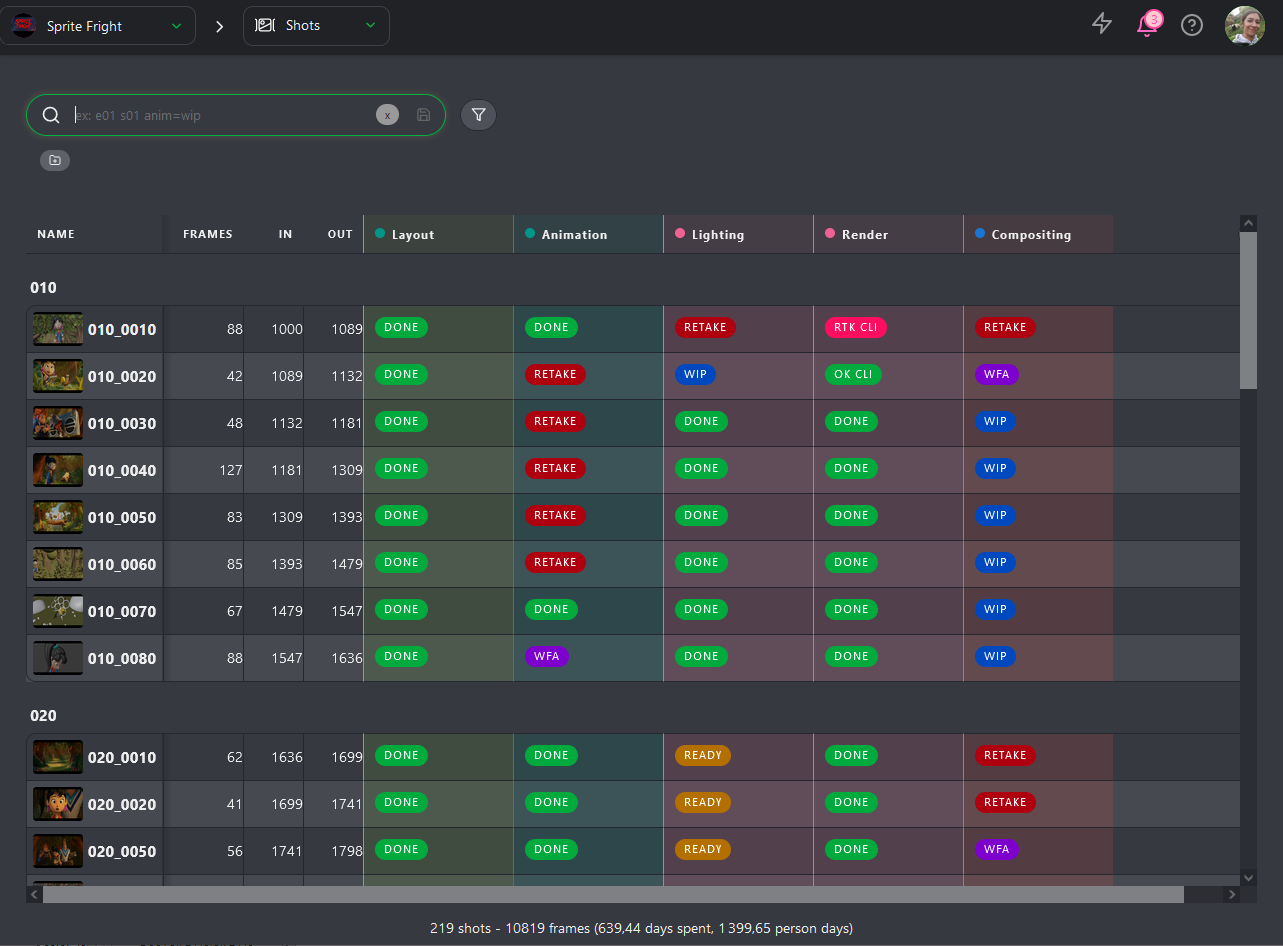
Global View of the Shots
As a client, you can go to the global page of the shots with the drop-down menu on top of the screen.
On the global page, you will be able to see all the statuses of the different steps of the shots.
Remove Shots
Hover over the shot row you wish to remove in the list and click the Delete icon.
6. Production Report
As a Producer, having a comprehensive overview of the entire production process is essential.
Kitsu offers various tools to help you stay informed and manage production efficiently without getting overwhelmed by notifications or losing focus.
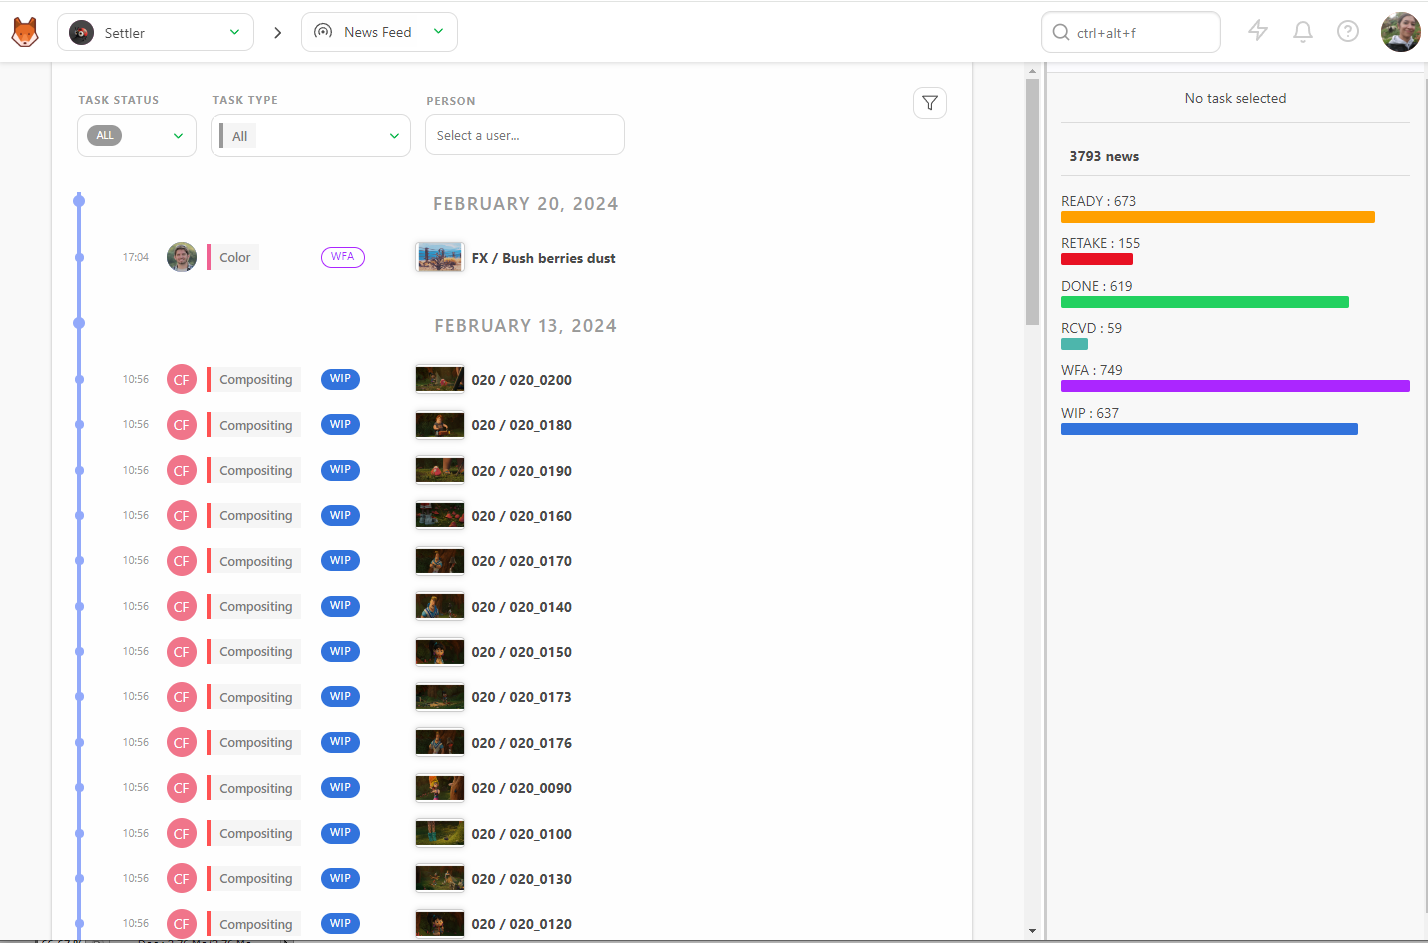
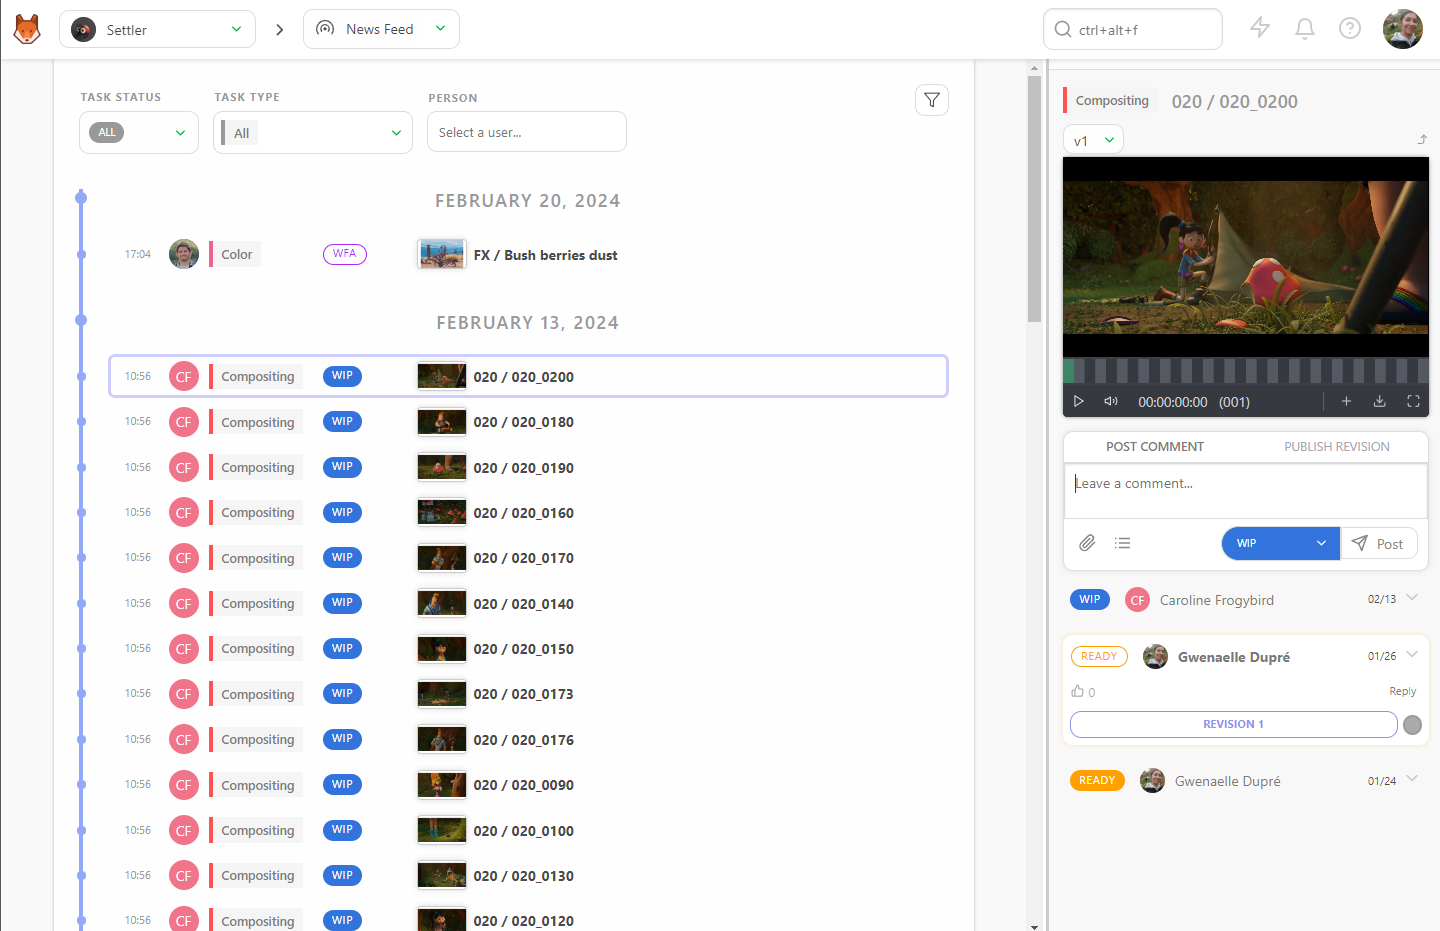
News Feed Features
The news feed section show real-time updates relating to your production, including:
- Real-Time Updates: View all status changes as they happen, minute by minute.
- Summarized View: The right part of the screen displays the total number of news items and a breakdown by status.
- Filtering Options: Filter the list by Task Status, Task Type, and Person to focus on specific areas.
- Comment Panel: Clicking on a line opens the comment panel on the right, providing all necessary details.
Using Filters
You can customize the time frame for displaying information using the Filters Builder button. This is useful for focusing on specific supervisors or time periods.
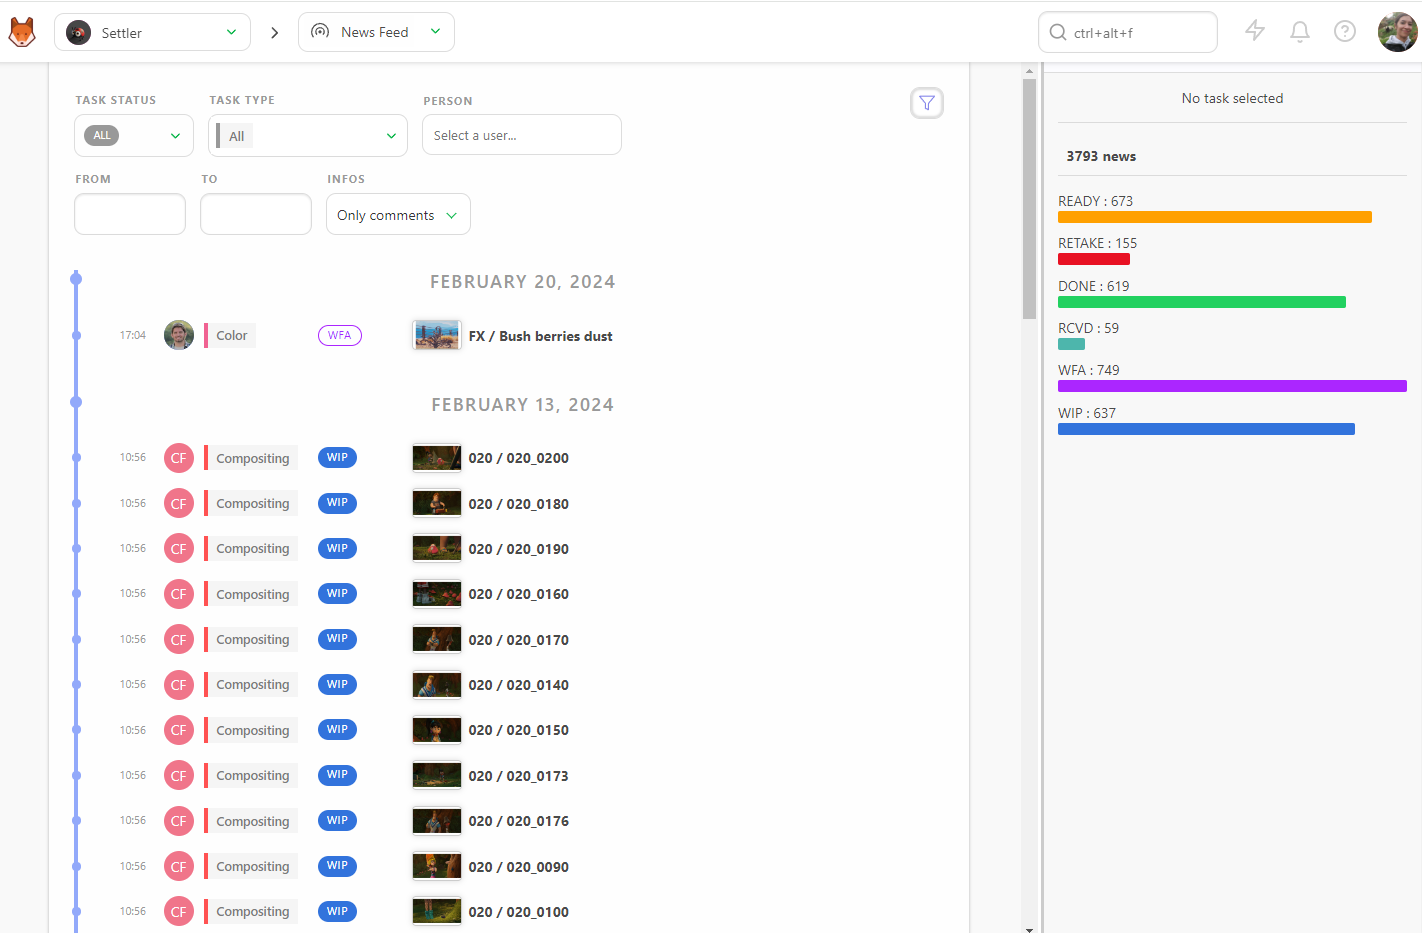
Example
If you want to focus on a supervisor for a specific month, select their name and pick a date in the From box.
Know the Current State of the Production
Understanding the current state of your production is crucial. Kitsu provides detailed statistics and visualizations to help you track progress effectively.
Short / Feature Specific
We're going to look at some features that are specific to Short / Feature Film workflows.
Sequence Stats
The Sequence Stats page offers pie charts that depict the status of your production, sequence by sequence. The color scheme of the pie charts corresponds to the status, allowing you to quickly understand the state of your production.
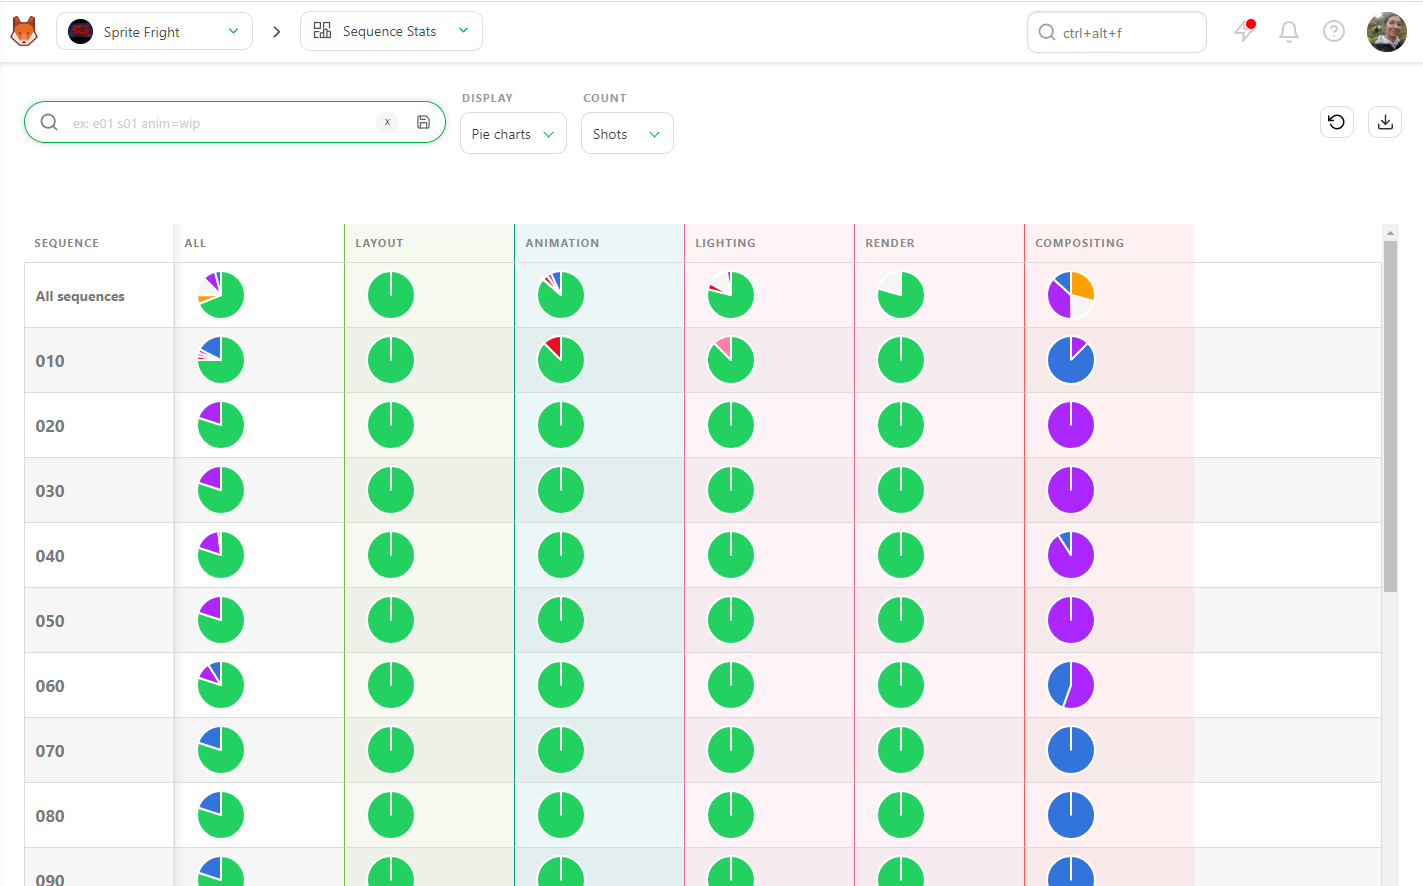
- All Sequences: The first line represents the whole production.
- All Tasks: The first column includes all tasks simultaneously.
By focusing on the first pie chart, you can see the exact state of your production. For more details, look at the rest of the line to get a global view of each task type's state.
Asset Types Stats
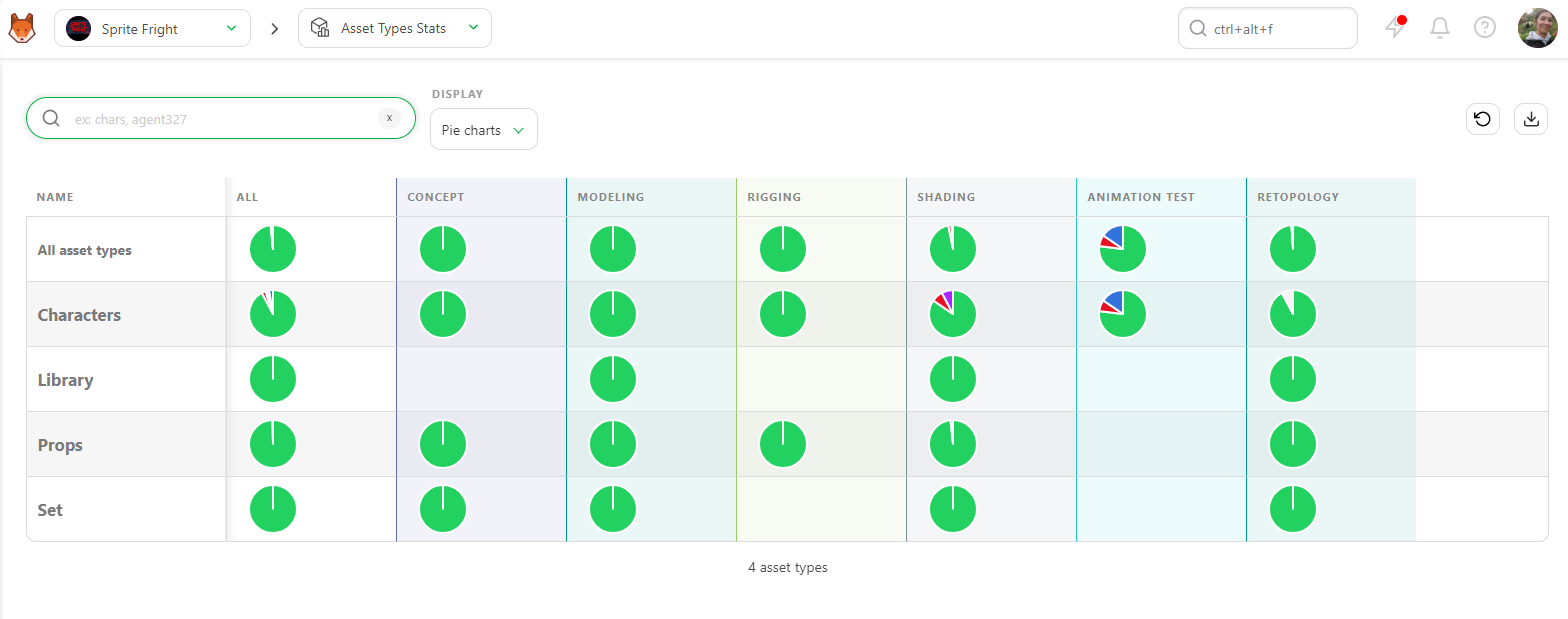
Similar to Sequence Stats, the Asset Types Stats page provides pie charts for asset types, giving you a clear view of the asset status across the production.
Count View
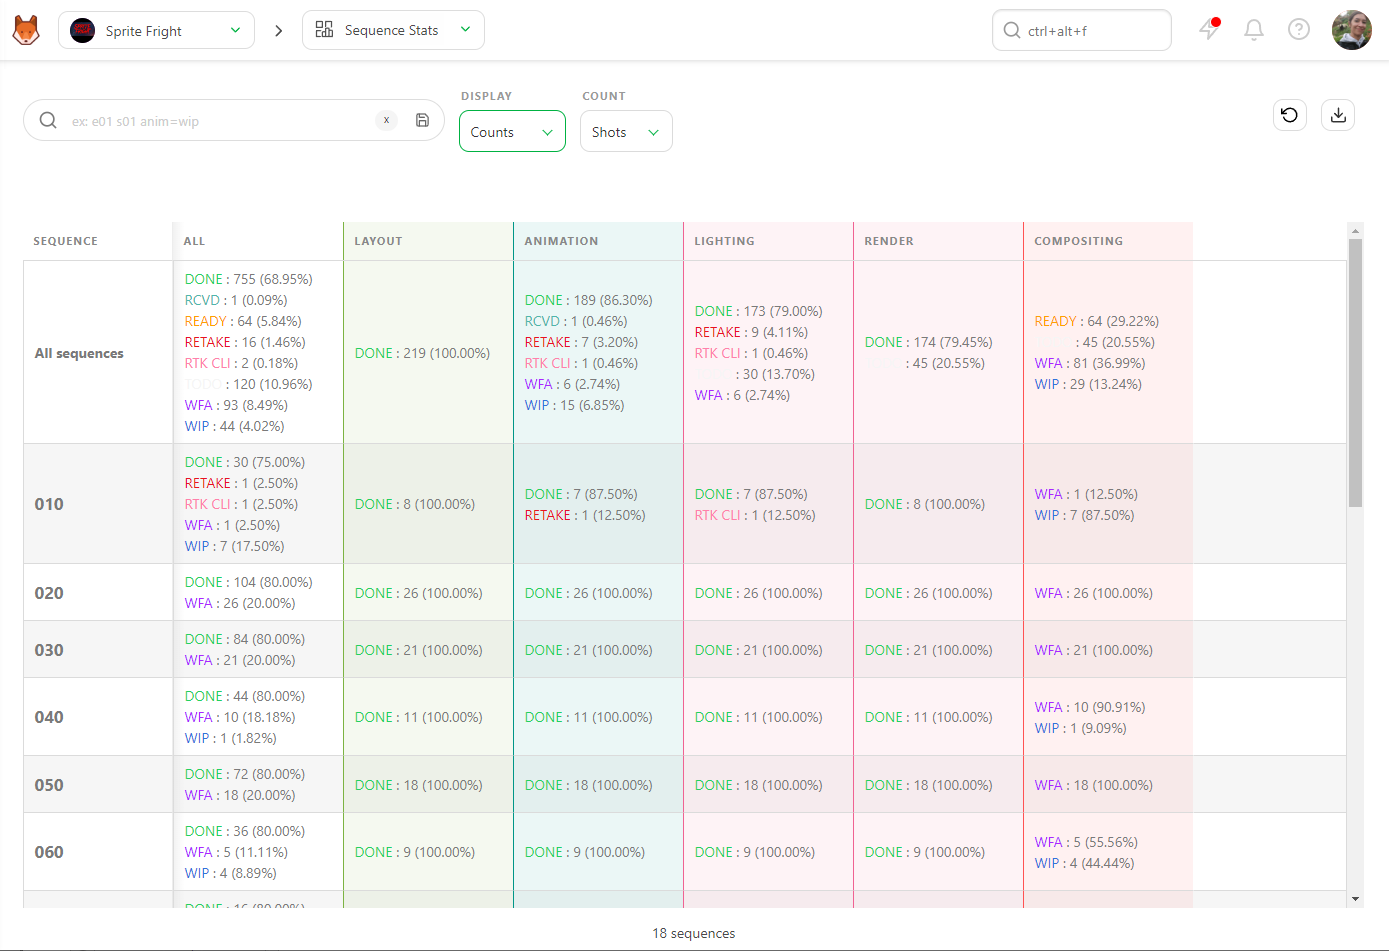
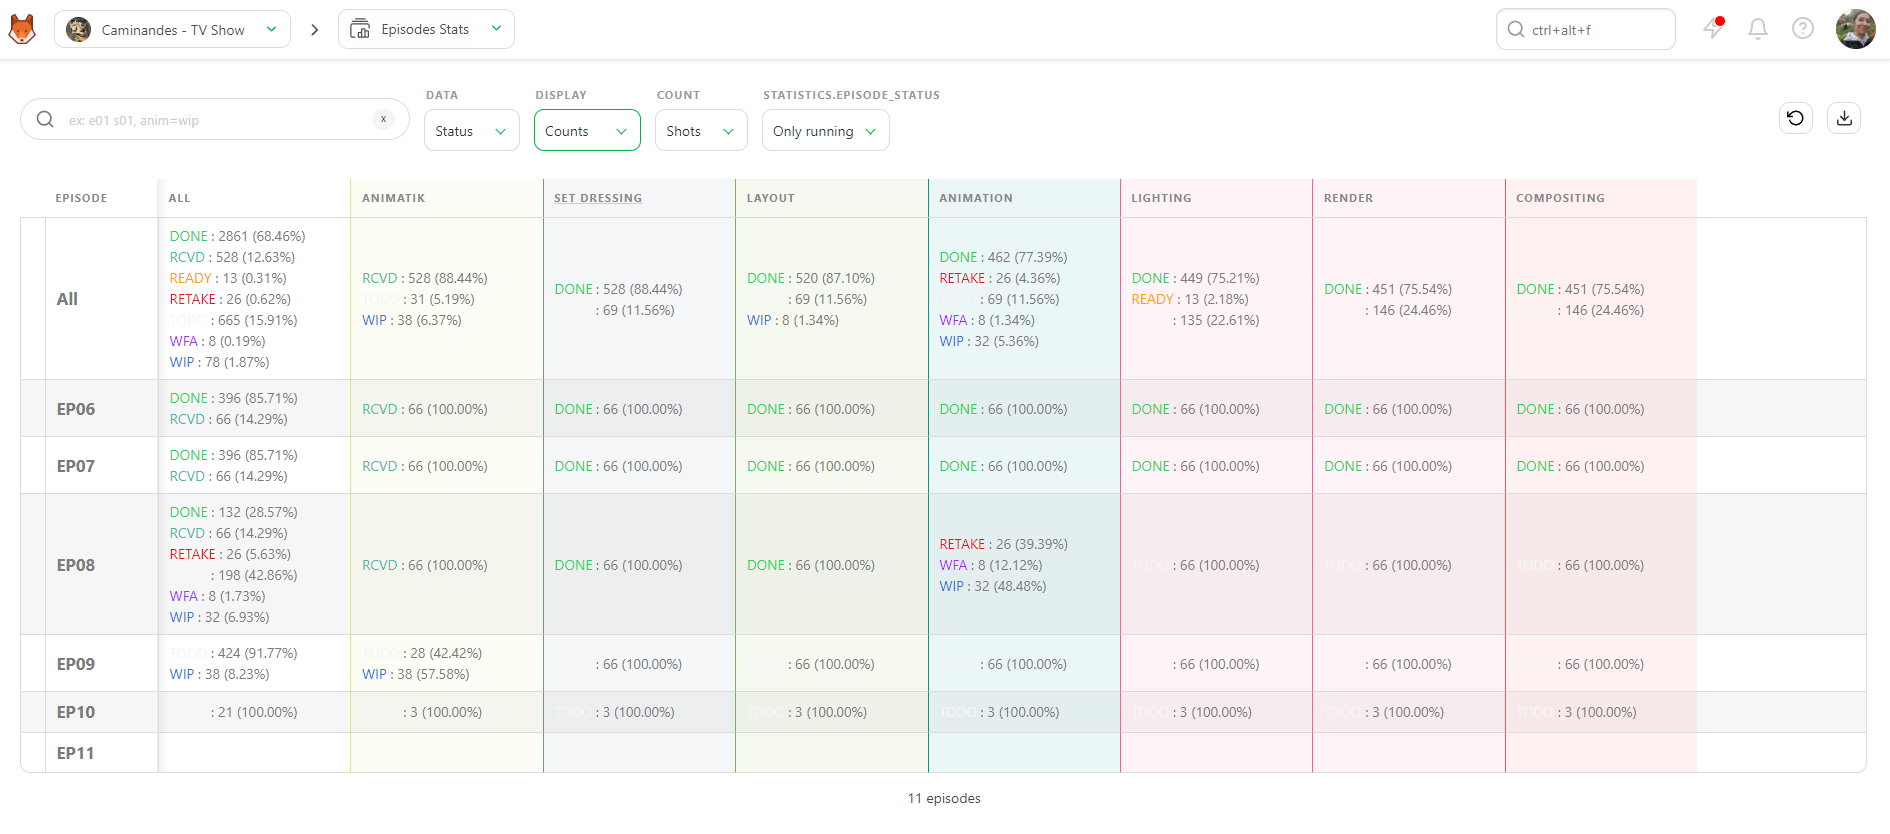
You can also display data as Counts to see the exact number of assets, shots, or frames, along with their percentage per status.
Exporting Data
You can export this page as a .csv text file and import it into spreadsheet software for further analysis and reporting.
By leveraging these tools, you can stay on top of the production process, ensuring everything runs smoothly and on schedule.
TV Show Specific
You can access an extra information level on a TV show through the Episodes Stats Page.
Retakes Display
The default setting for the Episodes Stats page is Retakes. This display lets you see the number of retakes (back and forth) for each episode on each task type. Only three colors are displayed:
- Validated as Green
- Retakes as Red
- In progress as Grey
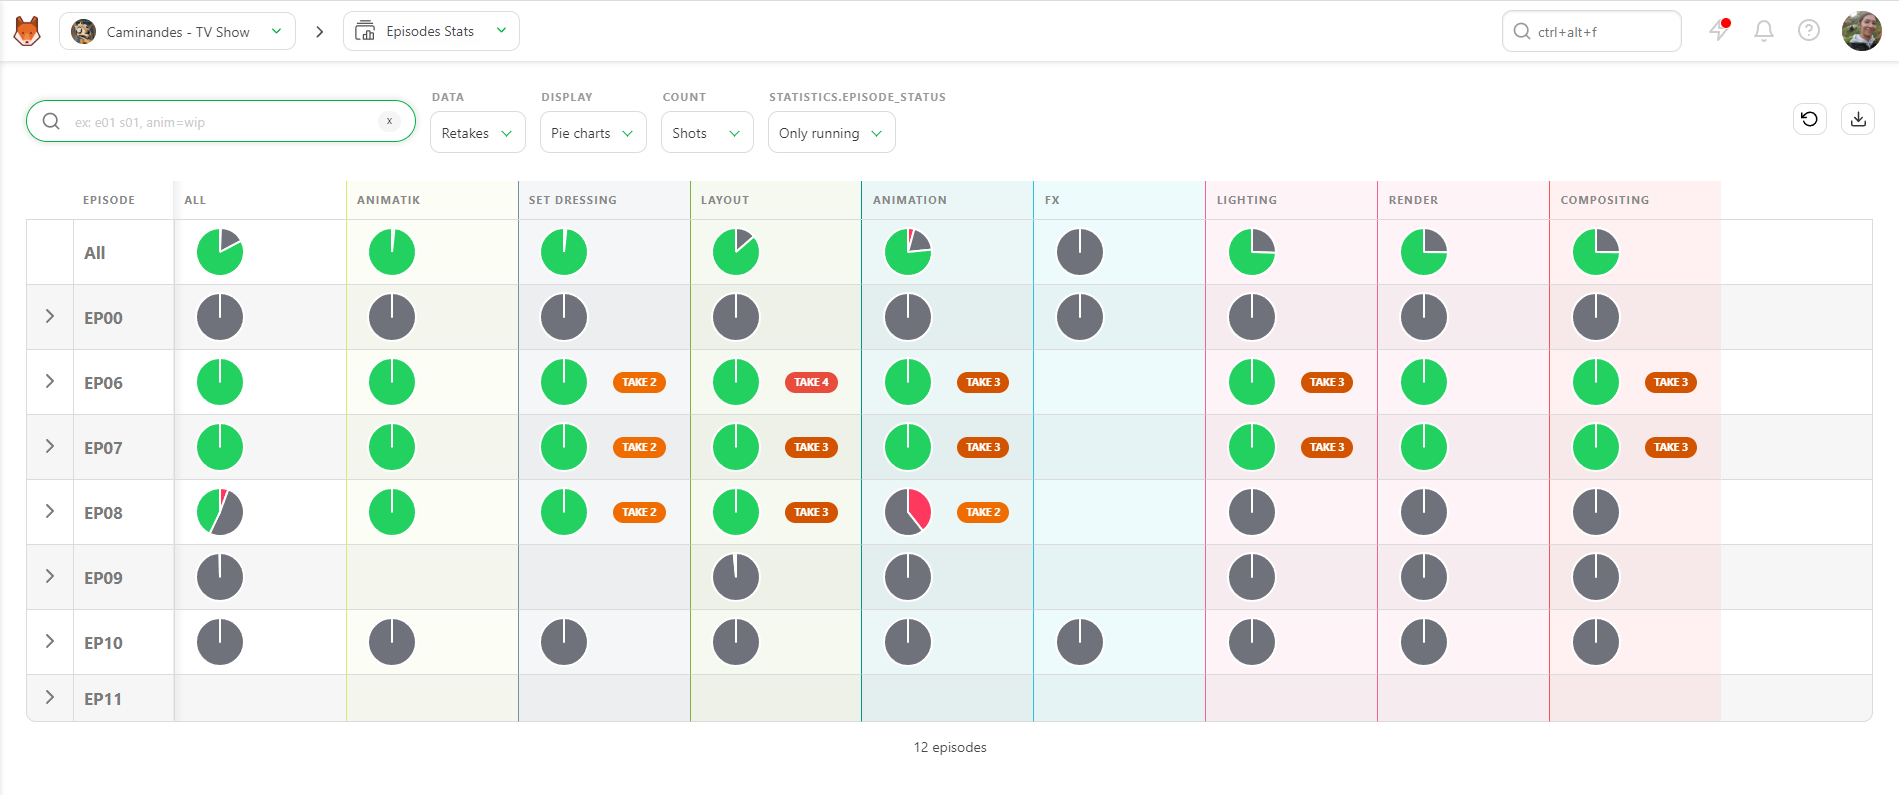
If you unfold an episode, you will see the percentage of each take and the evolution of the retakes versus approval. This helps you see the progress of each episode per task.
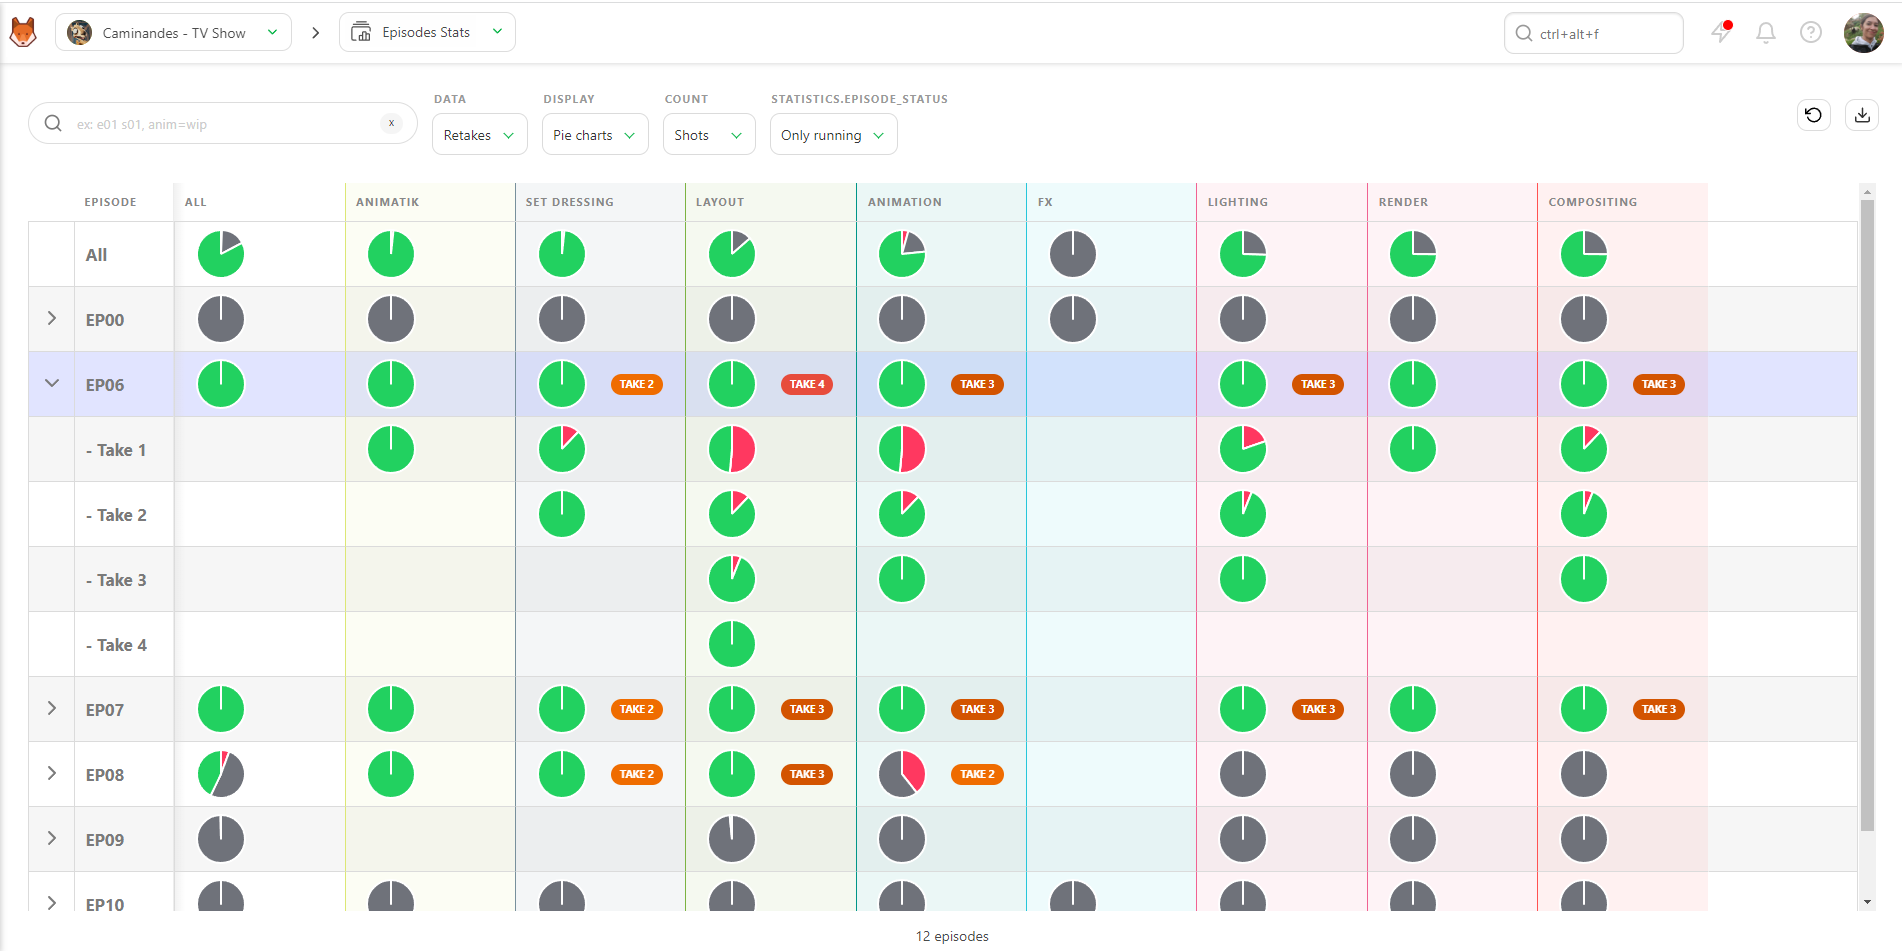
Usually, the first episodes have many back-and-forths, but it should get better over time. However, if late episodes still have many retakes, something must be fixed. It's time to discuss the issue with the director and the supervisor.
Status Display
The second option for data display is Status. This status display works like the Sequence / Asset Type Stats page.
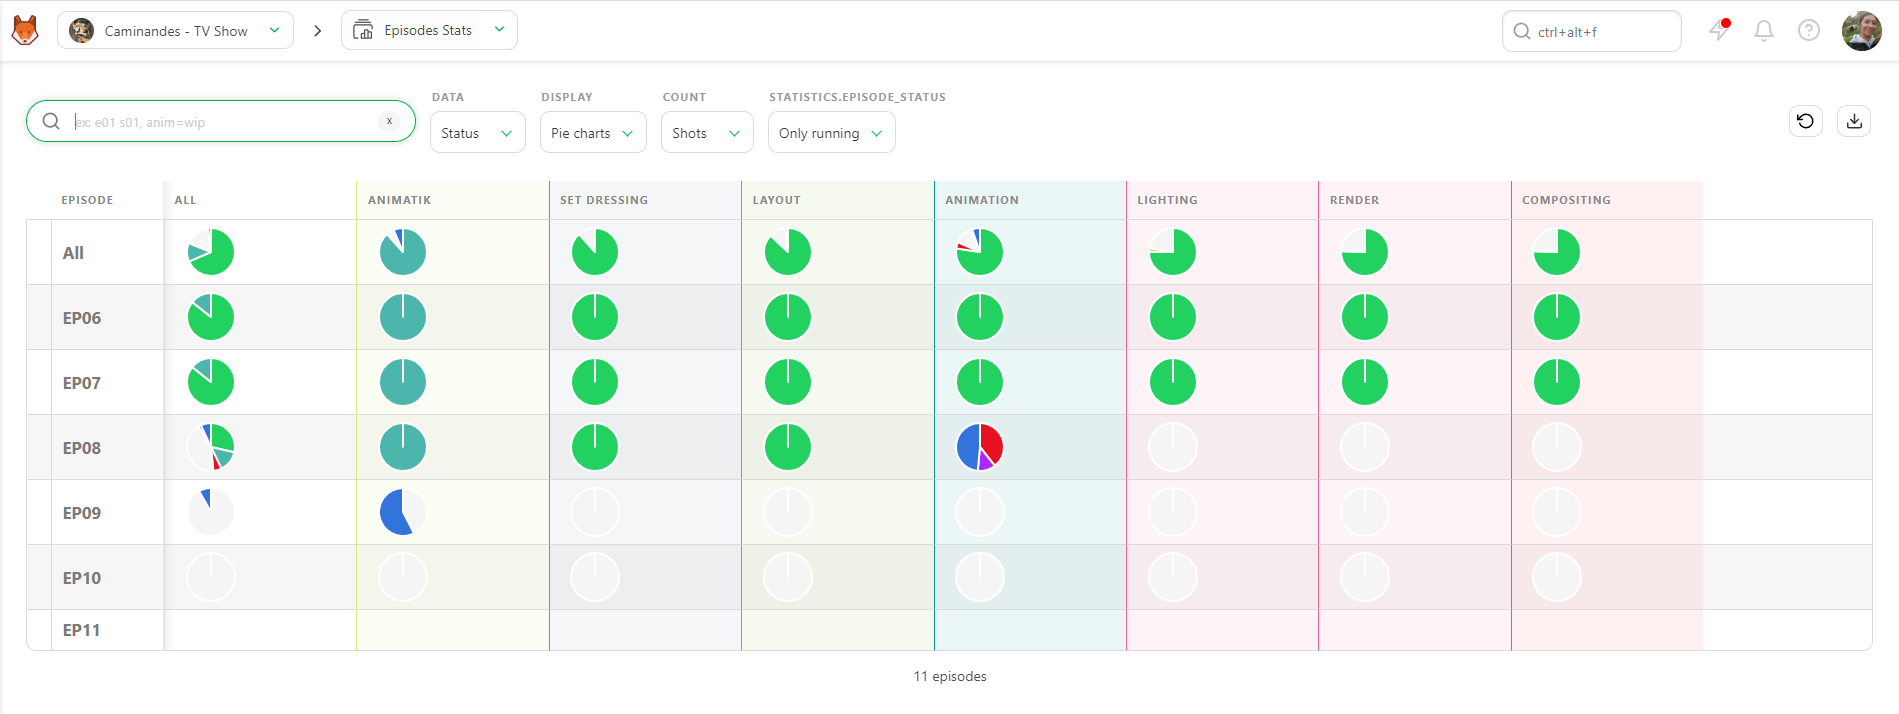
You can also display data as Counts. This way, you'll see the exact number of shots/frames with the percentage per status.
You can export this page as a .csv text file and import it into spreadsheet software.
Production Report
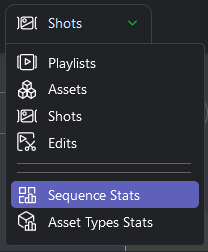
To ease the communication with the studio, you have direct access to the production report, separated into two parts: the Sequence Stats and the Asset Types Stats
The Sequence Stats page is updated in real-time. Every time you look at this page, you are sure to have updated information.
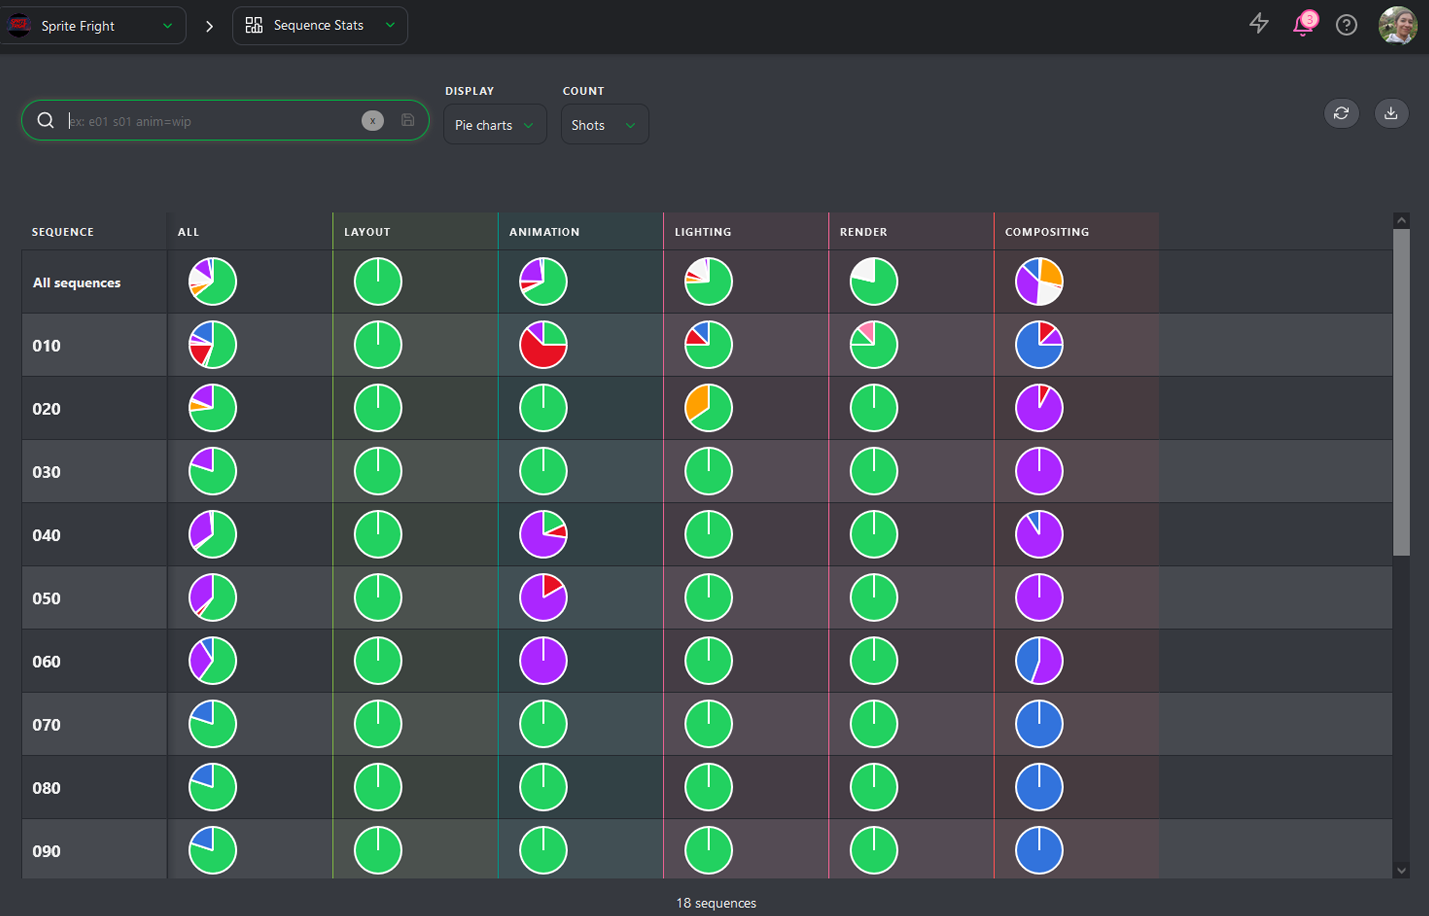
You can choose to display the stats per number of shots or number of frames.
You can also change the Display Mode; you can switch from the Pie charts View to the Counts view.
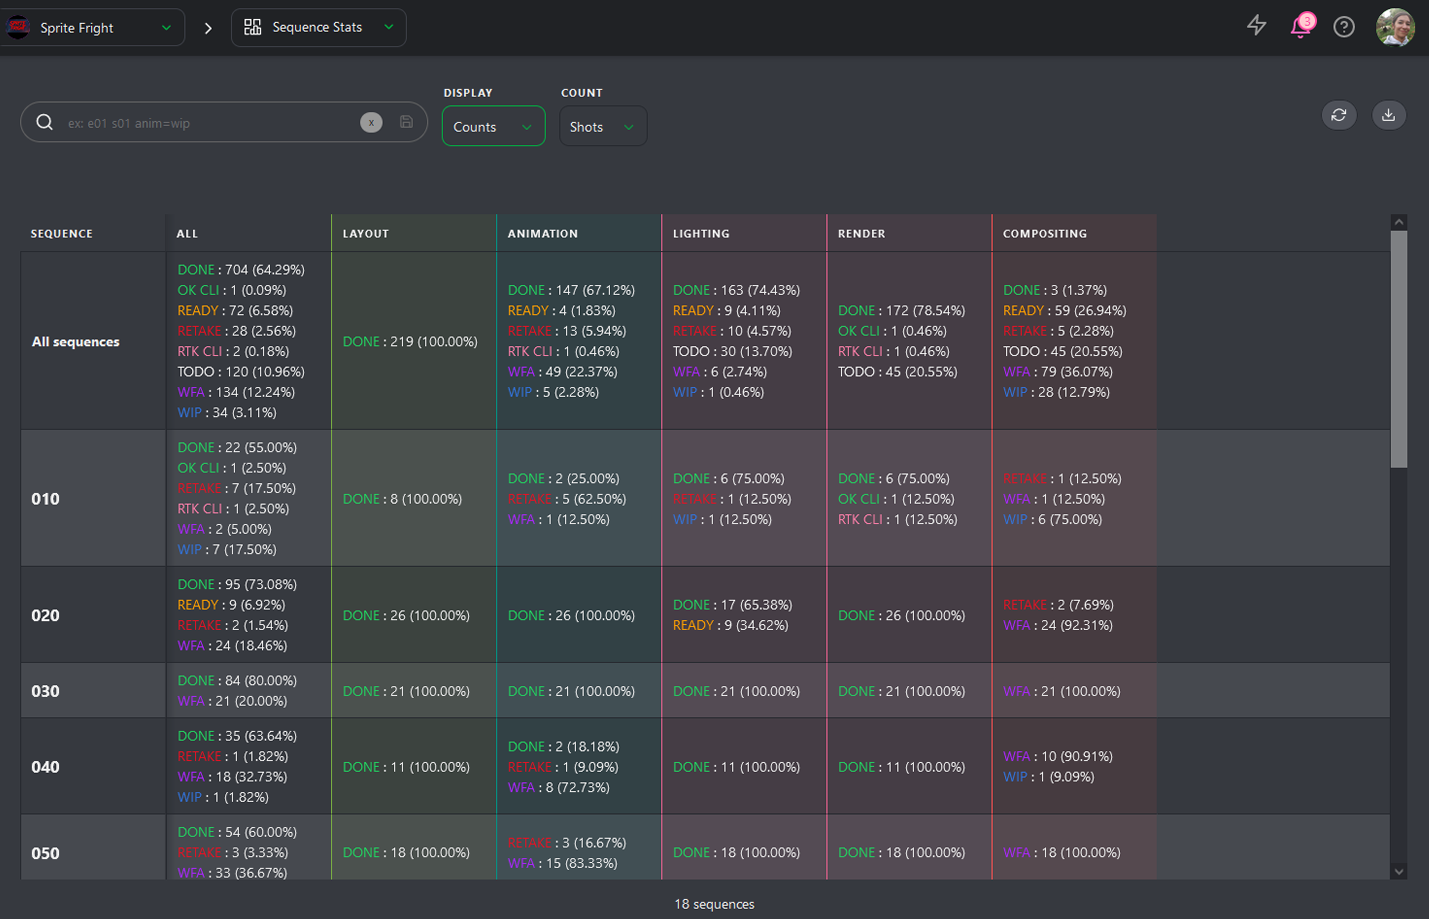
It's this presentation that you can download to keep track of the production progress.