
Quickstart for Shots-Only Productions
1. Create a new production
Click on the Create a new production button:
A dialog appears:
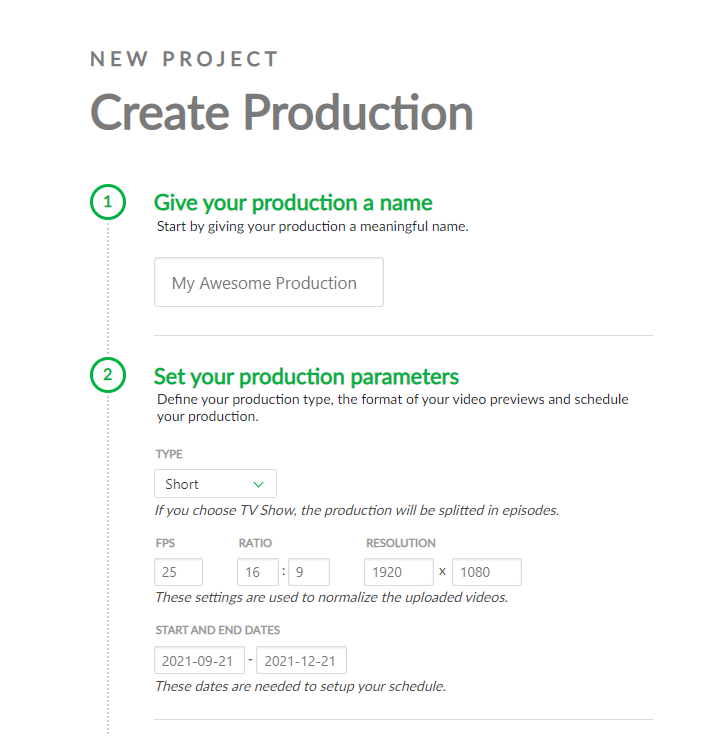
Enter your production name, choose a Production Type, and select your production style (2D, 3D).
Then, you must fill in technical information, such as the number of FPS, the Ration, and the Resolution.
All these data will be used when Kitsu re-encodes the video previews uploaded.
Then, you need to define your production's start and end dates.
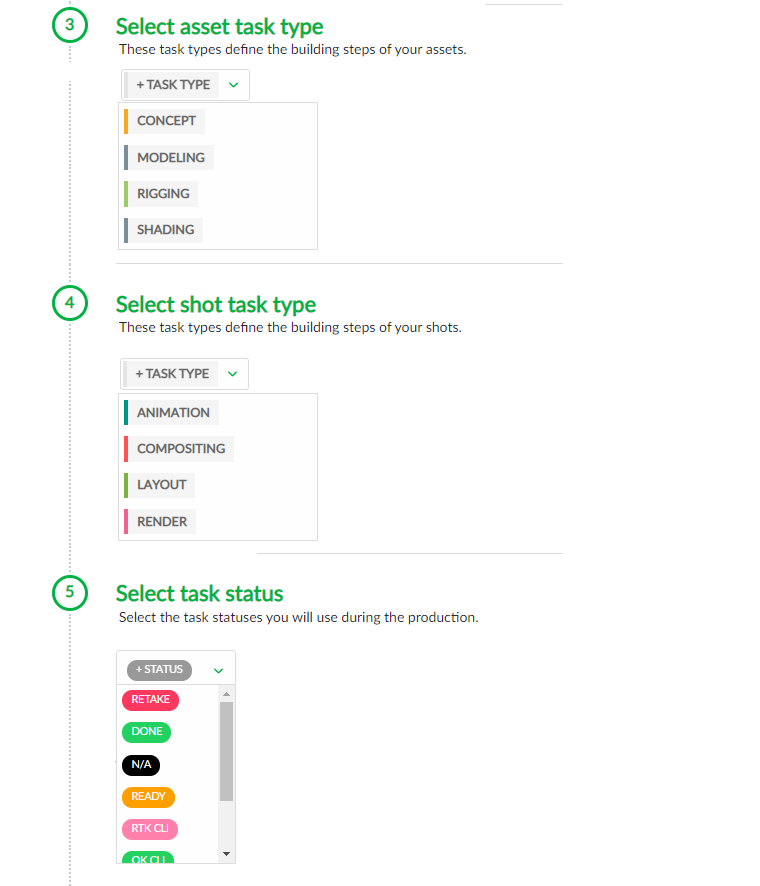
You can define your production workflow in the next part, 3 to 6.
You need to select your asset task type (3), shot task type (4), task status (5), and asset types (6).
TIP
To create your Production Workflow, you will select Task Types from the Global Library.
If you realize you missed some Task Types, you can create them later.
See the Studio Workflow section.
Then, 7 and 8 are the option parts. If you already have a spreadsheet with your asset/shot.
See the Import from CSV sections of each entity page for more details:
Validate everything with the All done button.

Using Production Templates
Getting a new production set up often means repeating the same configuration steps over and over like choosing task types for shots and assets, defining task statuses, and adjusting project-wide settings to match your team's workflow.
With Project Templates, you can start from a predefined setup in one click:
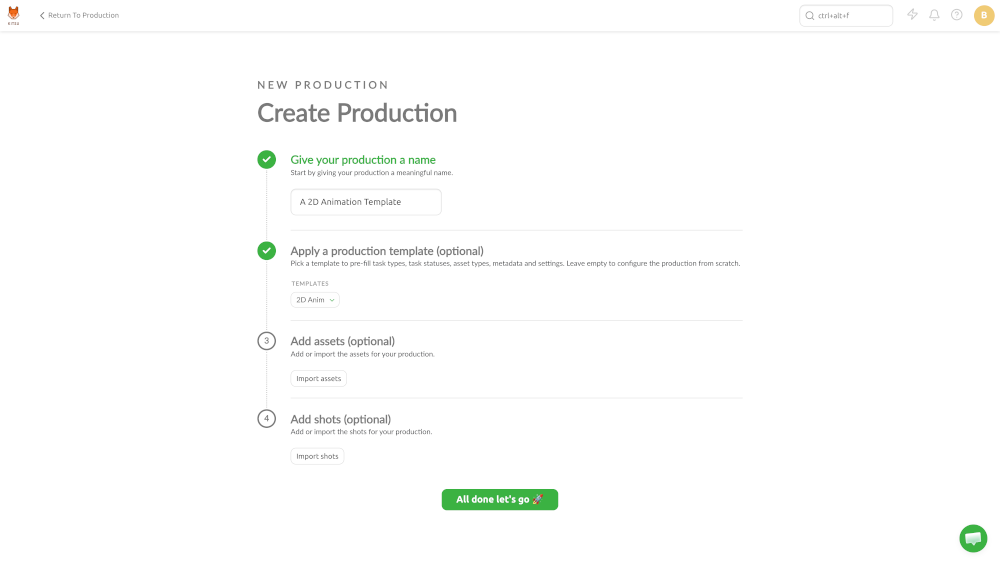
When creating a new production, simply pick a template and Kitsu will automatically apply your preferred settings.
In the example above, the template comes bundled with pre-configured asset types, task types, task statuses, etc. we don't need to pick manually from the Global Library:
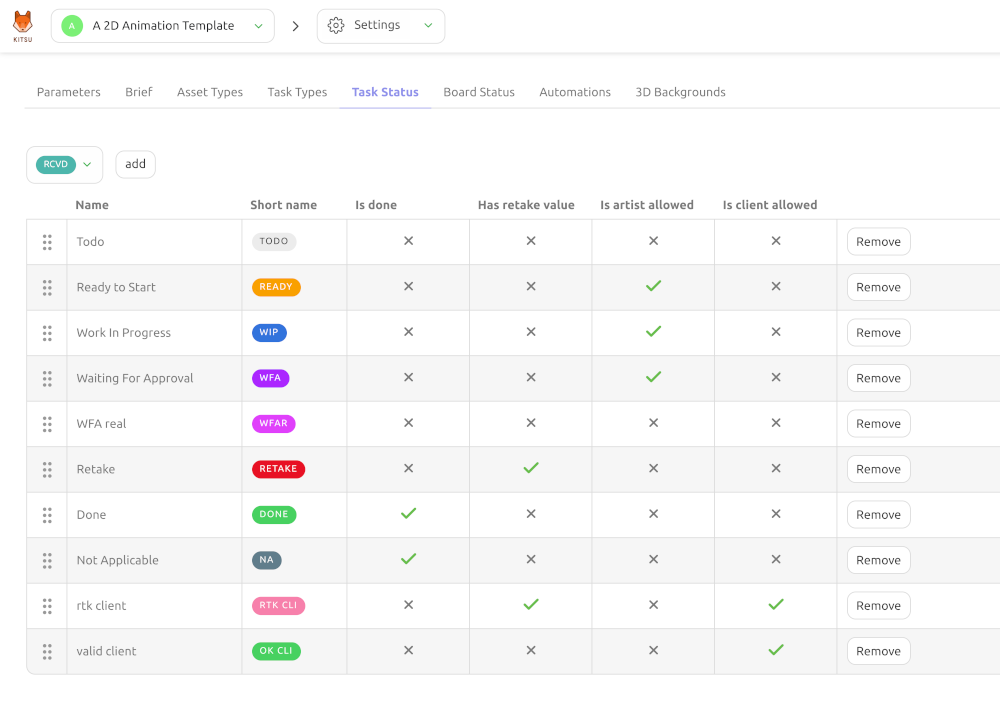
Check out the section Create Your Own Production Template below to add your own.
2. Create a Shot
It's time to create shots for your production.
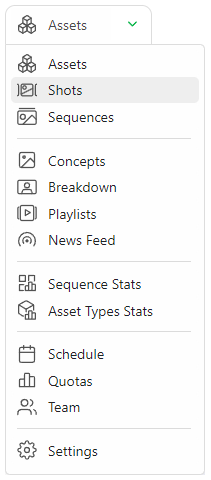
You need to go to the Shots page: you can use the dropdown menu and click on the SHOTS.
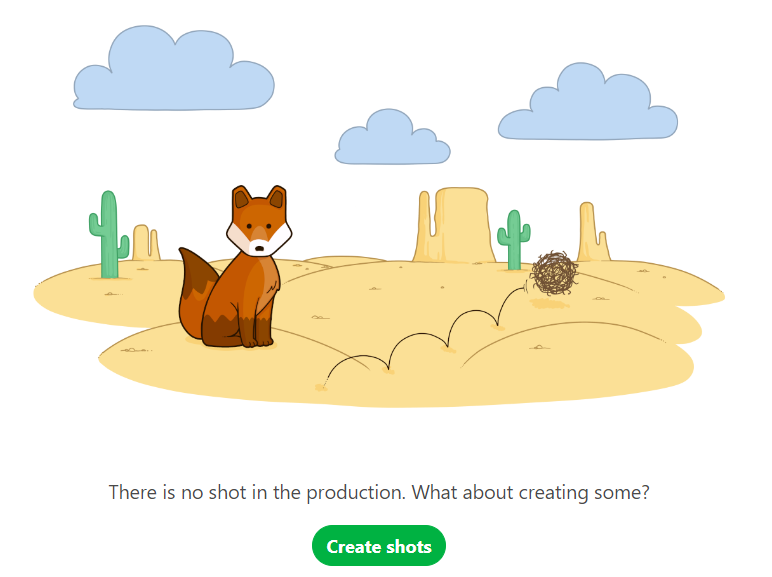
Click on the Add shots button to start with the shot creation.
WARNING
When you create a shot, the task workflow you have designed will be applied, and all the tasks will be created at the same time as the shot.
A new pop-up opens for the creation of the shots. You can now add sequences and corresponding shots:
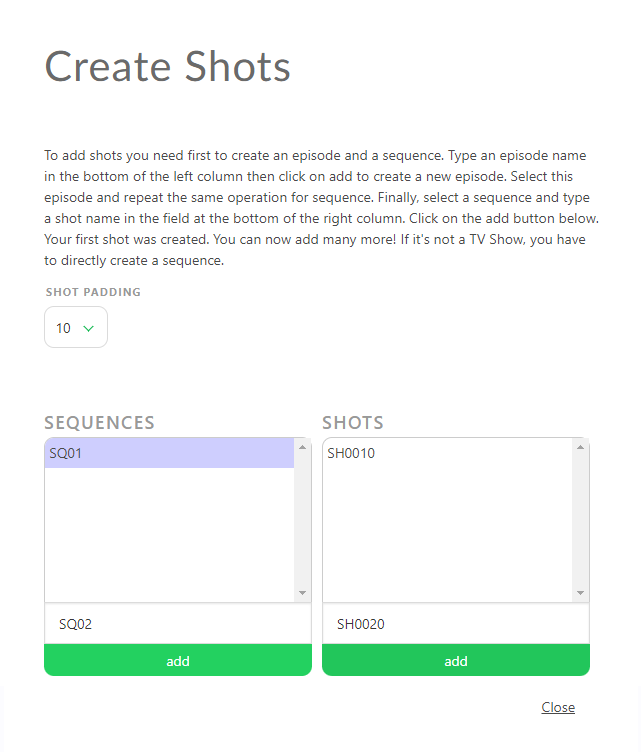
Enter the first sequence, for instance, SQ01, then click add.
To add shots to this sequence, select it and type a name in the input field of the shots column (e.g SH0020), then again click add.
TIP
You can also define padding for your shots instead of doing it manually.
If you want to name your shots ten on ten as SH0010, SH0020, SH0030, etc, set the Shot Padding to 10.
You can now see that new shots are listed and linked by their sequence: you just created the first shot of the first sequence!
Now, let's add more shots.
The input field already pre-writes an incremented name code based on your padding, so you just have to keep clicking on add to create more shots:
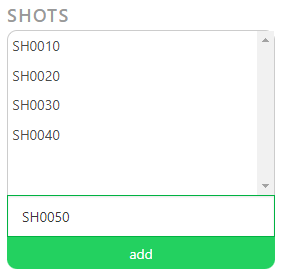
To add more sequences, go to the left part, type the name of your new sequence, and then click on add.
Your second sequence is selected, and you can now add shots.
TIP
If a shot is misplaced on a sequence, you have to edit the shot in its dedicated Shot page to change the sequence. Look at the section Update your shots for more information.
3. Create Shots from an EDL File
WARNING
Shots are linked to Sequences in Kitsu. You must create a sequence first to populate it with shots.
Create a Shot
It's time to create shots for your production.
You need to go to the Shots page: you can use the dropdown menu and click on the SHOTS.
Click on the Add shots button to start with the shot creation.
WARNING
When you create a shot, the task workflow you have designed will be applied, and all the tasks will be created at the same time as the shot.
A new pop-up opens for the creation of the shots. You can now add sequences and corresponding shots:
Enter the first sequence, for instance, SQ01, then click add.
To add shots to this sequence, select it and type a name in the input field of the shots column (e.g SH0020), then again click add.
TIP
You can also define padding for your shots instead of doing it manually.
If you want to name your shots ten on ten as SH0010, SH0020, SH0030, etc, set the Shot Padding to 10.
You can now see that new shots are listed and linked by their sequence: you just created the first shot of the first sequence!
Now, let's add more shots.
The input field already pre-writes an incremented name code based on your padding, so you just have to keep clicking on add to create more shots:
To add more sequences, go to the left part, type the name of your new sequence, and then click on add.
Your second sequence is selected, and you can now add shots.
TIP
If a shot is misplaced on a sequence, you have to edit the shot in its dedicated Shot page to change the sequence. Look at the section Update your shots for more information.
Import Shots
From an EDL File
You may already have your shots list ready in an EDL file. With Kitsu, you can directly import your EDL file to create the sequence, shot, number of frames, Frame in and out, and more.
On the Global Shot Page, you will see an Import EDL button.

You can select the naming convention of the video file used during the editing on the pop-up.
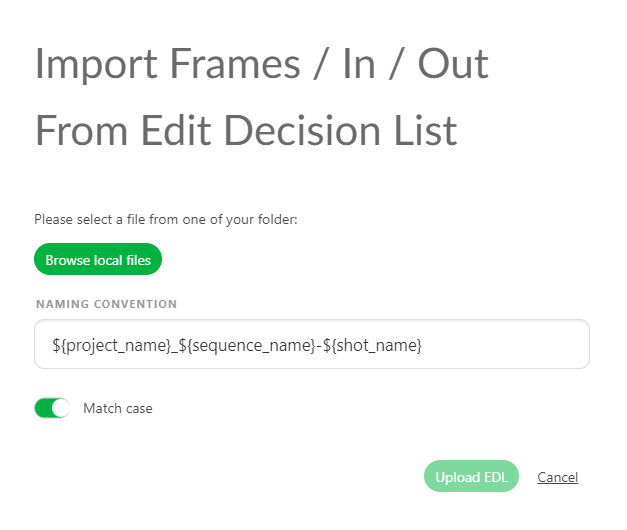
It means the video clip on the editing is named as project_sequence_shot.extension.
Here is an example of an EDL for the LGC production.
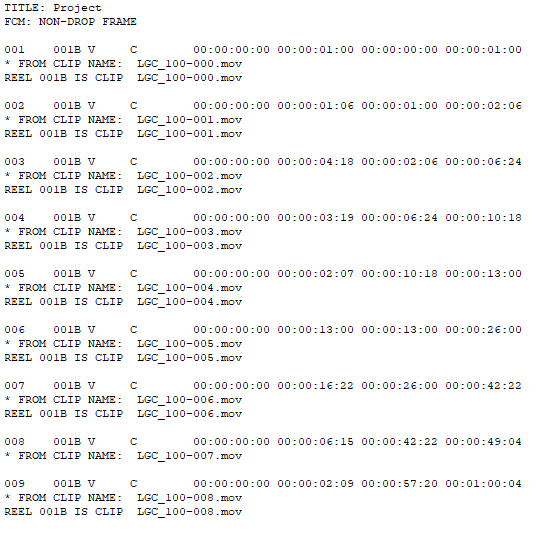
The video files are named LGC_100-000.mov, which means LGC is the production name, 100 is the sequence name, and 000 is the shot name.
You can import the EDL file once you have the naming convention.
Then click on Upload EDL
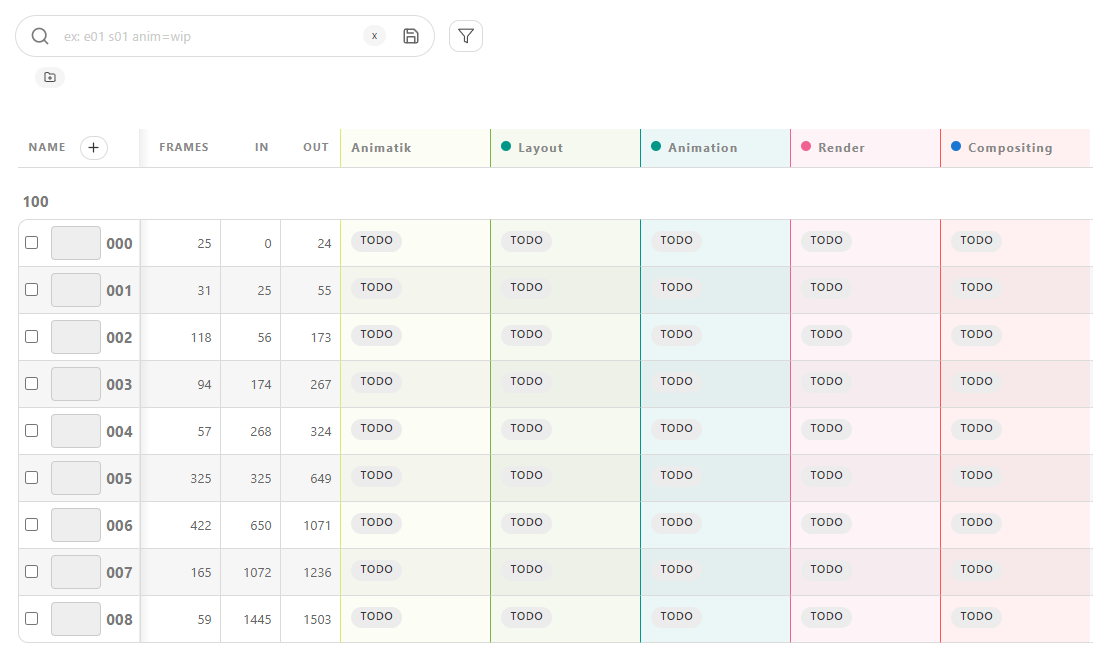
Then Kitsu will create the shots.
From a Spreadsheet File
You may already have your shots list ready in a spreadsheet file. With Kitsu, you have two ways to import them: importing a .csv file directly, or copy-pasting your data directly into Kitsu.
Option 1: Import a CSV file
First, save your spreadsheet as a .csv file.
Then, return to the shot page on Kitsu and click the Import icon. 
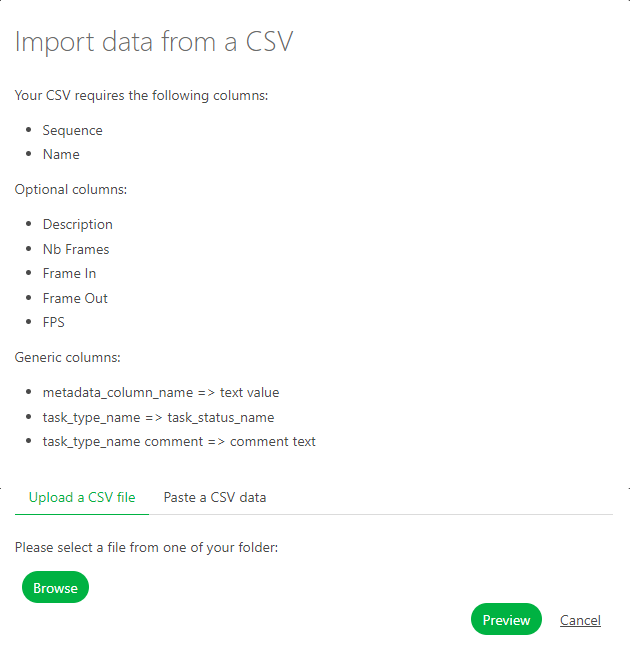
A pop-up window Import data from a CSV opens. Click on Browse to pick your .csv file.
Option 2: Copy / paste from a spreadsheet
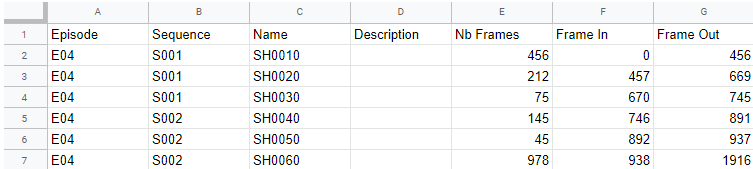
Open your spreadsheet, select your data, and copy them.
Then, go back to the shot page on Kitsu and click on the Import icon.
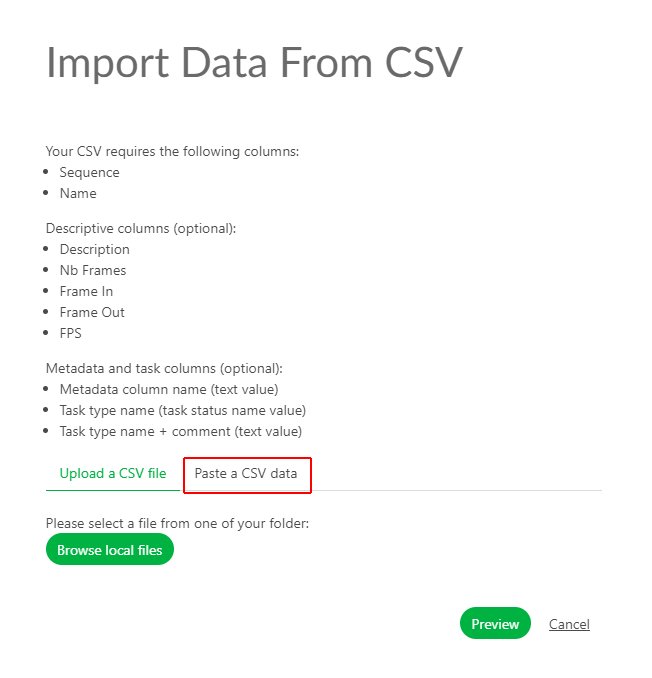
A pop-up window Import data from a CSV opens; click on the Paste a CSV data tab.
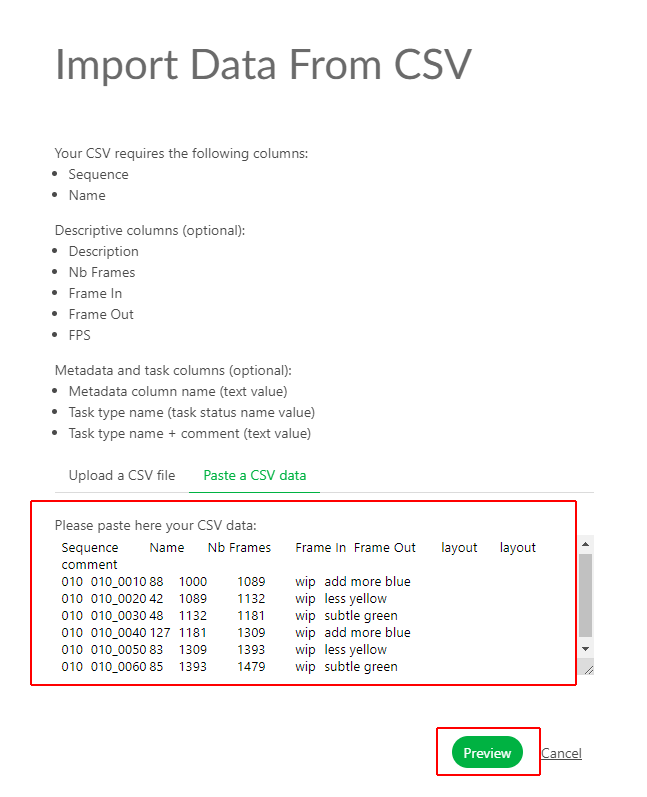
You can paste your previously selected data.
Previewing and confirming your import
Whichever method you used, click on the Preview button to see the result.
You can check and adjust the name of the columns by previewing your data.
NB: the Episode column is only mandatory for a TV Show production.
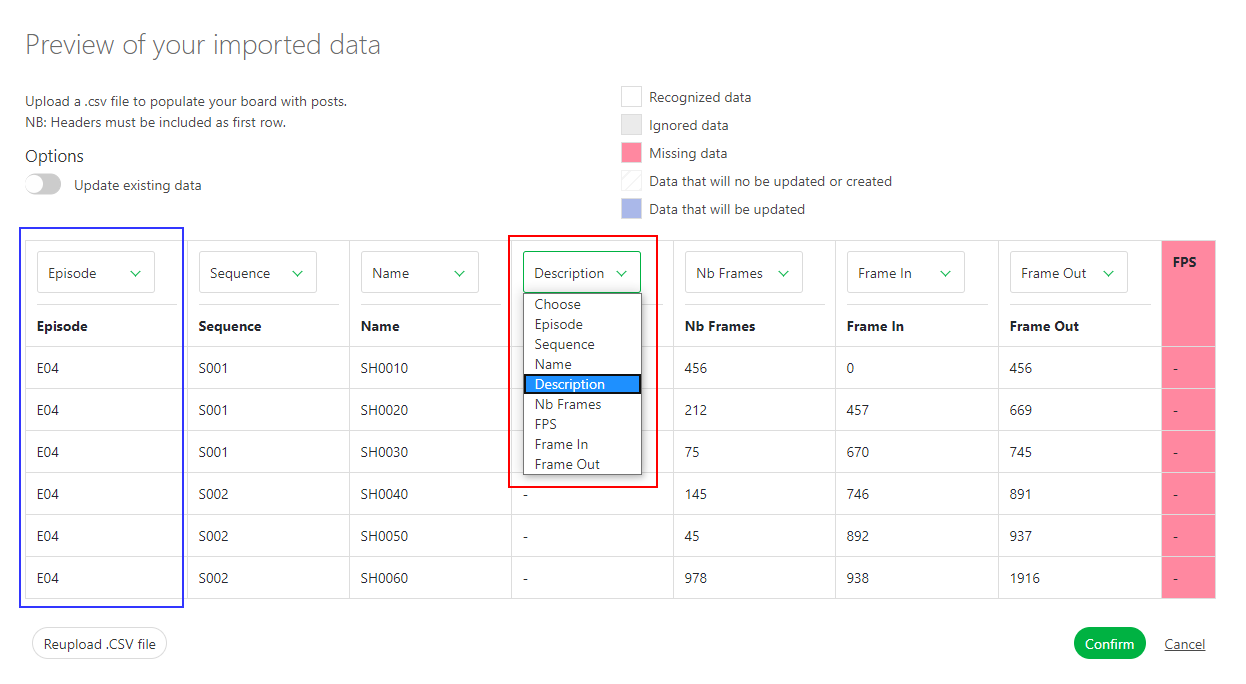
Once everything is good, click the Confirm button to import your data into Kitsu.
All your shots are imported into Kitsu, and the task is created according to your Settings.
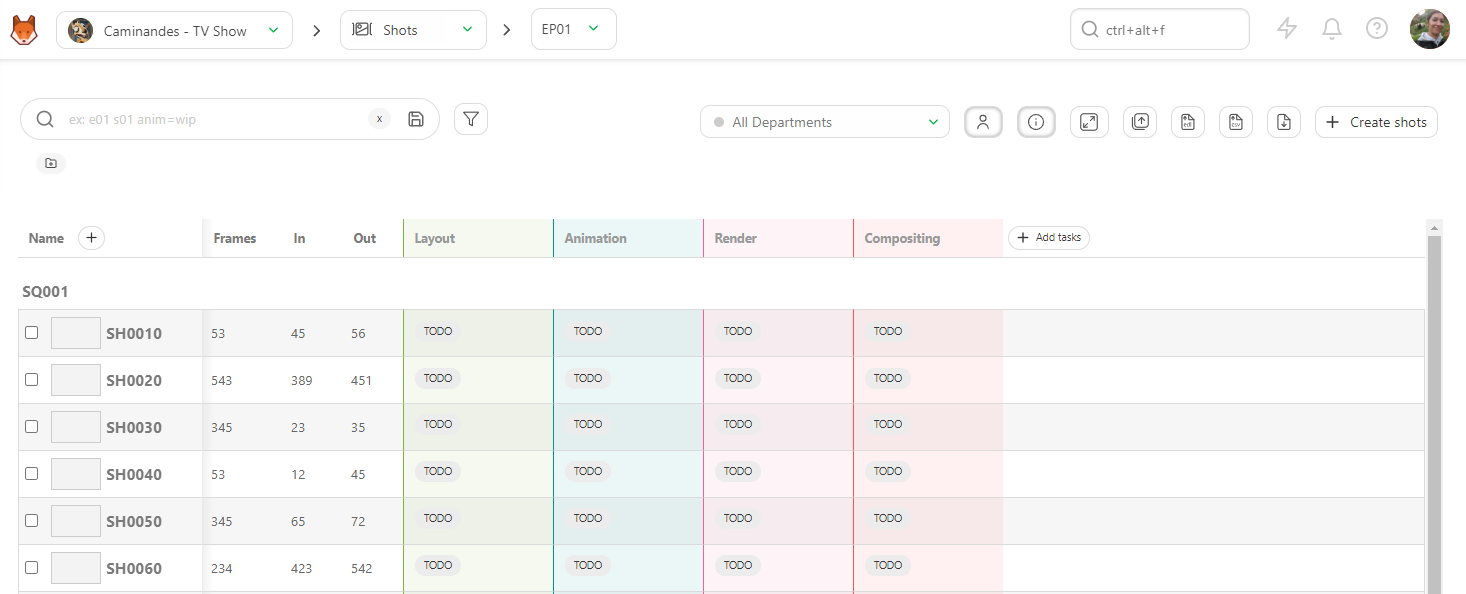
See the Details of a Shot
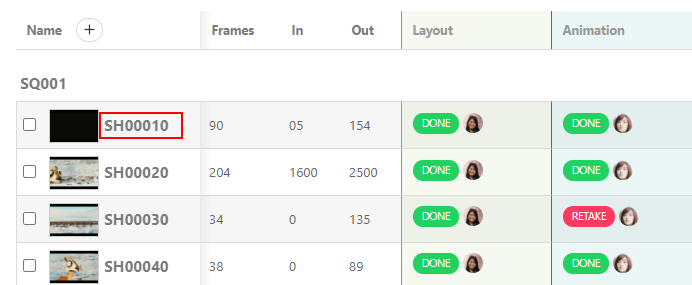
If you want to see the details of a shot, click on its name.
A new page opens with the list of the tasks, the assignation, and the status newsfeed on the right. You can navigate through each by clicking on the name of the tabs.
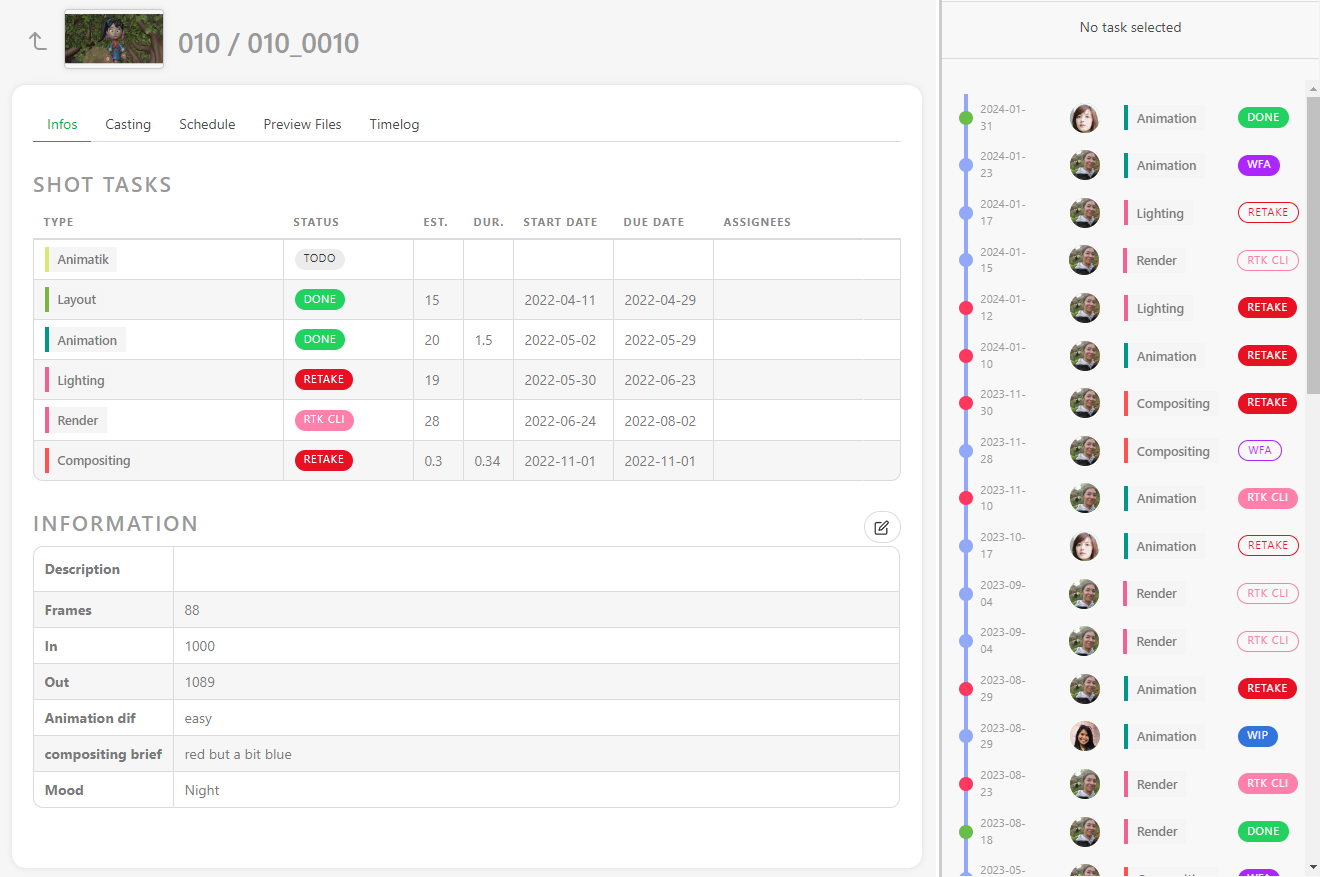
You can click on the status of each task to open the comment panel and see the history of the comments and the different versions.
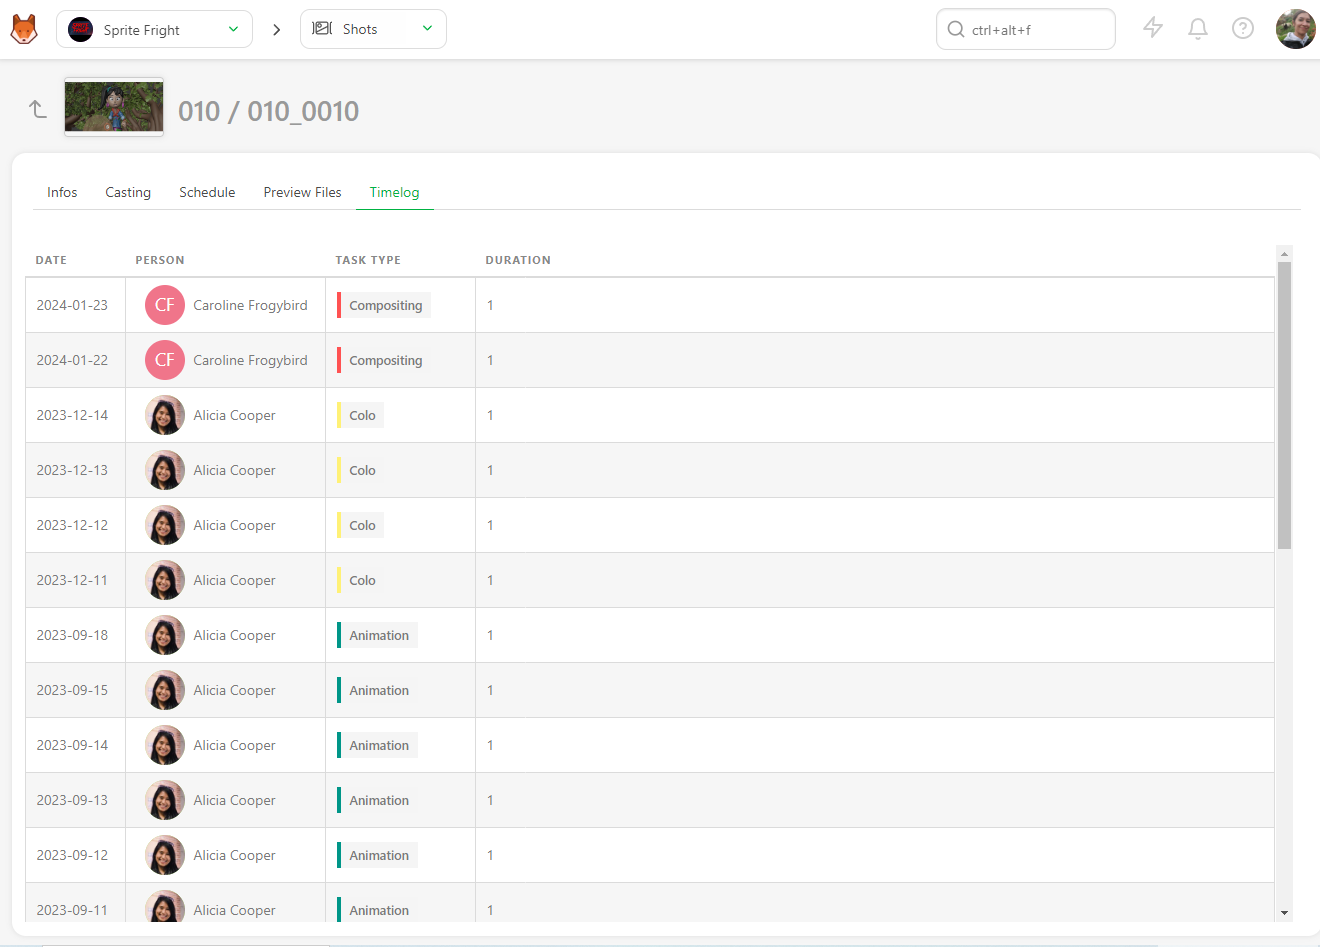
You can also access the Casting,
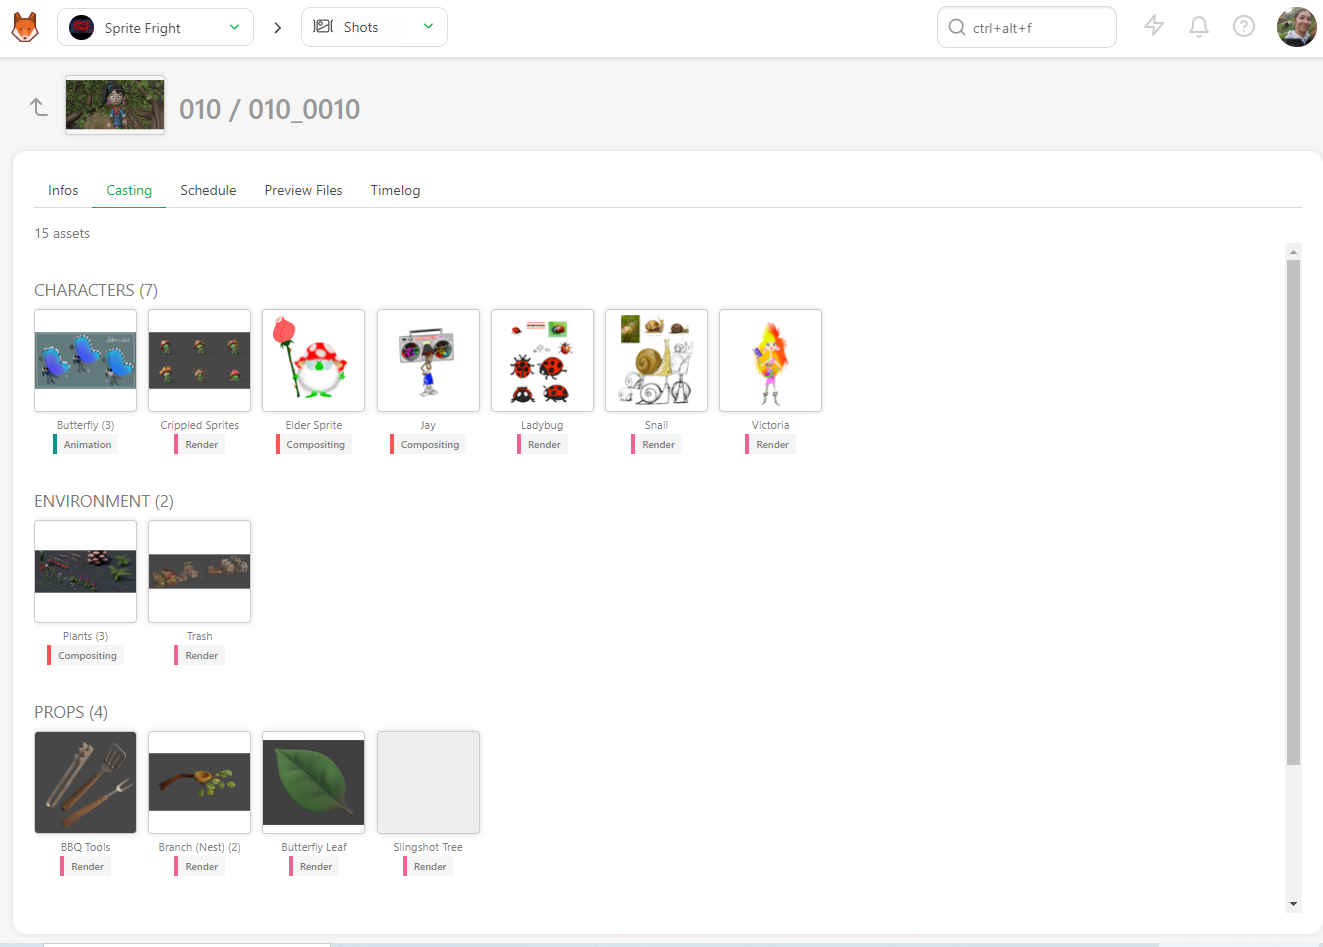
The Schedule is available if you have previously filled out the task type page data. If you have already filled out the data, you can modify them directly here.
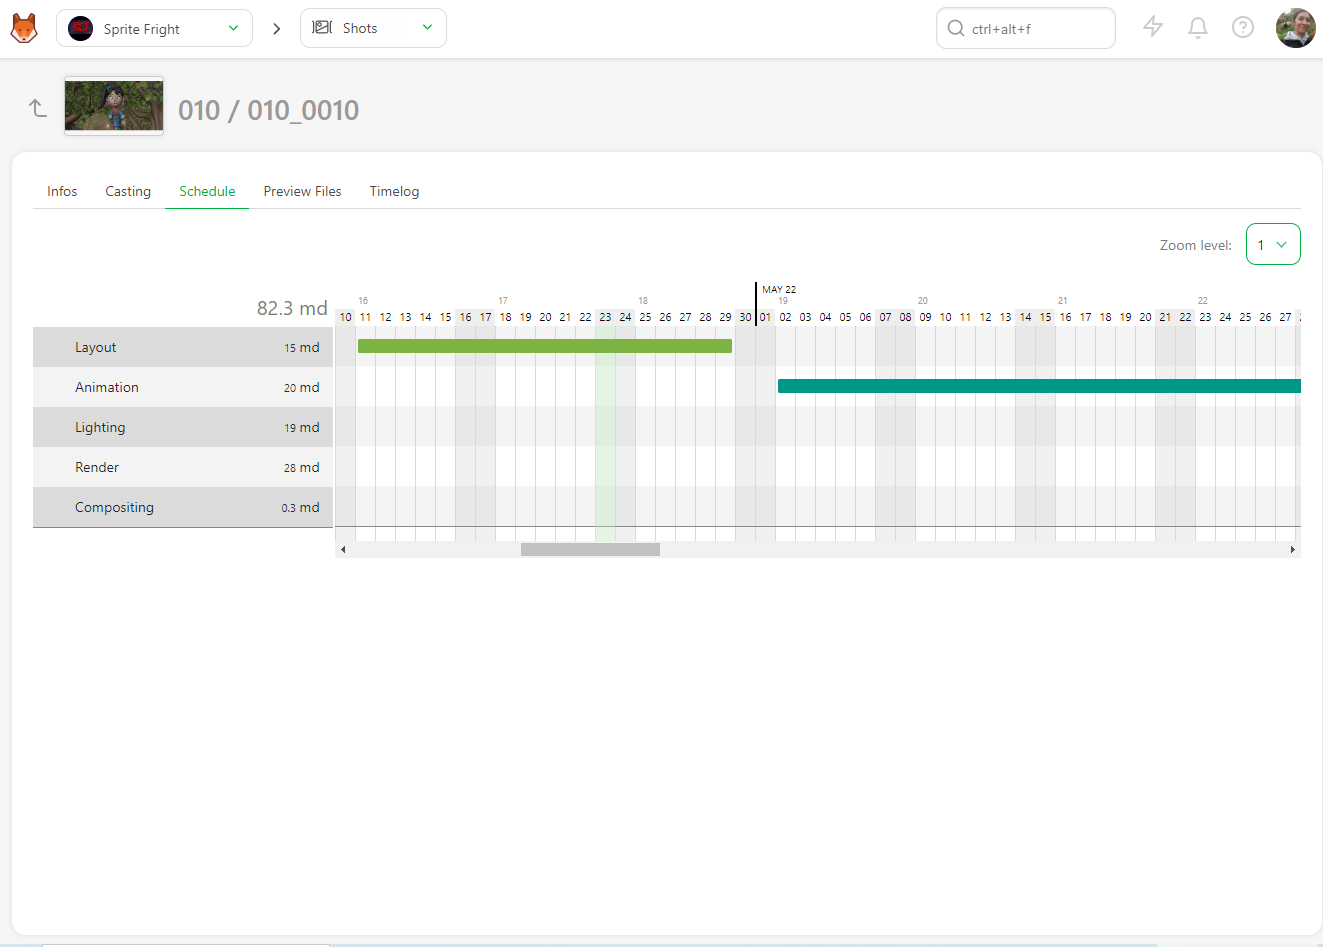
the Preview Files uploaded at various task types,
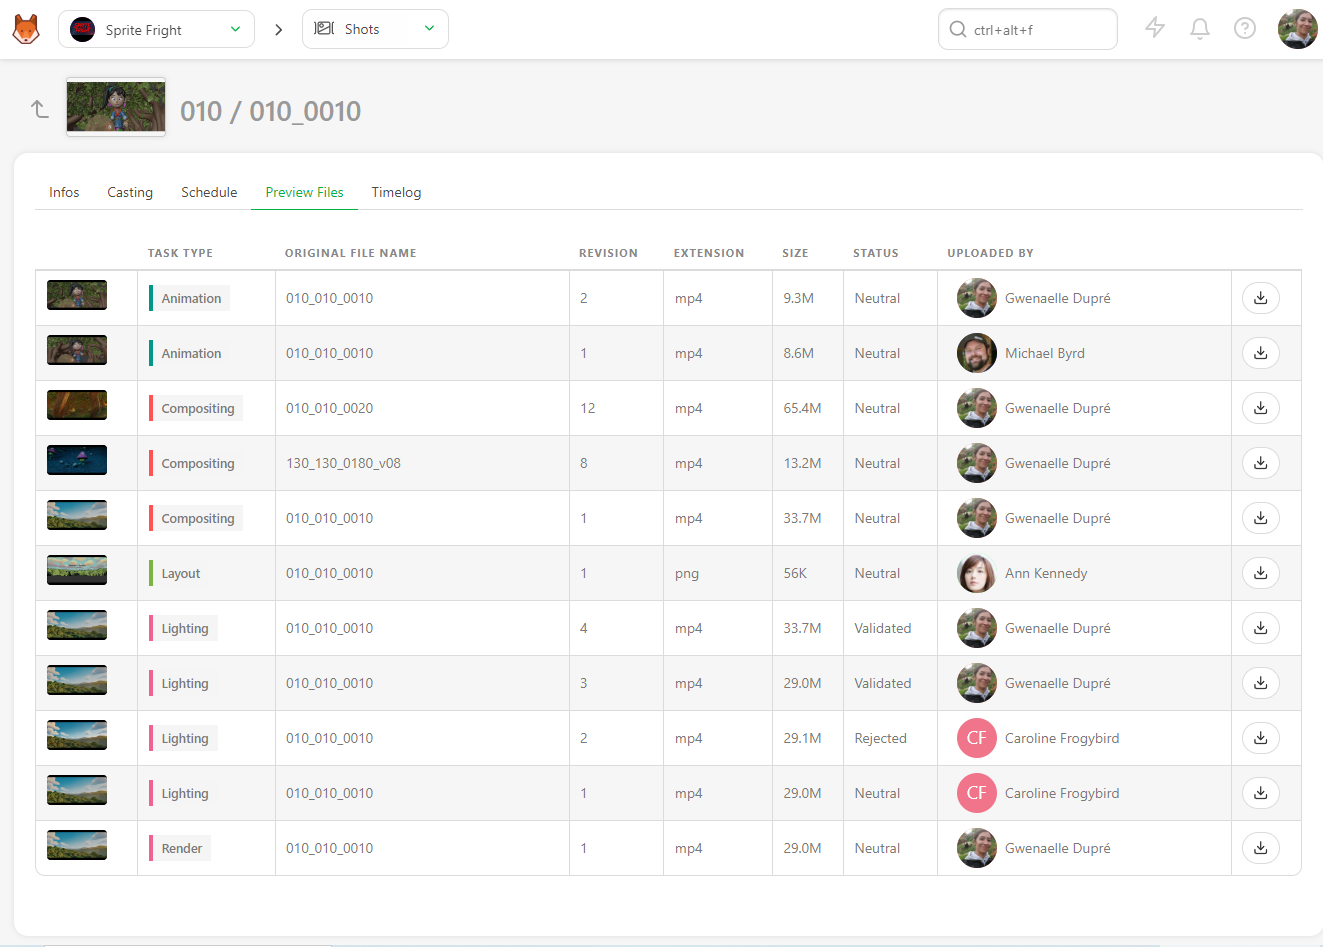
And the Timelog if people have filled out their timesheet on the tasks of this asset.
Add More Tasks After Creating Shots
If you realize after creating the shots that a task is missing, you can still add it afterwards.
First, make sure the missing task type is added to the Settings page under the Task Type tab.
Then go back to the Shots page and click on + Add tasks.
Update Shots
You can update your shots at any point, change their names and sequences, modify their descriptions, and add any custom information you added to the global page.
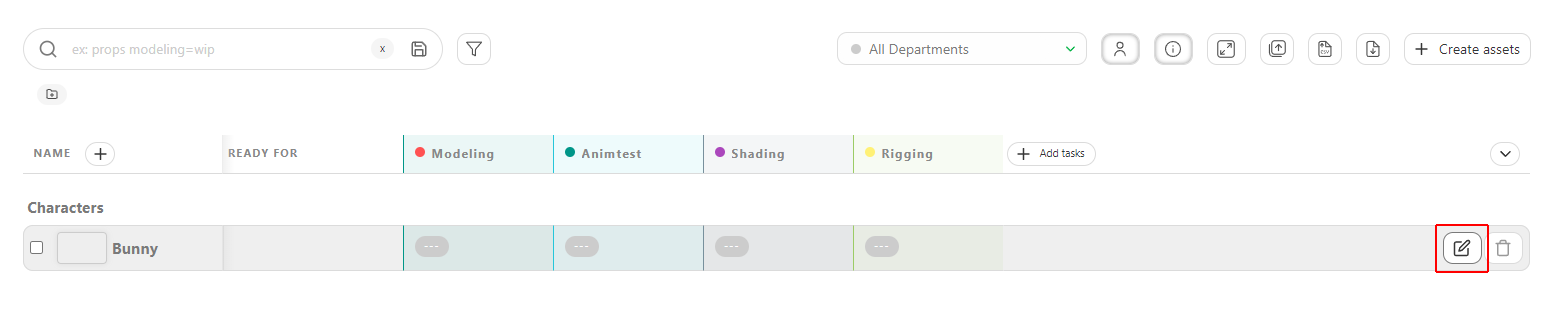
You can edit shots by going to the shot page, hovering over the shot you want to modify, and then clicking on the Edit button:
To extend the description on the main shot page, click on the shot name, and a pop-up with the full description will open.
From CSV
You can use the CSV Import to update your data in bulk.
Open your spreadsheet, copy your data, and paste it like in the Import Shots From CSV section.
The only difference is you need to switch on the Option: Update existing data.
The updated shots will apear in blue: NB: the Episode column is only mandatory for a TV Show production. 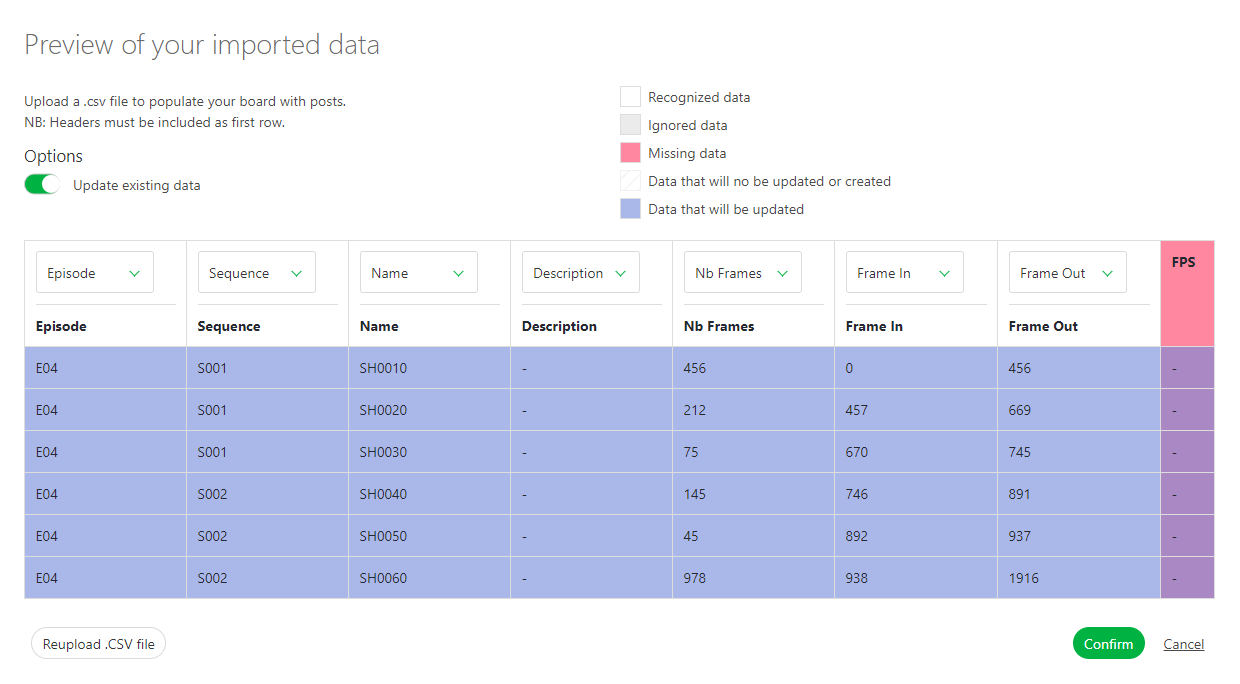
Add the number of Frames and Frame ranges to the shots
Once your animatic is done, you have the length (number of frames, Frame range In, and Frame range Out) for each shot. You can add this information to the spreadsheet to make sure that all the frames are accounted for in your pipeline.
WARNING
If you have created your shots and sequence by hand, the Frame column will be hidden. You must edit at least one shot and fill in the number of frames to display the Frame column.
The column will be displayed if you have created your shots and imported the number of frames with a CSV/spreadsheet.
You need to edit the shots to fill in the frame range information. Click on the Edit icon on the right side of the shot line:
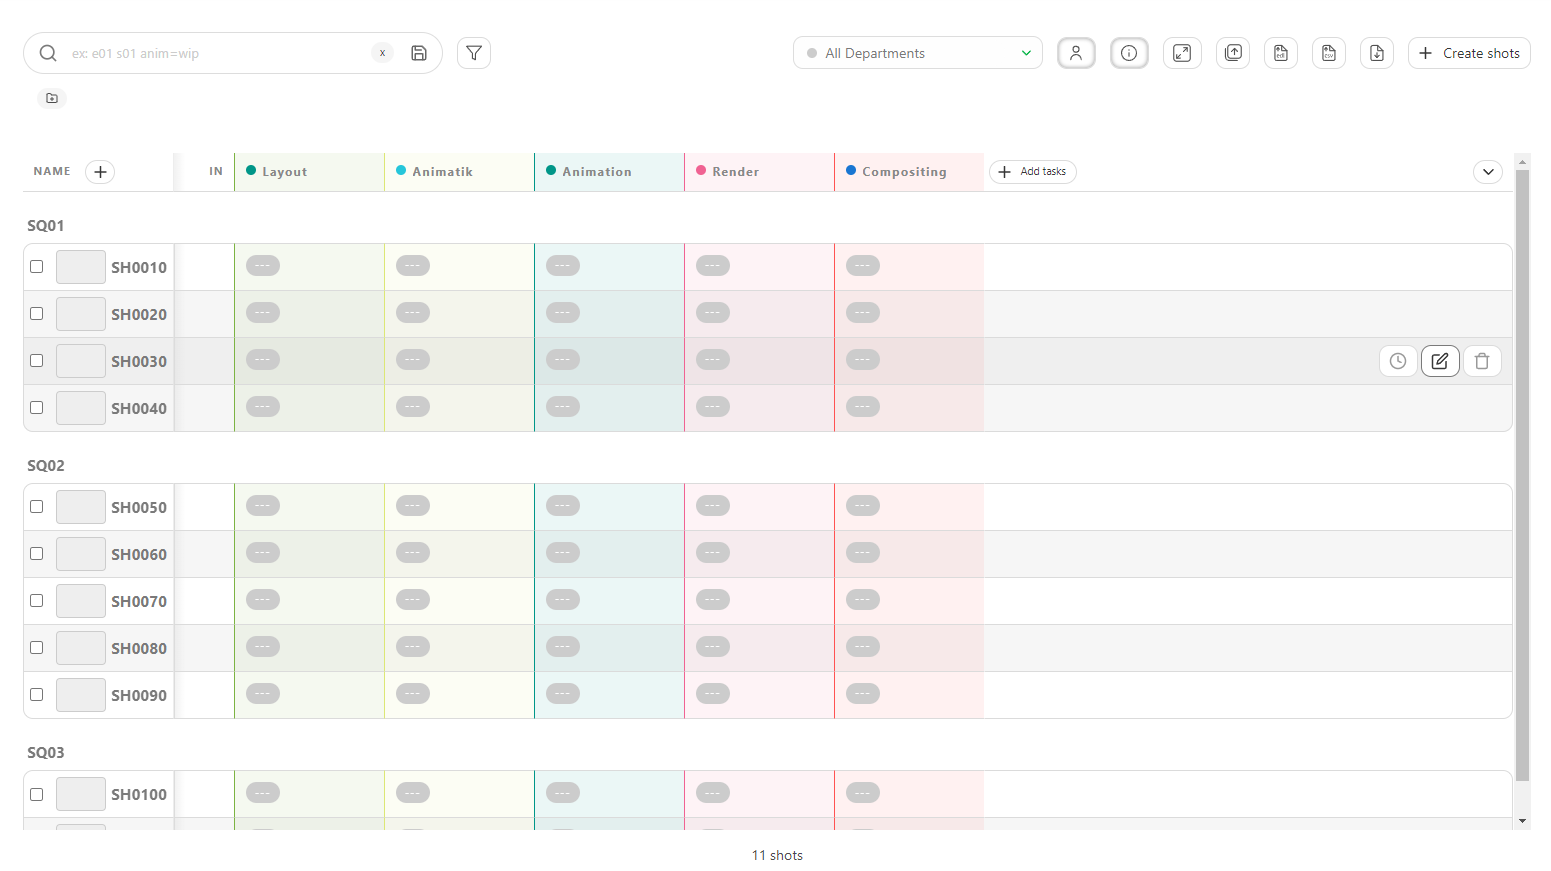
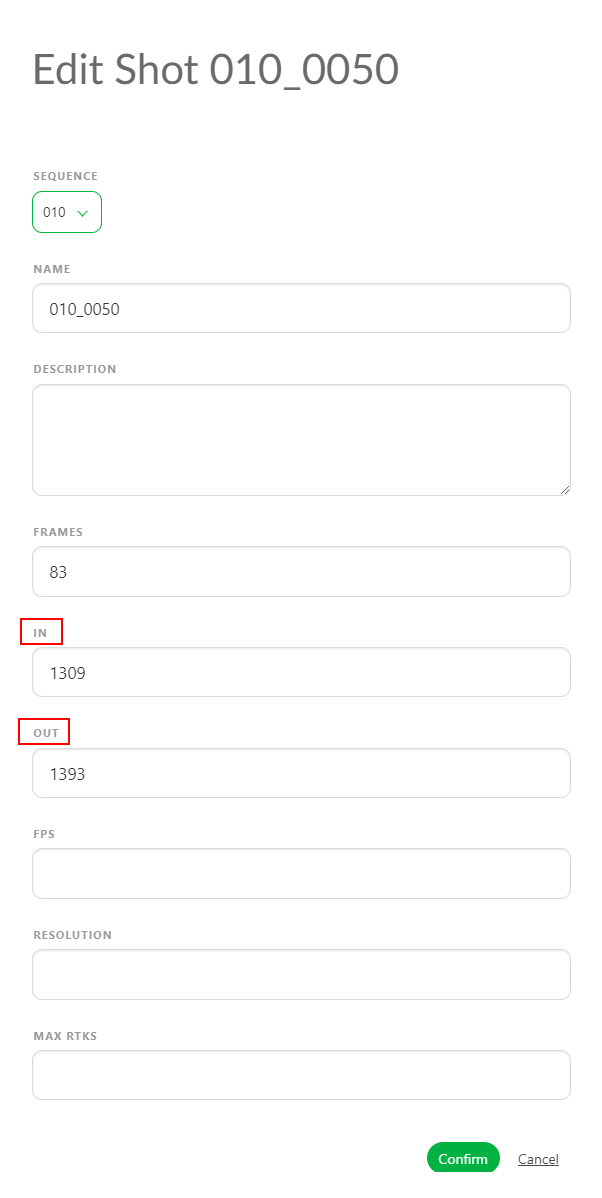
You can enter the shots Frame In and Frame Out in the new window. Then, save by clicking the Confirm button.
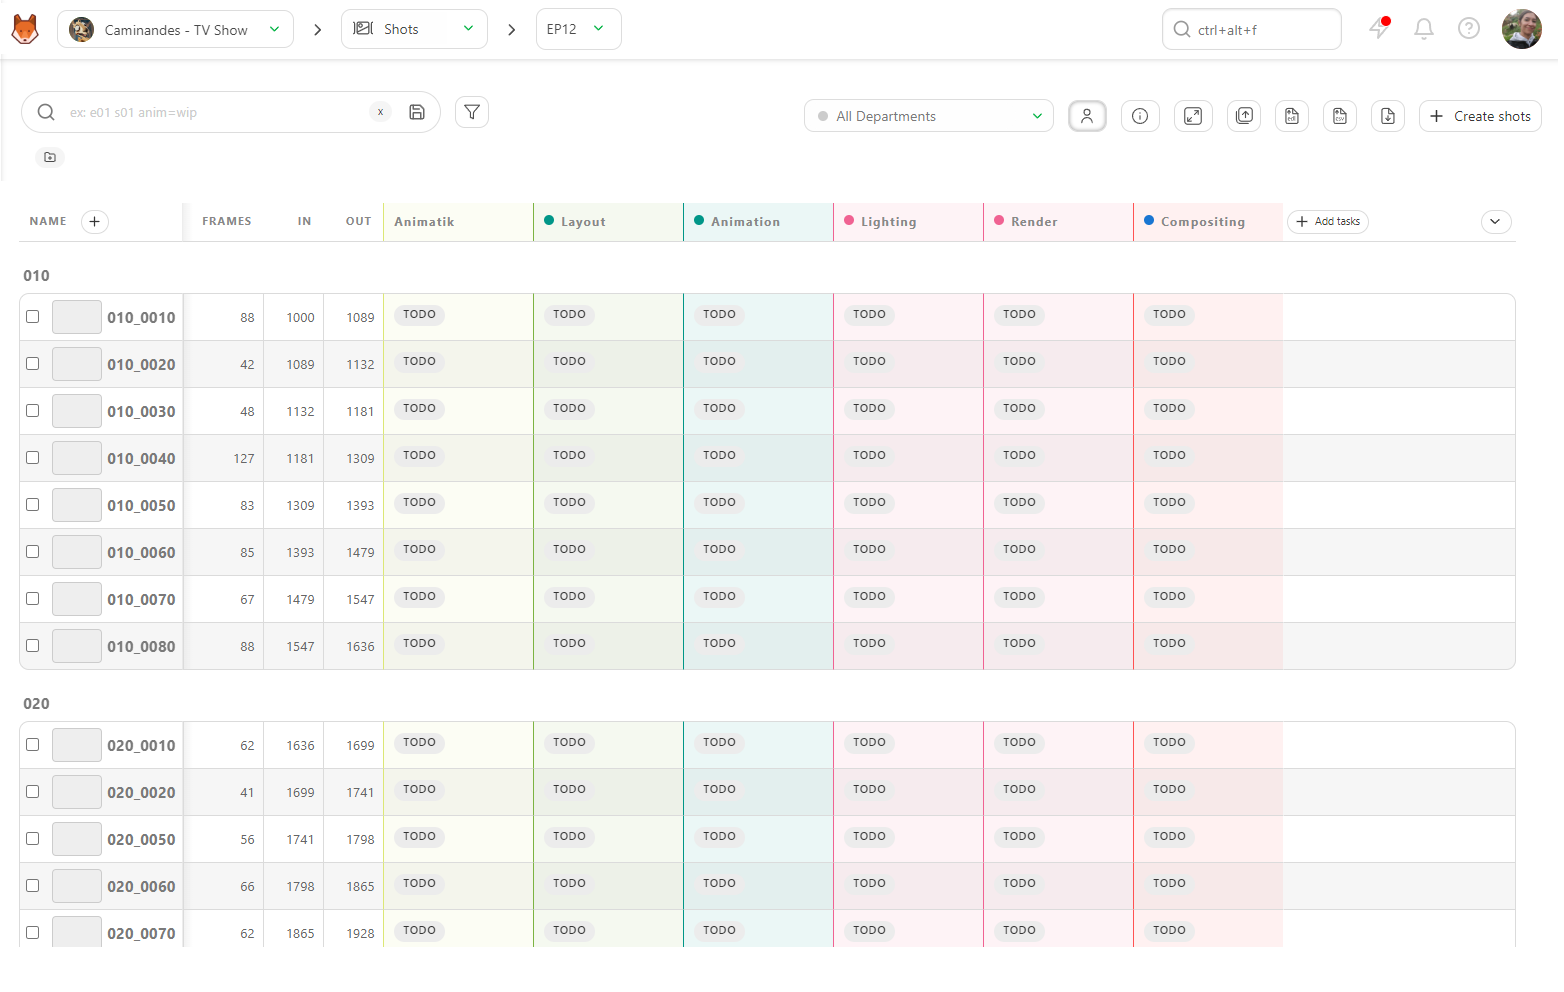
Now, the frame range appears on the general spreadsheet of the shot page
TIP
If you enter the Frame In and Frame Out, Kitsu automatically calculates the Number of Frame.
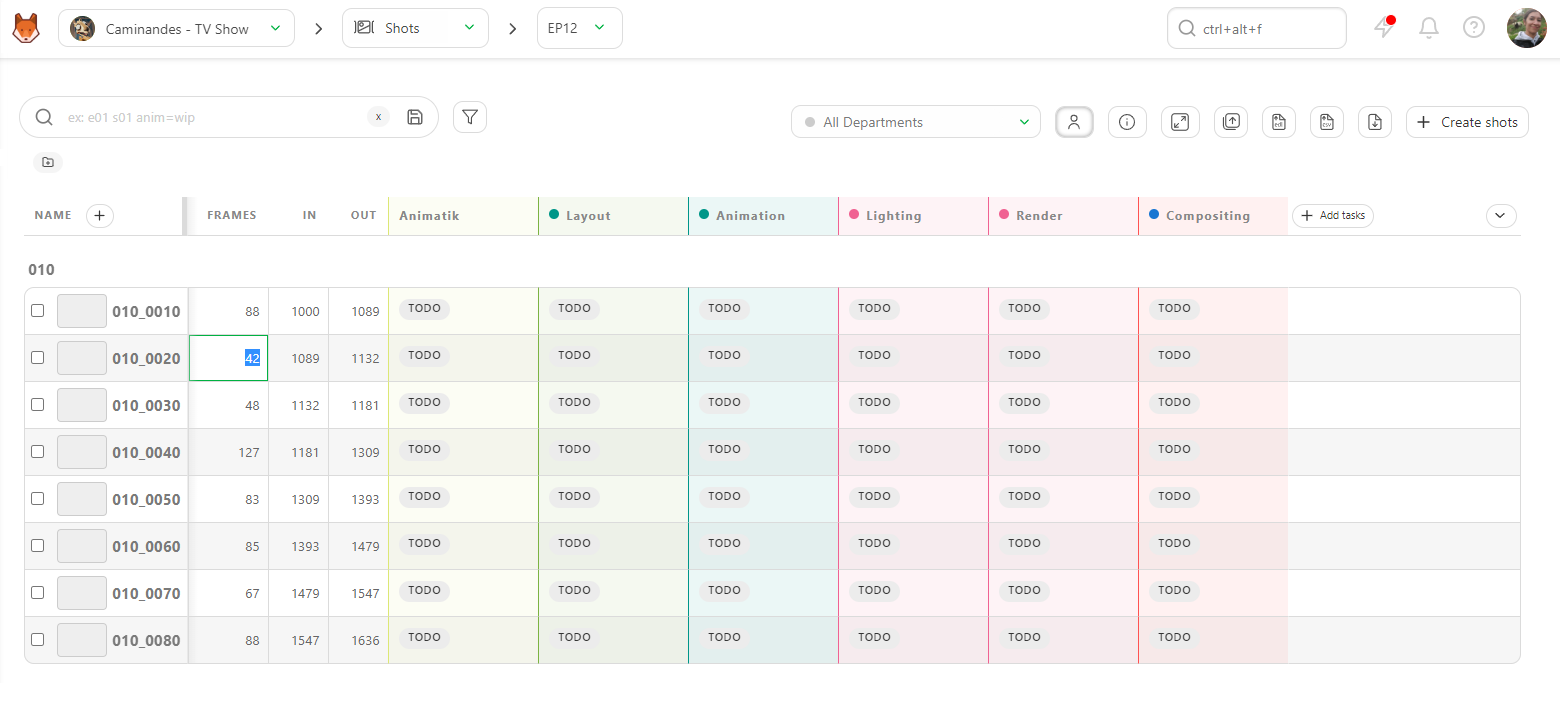
Now that you have unlocked the Frames, In, and Out columns, you can edit the cells directly from the global shot page. Simply, click on the cell you want to edit:
Again, you can use the CSV Import to update your frame ranges faster.
Access a Shot's Change History
You can also access the change history of your shots.
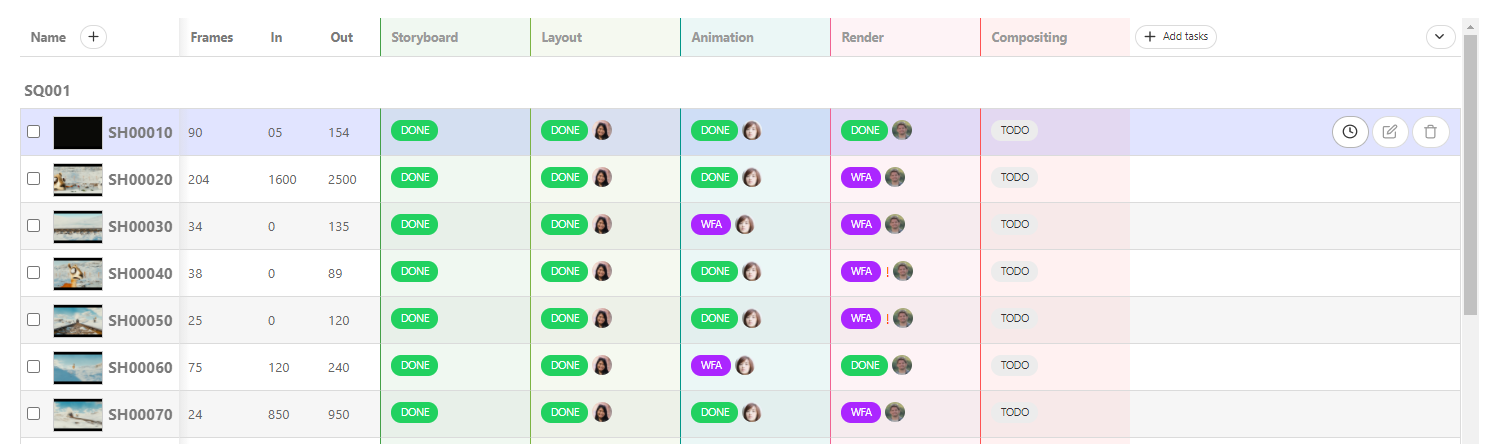
Just click the History icon:
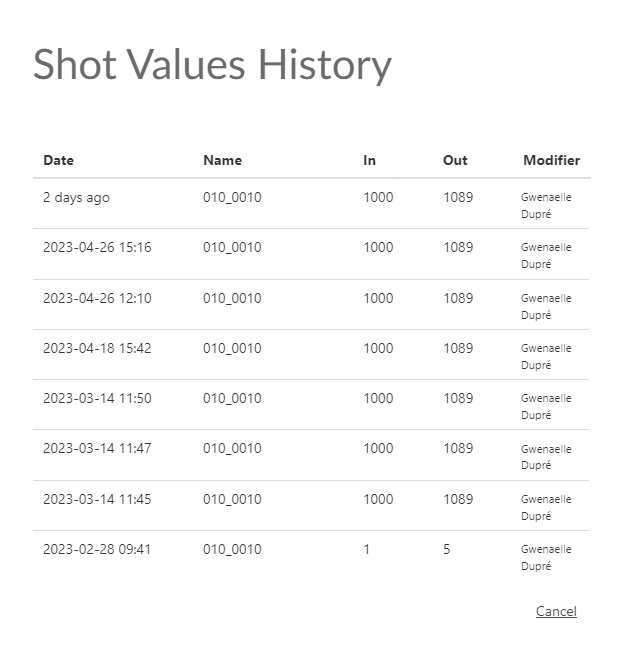
And a dialog will appear with a table listing all your changes:
Remove Shots
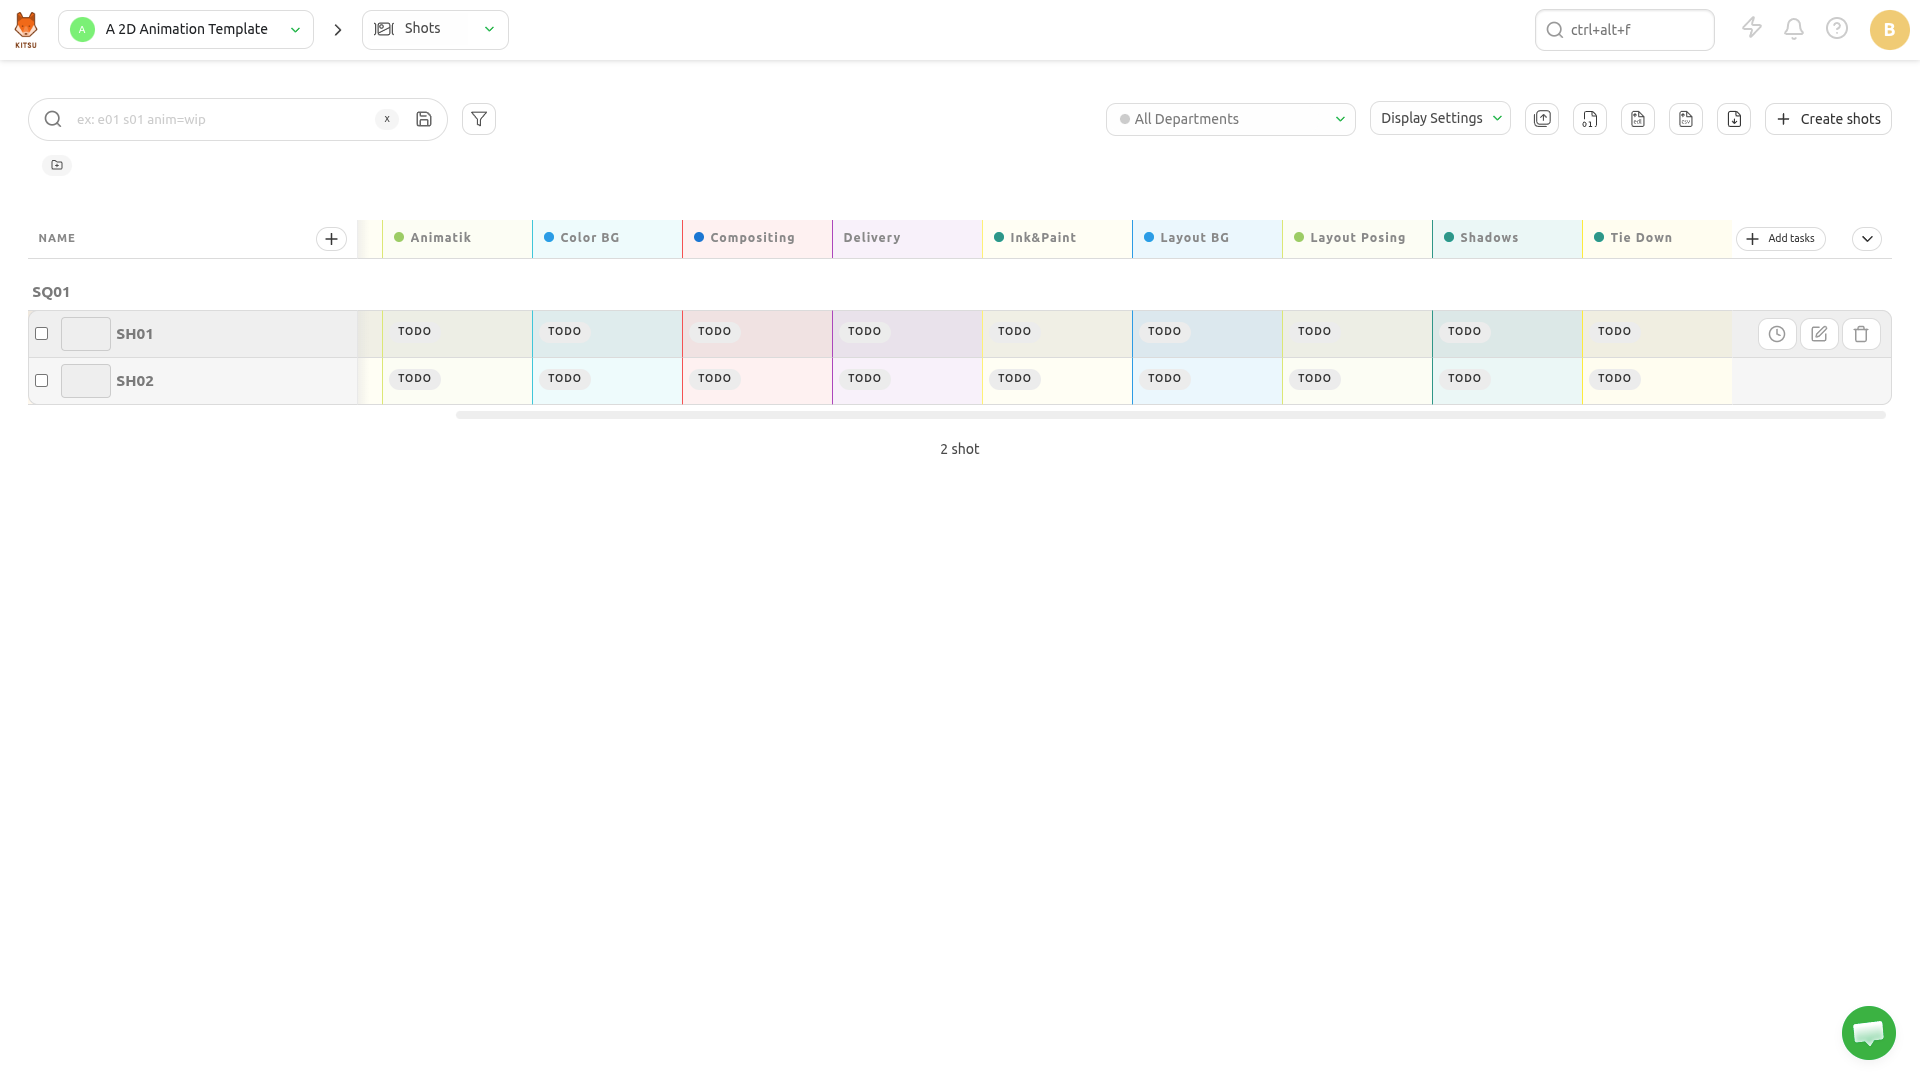
Hover over the shot row you wish to remove in the list and click the Delete icon:
4. Update your shots
WARNING
Shots are linked to Sequences in Kitsu. You must create a sequence first to populate it with shots.
Create a Shot
It's time to create shots for your production.
You need to go to the Shots page: you can use the dropdown menu and click on the SHOTS.
Click on the Add shots button to start with the shot creation.
WARNING
When you create a shot, the task workflow you have designed will be applied, and all the tasks will be created at the same time as the shot.
A new pop-up opens for the creation of the shots. You can now add sequences and corresponding shots:
Enter the first sequence, for instance, SQ01, then click add.
To add shots to this sequence, select it and type a name in the input field of the shots column (e.g SH0020), then again click add.
TIP
You can also define padding for your shots instead of doing it manually.
If you want to name your shots ten on ten as SH0010, SH0020, SH0030, etc, set the Shot Padding to 10.
You can now see that new shots are listed and linked by their sequence: you just created the first shot of the first sequence!
Now, let's add more shots.
The input field already pre-writes an incremented name code based on your padding, so you just have to keep clicking on add to create more shots:
To add more sequences, go to the left part, type the name of your new sequence, and then click on add.
Your second sequence is selected, and you can now add shots.
TIP
If a shot is misplaced on a sequence, you have to edit the shot in its dedicated Shot page to change the sequence. Look at the section Update your shots for more information.
Import Shots
From an EDL File
You may already have your shots list ready in an EDL file. With Kitsu, you can directly import your EDL file to create the sequence, shot, number of frames, Frame in and out, and more.
On the Global Shot Page, you will see an Import EDL button.
You can select the naming convention of the video file used during the editing on the pop-up.
It means the video clip on the editing is named as project_sequence_shot.extension.
Here is an example of an EDL for the LGC production.
The video files are named LGC_100-000.mov, which means LGC is the production name, 100 is the sequence name, and 000 is the shot name.
You can import the EDL file once you have the naming convention.
Then click on Upload EDL
Then Kitsu will create the shots.
From a Spreadsheet File
You may already have your shots list ready in a spreadsheet file. With Kitsu, you have two ways to import them: importing a .csv file directly, or copy-pasting your data directly into Kitsu.
Option 1: Import a CSV file
First, save your spreadsheet as a .csv file.
Then, return to the shot page on Kitsu and click the Import icon.
A pop-up window Import data from a CSV opens. Click on Browse to pick your .csv file.
Option 2: Copy / paste from a spreadsheet
Open your spreadsheet, select your data, and copy them.
Then, go back to the shot page on Kitsu and click on the Import icon.
A pop-up window Import data from a CSV opens; click on the Paste a CSV data tab.
You can paste your previously selected data.
Previewing and confirming your import
Whichever method you used, click on the Preview button to see the result.
You can check and adjust the name of the columns by previewing your data.
NB: the Episode column is only mandatory for a TV Show production.
Once everything is good, click the Confirm button to import your data into Kitsu.
All your shots are imported into Kitsu, and the task is created according to your Settings.
See the Details of a Shot
If you want to see the details of a shot, click on its name.
A new page opens with the list of the tasks, the assignation, and the status newsfeed on the right. You can navigate through each by clicking on the name of the tabs.
You can click on the status of each task to open the comment panel and see the history of the comments and the different versions.
You can also access the Casting,
The Schedule is available if you have previously filled out the task type page data. If you have already filled out the data, you can modify them directly here.
the Preview Files uploaded at various task types,
And the Timelog if people have filled out their timesheet on the tasks of this asset.
Add More Tasks After Creating Shots
If you realize after creating the shots that a task is missing, you can still add it afterwards.
First, make sure the missing task type is added to the Settings page under the Task Type tab.
Then go back to the Shots page and click on + Add tasks.
Update Shots
You can update your shots at any point, change their names and sequences, modify their descriptions, and add any custom information you added to the global page.
You can edit shots by going to the shot page, hovering over the shot you want to modify, and then clicking on the Edit button:
To extend the description on the main shot page, click on the shot name, and a pop-up with the full description will open.
From CSV
You can use the CSV Import to update your data in bulk.
Open your spreadsheet, copy your data, and paste it like in the Import Shots From CSV section.
The only difference is you need to switch on the Option: Update existing data.
The updated shots will apear in blue: NB: the Episode column is only mandatory for a TV Show production.
Add the number of Frames and Frame ranges to the shots
Once your animatic is done, you have the length (number of frames, Frame range In, and Frame range Out) for each shot. You can add this information to the spreadsheet to make sure that all the frames are accounted for in your pipeline.
WARNING
If you have created your shots and sequence by hand, the Frame column will be hidden. You must edit at least one shot and fill in the number of frames to display the Frame column.
The column will be displayed if you have created your shots and imported the number of frames with a CSV/spreadsheet.
You need to edit the shots to fill in the frame range information. Click on the Edit icon on the right side of the shot line:
You can enter the shots Frame In and Frame Out in the new window. Then, save by clicking the Confirm button.
Now, the frame range appears on the general spreadsheet of the shot page
TIP
If you enter the Frame In and Frame Out, Kitsu automatically calculates the Number of Frame.
Now that you have unlocked the Frames, In, and Out columns, you can edit the cells directly from the global shot page. Simply, click on the cell you want to edit:
Again, you can use the CSV Import to update your frame ranges faster.
Access a Shot's Change History
You can also access the change history of your shots.
Just click the History icon:
And a dialog will appear with a table listing all your changes:
Remove Shots
Hover over the shot row you wish to remove in the list and click the Delete icon:
5. Add more tasks after creating the shots
WARNING
Shots are linked to Sequences in Kitsu. You must create a sequence first to populate it with shots.
Create a Shot
It's time to create shots for your production.
You need to go to the Shots page: you can use the dropdown menu and click on the SHOTS.
Click on the Add shots button to start with the shot creation.
WARNING
When you create a shot, the task workflow you have designed will be applied, and all the tasks will be created at the same time as the shot.
A new pop-up opens for the creation of the shots. You can now add sequences and corresponding shots:
Enter the first sequence, for instance, SQ01, then click add.
To add shots to this sequence, select it and type a name in the input field of the shots column (e.g SH0020), then again click add.
TIP
You can also define padding for your shots instead of doing it manually.
If you want to name your shots ten on ten as SH0010, SH0020, SH0030, etc, set the Shot Padding to 10.
You can now see that new shots are listed and linked by their sequence: you just created the first shot of the first sequence!
Now, let's add more shots.
The input field already pre-writes an incremented name code based on your padding, so you just have to keep clicking on add to create more shots:
To add more sequences, go to the left part, type the name of your new sequence, and then click on add.
Your second sequence is selected, and you can now add shots.
TIP
If a shot is misplaced on a sequence, you have to edit the shot in its dedicated Shot page to change the sequence. Look at the section Update your shots for more information.
Import Shots
From an EDL File
You may already have your shots list ready in an EDL file. With Kitsu, you can directly import your EDL file to create the sequence, shot, number of frames, Frame in and out, and more.
On the Global Shot Page, you will see an Import EDL button.
You can select the naming convention of the video file used during the editing on the pop-up.
It means the video clip on the editing is named as project_sequence_shot.extension.
Here is an example of an EDL for the LGC production.
The video files are named LGC_100-000.mov, which means LGC is the production name, 100 is the sequence name, and 000 is the shot name.
You can import the EDL file once you have the naming convention.
Then click on Upload EDL
Then Kitsu will create the shots.
From a Spreadsheet File
You may already have your shots list ready in a spreadsheet file. With Kitsu, you have two ways to import them: importing a .csv file directly, or copy-pasting your data directly into Kitsu.
Option 1: Import a CSV file
First, save your spreadsheet as a .csv file.
Then, return to the shot page on Kitsu and click the Import icon.
A pop-up window Import data from a CSV opens. Click on Browse to pick your .csv file.
Option 2: Copy / paste from a spreadsheet
Open your spreadsheet, select your data, and copy them.
Then, go back to the shot page on Kitsu and click on the Import icon.
A pop-up window Import data from a CSV opens; click on the Paste a CSV data tab.
You can paste your previously selected data.
Previewing and confirming your import
Whichever method you used, click on the Preview button to see the result.
You can check and adjust the name of the columns by previewing your data.
NB: the Episode column is only mandatory for a TV Show production.
Once everything is good, click the Confirm button to import your data into Kitsu.
All your shots are imported into Kitsu, and the task is created according to your Settings.
See the Details of a Shot
If you want to see the details of a shot, click on its name.
A new page opens with the list of the tasks, the assignation, and the status newsfeed on the right. You can navigate through each by clicking on the name of the tabs.
You can click on the status of each task to open the comment panel and see the history of the comments and the different versions.
You can also access the Casting,
The Schedule is available if you have previously filled out the task type page data. If you have already filled out the data, you can modify them directly here.
the Preview Files uploaded at various task types,
And the Timelog if people have filled out their timesheet on the tasks of this asset.
Add More Tasks After Creating Shots
If you realize after creating the shots that a task is missing, you can still add it afterwards.
First, make sure the missing task type is added to the Settings page under the Task Type tab.
Then go back to the Shots page and click on + Add tasks.
Update Shots
You can update your shots at any point, change their names and sequences, modify their descriptions, and add any custom information you added to the global page.
You can edit shots by going to the shot page, hovering over the shot you want to modify, and then clicking on the Edit button:
To extend the description on the main shot page, click on the shot name, and a pop-up with the full description will open.
From CSV
You can use the CSV Import to update your data in bulk.
Open your spreadsheet, copy your data, and paste it like in the Import Shots From CSV section.
The only difference is you need to switch on the Option: Update existing data.
The updated shots will apear in blue: NB: the Episode column is only mandatory for a TV Show production.
Add the number of Frames and Frame ranges to the shots
Once your animatic is done, you have the length (number of frames, Frame range In, and Frame range Out) for each shot. You can add this information to the spreadsheet to make sure that all the frames are accounted for in your pipeline.
WARNING
If you have created your shots and sequence by hand, the Frame column will be hidden. You must edit at least one shot and fill in the number of frames to display the Frame column.
The column will be displayed if you have created your shots and imported the number of frames with a CSV/spreadsheet.
You need to edit the shots to fill in the frame range information. Click on the Edit icon on the right side of the shot line:
You can enter the shots Frame In and Frame Out in the new window. Then, save by clicking the Confirm button.
Now, the frame range appears on the general spreadsheet of the shot page
TIP
If you enter the Frame In and Frame Out, Kitsu automatically calculates the Number of Frame.
Now that you have unlocked the Frames, In, and Out columns, you can edit the cells directly from the global shot page. Simply, click on the cell you want to edit:
Again, you can use the CSV Import to update your frame ranges faster.
Access a Shot's Change History
You can also access the change history of your shots.
Just click the History icon:
And a dialog will appear with a table listing all your changes:
Remove Shots
Hover over the shot row you wish to remove in the list and click the Delete icon:
6. Adding Frame Numbers and Ranges to Shots
Once your animatic is done, you have the length (number of frames, Frame range In, and Frame range Out) for each shot. You can add this information to the spreadsheet to make sure that all the frames are accounted for in your pipeline.
WARNING
If you have created your shots and sequence by hand, the Frame column will be hidden. You must edit at least one shot and fill in the number of frames to display the Frame column.
The column will be displayed if you have created your shots and imported the number of frames with a CSV/spreadsheet.
You need to edit the shots to fill in the frame range information. Click on the Edit icon on the right side of the shot line:
You can enter the shots Frame In and Frame Out in the new window. Then, save by clicking the Confirm button.
Now, the frame range appears on the general spreadsheet of the shot page
TIP
If you enter the Frame In and Frame Out, Kitsu automatically calculates the Number of Frame.
Now that you have unlocked the Frames, In, and Out columns, you can edit the cells directly from the global shot page. Simply, click on the cell you want to edit:
Again, you can use the CSV Import to update your frame ranges faster.
7. Creating Custom Metadata Columns
To add a new custom metadata column, click on the + icon next to the Name column.

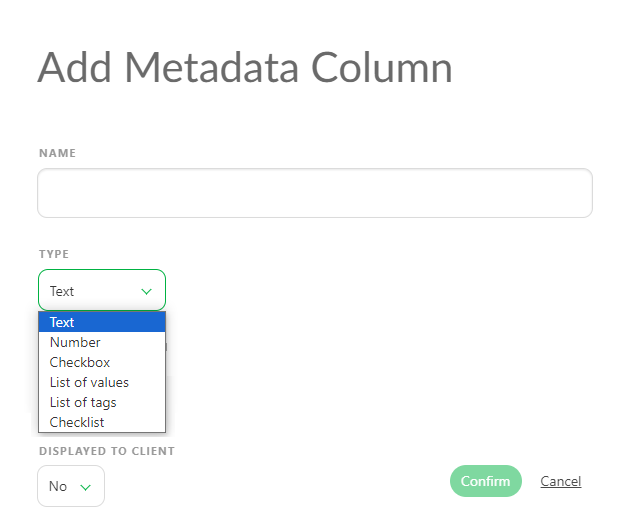
First, choose the name you prefer for your field. Then, select the appropriate Type based on your needs:
Text: This type accommodates text based input, including both letters and numbers. It offers flexibility in storing information such as descriptions, comments, or textual content.
Number: Reserved solely for numerical data. It's recommended for tracking information exclusively comprised of numerical values, such as framerates, dates, or times.
Checkbox: This option allows you to mark items as either on or off. It's suitable for tracking data with only two possible states, like indicating shots intended for a trailer cut.
List of values: With this type, you define a list of options from which only one unique element can be selected. It's ideal when you need to track data with a limited number of choices. For instance, for tracking camera movements, options like "Static," "Pan," "Tilt," or "Zoom" could be included.
List of tags: Here, you can define multiple tags. Unlike a list of values, which allows selecting only one item, this type enables selecting multiple entries from the list.
Checklist: This type presents a list of options, each accompanied by its own checkbox. It's useful for tracking minor sub-tasks associated with a shot or asset, which don't warrant their own task in the production pipeline.
WARNING
When creating Text and Number metadata types, a default value is not required upon creation.
However, when using the List of value, List of tags, and Checklist, you have to specify which values you want to include at the point of creation.
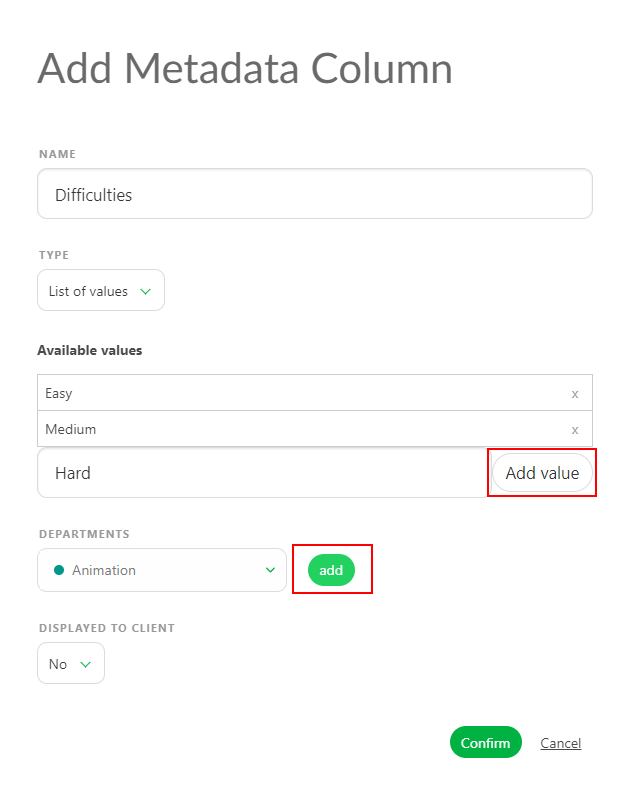
Type the list elements below Available values, and confirm them by clicking on Add value.
8. Create a Sequence
Once you have your task types ready in the settings page, you can create a sequence.
This new page behaves like the asset and shot global page. You can add your edits with the + New Sequence button.
You can assign tasks, do the review, change status, etc.
You can add a metadata column, fill in the description, etc.
TIP
You can create a sequence directly from here (+New sequence button) or create a sequence linked to your shots from the global shot page.
You can Rename and Delete the Sequence entity on this page, as for the asset and shot entity.
If you click on the name of a sequence, you will see the detail page of this sequence.
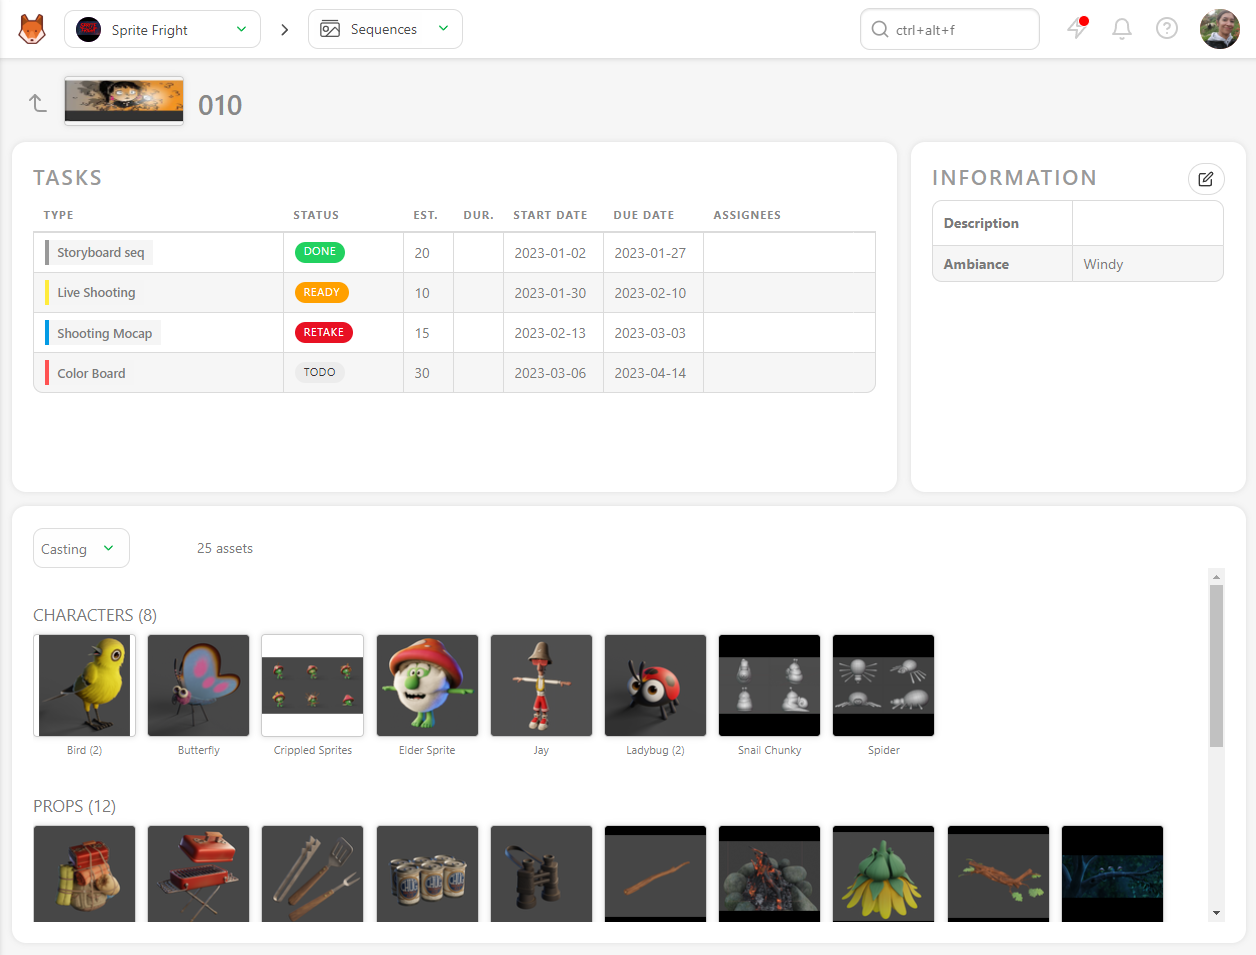
On the detailed page, you have access to the sequence casting to see all the assets used in the whole sequence.
You can also access the schedule, Preview Files, Activity, and Timelog of the sequence tasks.
9. Create an Edit
WARNING
Per default, the Edit page will not be displayed until you have task types for it on your production library (setting page)
To use this page, you need to first create a dedicated task type on your Global Library with the Edit attribute.
See the Creating a New Task Type section to create a new Task Type.
Once you have created your Task Types on your Global Library, add them to your Production Library, you will see the Edit displayed on the navigation drop-down menu.
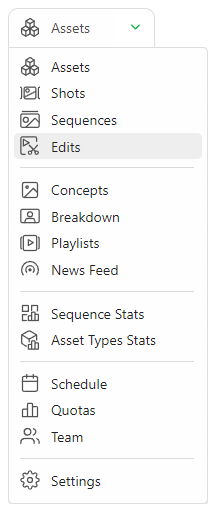
This new page behaves like the asset and shot global page. You can add your edits with the + New edit button.
You can assign tasks, do the review, change status, etc.
You can add a metadata column, fill in the description, etc.
TIP
Depending on your deliveries, you can also change the resolution per Edit.
WARNING
The detail page is different from the other entities.
As Edit focuses on a specific long video, the detail page looks more like the comment detail page.
You can Rename and Delete the Edit entity on this page for the asset and shot entity.